Teacher Portal:
Work and Simple Machines
Investigation 4 – PreLab
 MINDSET
This Investigation is designed to:
- reinforce the concepts of work and force.
- introduce the lever, a simple machine, and its components – the fulcrum, beam, load arm, and effort arm.
- reinforce students’ experience with the formula Work = Force x distance and introduce its use when using a lever.
- help students understand that work done on the effort arm of a lever equals work done on the load arm.
- introduce the concept that altering the position of the fulcrum changes the amount of force exerted on the effort arm as well as the distance over which the force is applied. The result is that as force increases, the distance over which it is applied decreases.
- introduce the concept that as the fulcrum moves closer to the load, the length of the effort arm increases and the amount of effort needed to lift the load decreases.
SCIENTIST’S GLOSSARY
1. Effort: The action of applying a force.
2. Effort arm: The part of a simple machine that supports the effort (i.e. where force is applied).
3. Force: The application of a constant effort, such as a push or pull. Force is represented mathematically as “F.”
4. Fulcrum: the component of a lever which supports the beam and upon which the beam turns.
5. Lever: a simple machine consisting of a beam that turns on a fixed point, called the fulcrum.
6. Load: An object(s) moved by a force.
7. Load arm: The part of a simple machine that supports a load (i.e. where the load is attached).
8. Simple machine: One of six devices that make work feel easier. Simple machines include the fixed pulley, lever, inclined plane, wedge, screw, and wheel and axle.
9. Work (W): A measure of the distance (d) over which a force (F) is applied. Work is represented mathematically by the formula Work = Force x distance (W = Fd).
BE PREPARED
Watch the Investigation 4 Teacher Video (below) and Student Video (at end of PreLab SHARE IT) to prepare for the PreLab.
SET FOR SUCCESS
- Tell students that they will continue their study of the Work and Simple Machines CELL.
- Ask students to share the kinds of things they think they might learn in this Investigation.
Begin the PreLab Concept Slides to start students on their learning journey. Then watch the Pre-Lab Student Video as a class.
NAVIGATE IT
Once the slide presentation is launched
- use your left and right arrows to advance or go back in the slide presentation, and
- hover your mouse over the left edge of the presentation to get a view of the thumbnails for all the slides so that you can quickly move anywhere in the presentation.
- Click HERE to launch the slide presentation for the CELL.
SHARE IT
SLIDE VWORK4-pre-1
Begin the Investigation by reviewing with the class the concepts they explored while using the pulley in Investigation Three.
______________________________________________
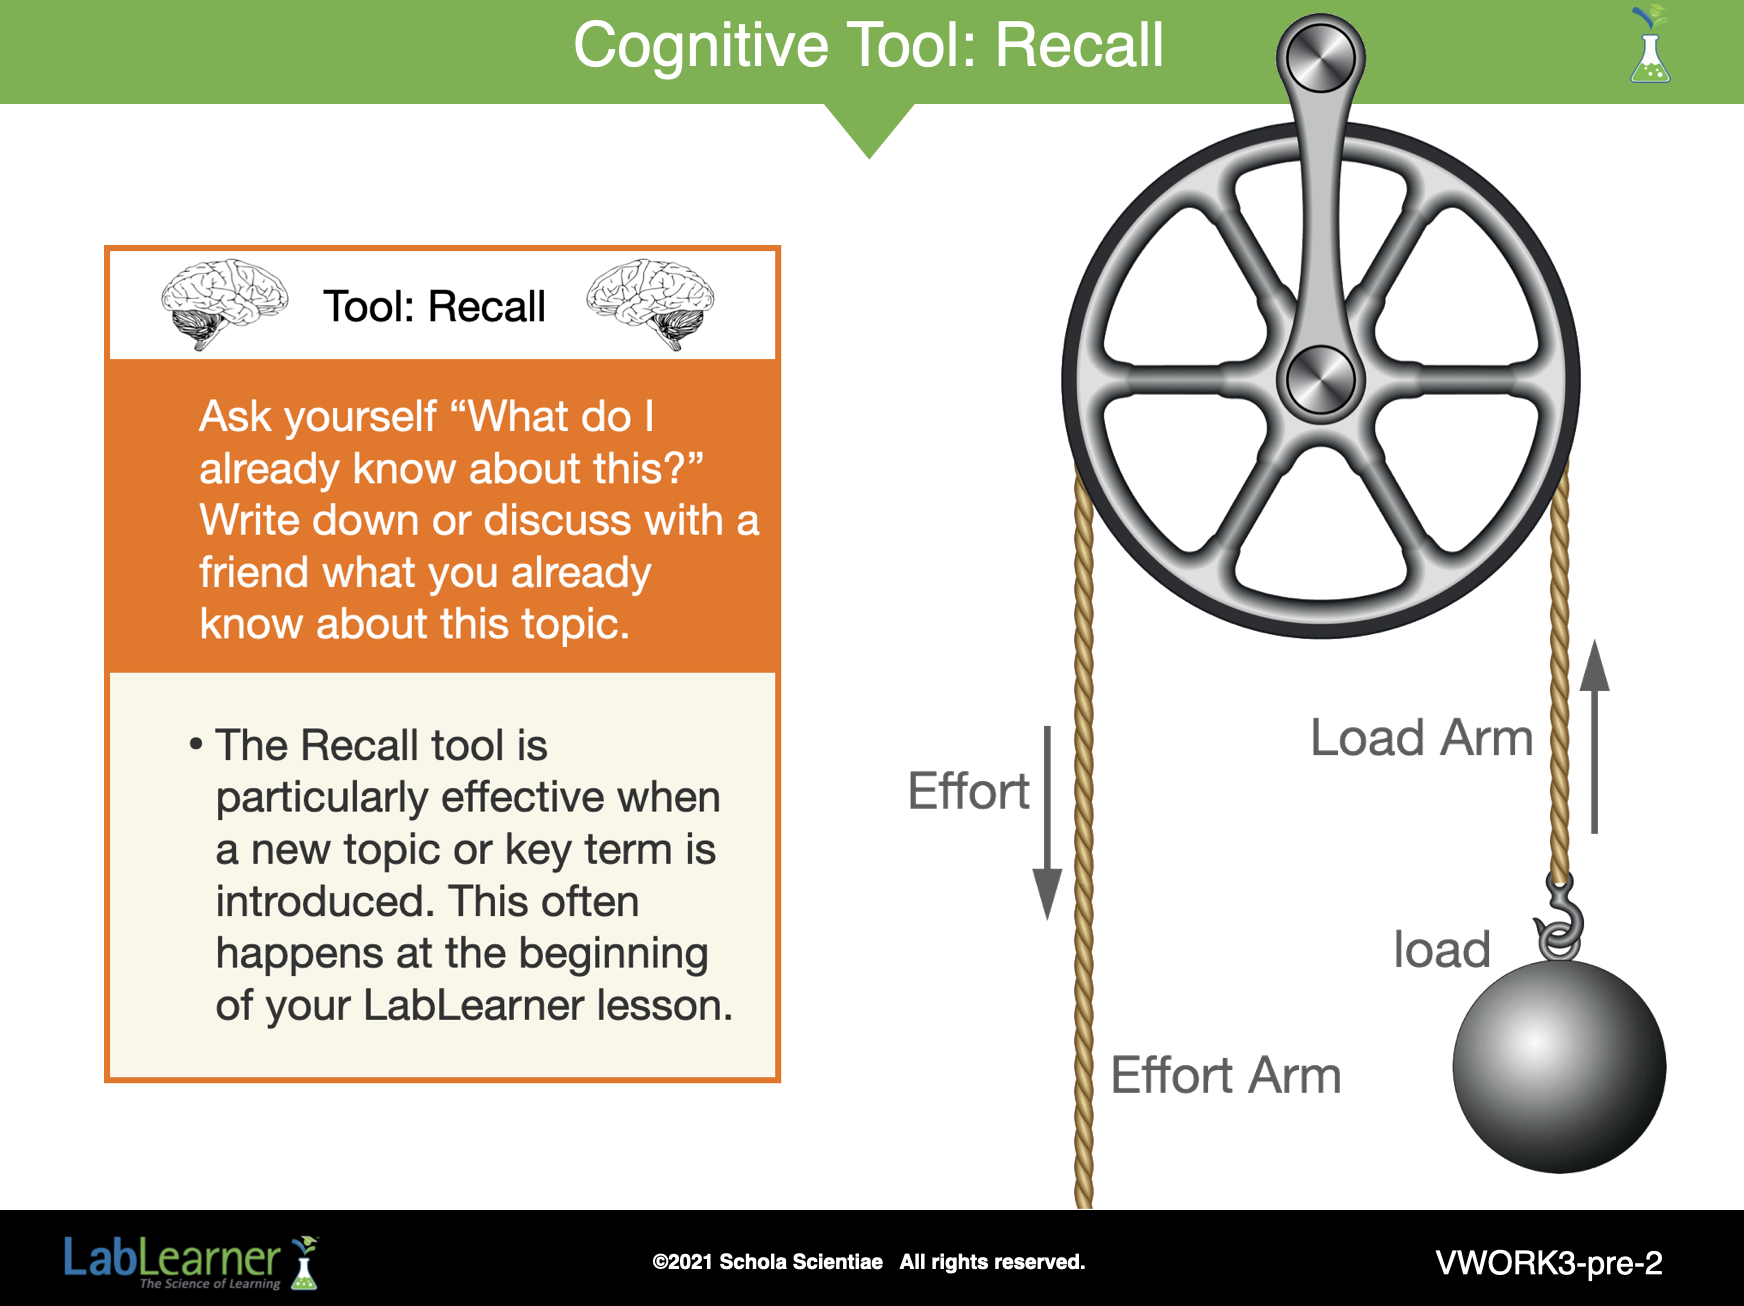
SLIDE VWORK4-pre-2
1. What is a fixed pulley? A simple machine that is attached to a surface and uses a stationary grooved wheel through which a rope, belt, chain, etc. runs.
2. Compare lifting the load with and without the pulley. Did the pulley reduce the force you applied to the load? No. The amount of force that was exerted to lift the load remained the same whether the pulley was used or not.
3. Did the pulley reduce the amount of work you did? Why or why not? No. The amount of work done was the same whether the pulley was used or not. The pulley did not change the distance the load was lifted, nor the force exerted to lift the load. Force and distance are the two factors that determine work, thus the amount of work done did not change.
4. If the amount of work done was not reduced, why did it feel easier to lift the load with the pulley? What is the advantage of using a simple machine like the fixed pulley? Simple machines like the pulley make work feel easier by changing how force is applied to a load.
5. How does the fixed pulley change how force is applied to a load? When lifting a load with the fixed pulley, the force is applied downward, whereas the applied force is in an upward direction when lifting without the pulley. An applied force in a downward direction is in the same direction as gravity. As a result, the load feels easier to lift.
______________________________________________

SLIDE VWORK4-pre-3
Transition students into associating the concepts of force and work with the use of another simple machine, the lever, by asking them to solve a problem. Direct the students to form five cooperative groups. Use the following steps and questions to assist with this activity.
1. First, read the problem to the class:
Carl and Lisa want to create a flower garden in their yard. There is a large rock in the spot where they want to plant a tree. They decide the rock would be more suitable in another location of their yard. They have a wheelbarrow that can be used to transport the rock to the new location, but the rock is too heavy for them to pick up and place into the wheelbarrow.
2. How can Lisa and Carl get the rock into the wheelbarrow? Tell students to work in their groups to come up with a solution to this problem. Allow sufficient time for students to discuss the problem within their group and formulate their solutions.
3. After students have formulated a solution, encourage each group to present their solution to the class. List a summary of each group’s solution on the board as they are presented.
4. Discuss with the class the feasibility of each solution.
______________________________________________

SLIDE VWORK4-pre-3b
Note: This slide is not available to students through their Portal. It does, however, exist in the HTML presentation for classroom discussion.
If students do not present a lever as a solution, suggest this possibility to them:
Carl and Lisa wedge one end of a plank under the base of the rock, then roll the rock onto the plank. They place a sturdy object, such as a tall metal toolbox, wooden chopping block, or a stone statue under the plank. Carl pushes down on the opposite end of the plank to raise the rock. Meanwhile, Lisa positions the wheelbarrow beneath the end of the plank supporting the rock. The rock can then be rolled into the wheelbarrow.
______________________________________________
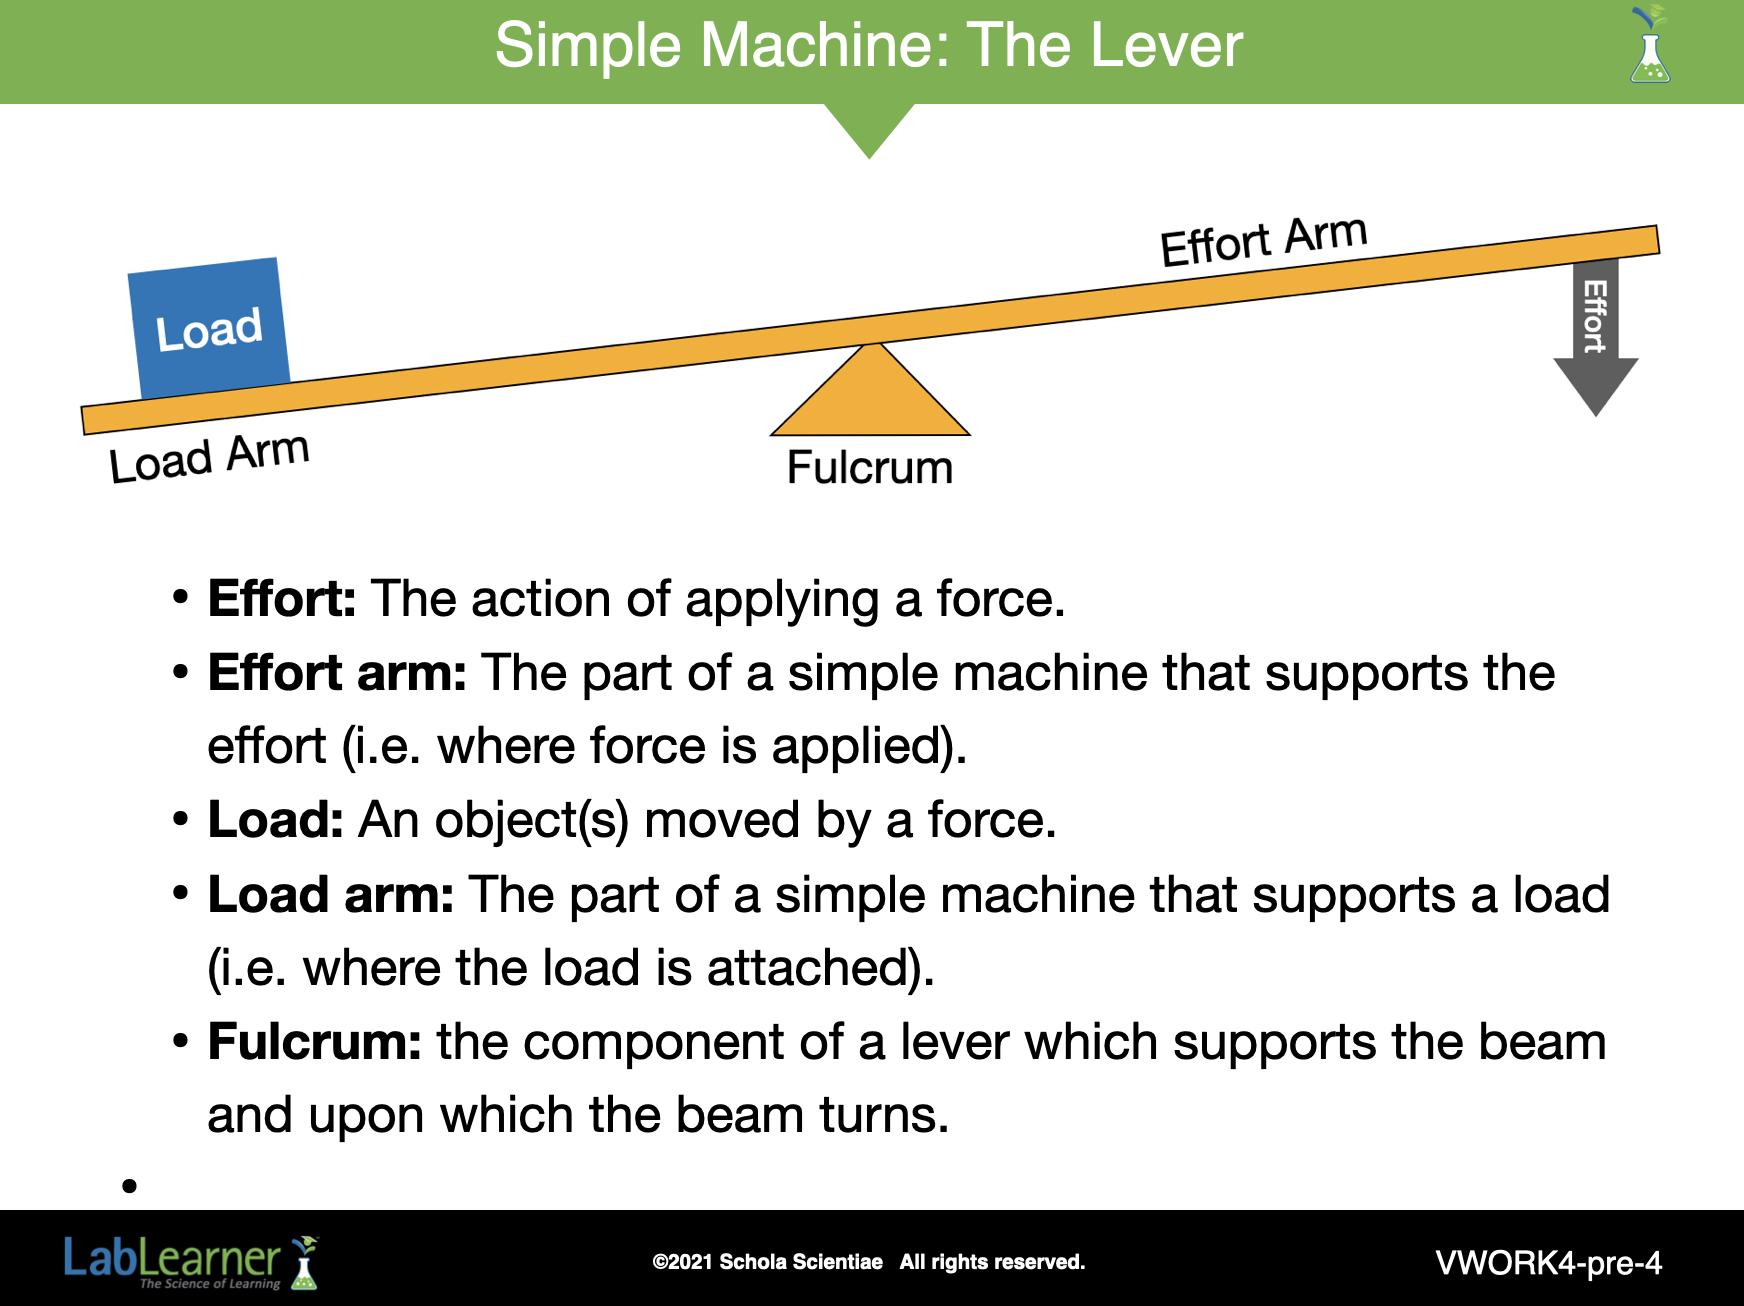
SLIDE VWORK4-pre-3b
Introduce the lever to students. Ask students to refer to their Scientist’s Glossary as you discuss the lever’s structure. Utilize the steps and questions that follow to encourage class discussion:
1. Examine the drawing of a lever on this slide.
2. Which structure in the drawing is the fulcrum? The fulcrum is the part that supports the beam of the lever.
3. Think about your experiments with the pulley and the terms in your Scientist’s Glossary. Can you describe the effort arm, load, and load arm in the lever model? Review with the class the definitions for the terms effort, effort arm, load, and load arm.
- Effort: The action of applying a force.
- Effort arm: The part of a simple machine that supports the effort (i.e. where force is applied).
- Load: An object(s) moved by a force.
- Load arm: The part of a simple machine that supports a load (i.e. where the load is attached).
- Fulcrum: the component of a lever which supports the beam and upon which the beam turns.
______________________________________________

SLIDE VWORK4-pre-5
(Continued from the previous slide)
4. Can you think of any examples of a lever in your everyday life? Examples include a seesaw, a nutcracker, scissors, tongs, pliers, your arm, a door, etc.
______________________________________________

SLIDE VWORK4-pre-6
This final slide asks simply, “Do you see any similarities between the pulley and the lever?”
There are many:
- Both have a load arm
- Both have a load on the load arm
- Both have an effort arm
- Effort (force) is applied to the effort arm.
- While the pulley has a wheel where the load and effort arm meet, the lever has the fulcrum where the load and effort arms meet.
______________________________________________
WATCH IT
Play the following Student Video(s) in preparation for the lab. Discuss as necessary to answer student questions. Notice: Given the length of the experiments, the Student PreLab Video is split into two parts. The first video covers Trials 1 through 4, while the second covers Trials 5 through 9.