Teacher Portal:
Microscopic Exploration
Investigation 2 – PreLab
ASK WHY
Microscopes are one of the most important scientific instruments developed. In fact, in the medical field, microscopes are largely responsible for making modern medicine “modern”!
BRANCH OUT
While we often think of microscopes in terms of research with cells, however, microscopes are used in many other fields where significant magnification is required. Professions that rely on microscopes include jewelers, gemologists (study gems), geologists (study rocks), and forensic scientists (study crimes).
PRINT IT
Use your browser to download a printable PDF as help during the slide presentation and to make additional notes. In your browser, go to File > Print and then choose to save as PDF.
MINDSET
This Investigation is designed to:
- provide you with an opportunity to view objects with the unassisted eye, a convex lens, a concave lens, and the compound microscope.
- allow you to investigate the differences and similarities of an object and the image of the object produced when using different lenses.
- encourage you to realize that the proportions of an object are the same regardless of whether an object or an image of the object is viewed.
- promote the understanding that lenses refract light and that the refraction of light produces an image that appears different from the object being viewed.
- introduce you to the compound microscope and its use.
- expand your understanding of refraction and resolution produced by lenses.
SCIENTIST’S GLOSSARY
1. Convex lens: A curved lens that refracts light, bringing parallel rays of light to a point. Convex lenses are thicker in the middle than at their edges and can produce a magnified image of an object.
2. Lens: A curved piece of transparent material, usually glass or plastic that refracts light.
3. Field of view: The portion of an object
that is visible through a lens or other
viewing device.
4. Magnify: When the size of an object’s image is increased. Magnification often occurs because of the refraction of light.
5. Microscope: A scientific tool that is used to view objects that are too small to see using the naked eye.
6. Microscopy: The science of observing very small objects and details of the objects.
7. Refract: When light passes through a transparent substance and is bent or redirected in a different direction.
8. Resolution: The process that makes fine details more clearly visible
BE PREPARED
Watch the Investigation 1 Teacher Video and Student Video below to prepare for the PreLab.
SET FOR SUCCESS
- Tell students that they will use the compound microscope in the lab again in this Investigation.
- Ask students to share the kinds of things they expect they might learn in these Investigations.
- Ask students to think of what they learned in Investigation 1 as they begin this new Investigation.
Begin the PreLab Concept Slides to continue on the students’ learning journey. Then watch the Pre-Lab Student Video as a class.
NAVIGATE IT
Once the slide presentation is launched
- use your left and right arrows to advance or go back in the slide presentation, and
- hover your mouse over the left edge of the presentation to get a view of the thumbnails for all the slides so that you can quickly move anywhere in the presentation.
- Click HERE to launch the slide presentation for the CELL.
SHARE IT
SLIDE MICRO2-pre-1
In Investigation 2, we will learn more about microscopic images. We will study the relationship between magnification, resolution, and Field of View.
______________________________________________
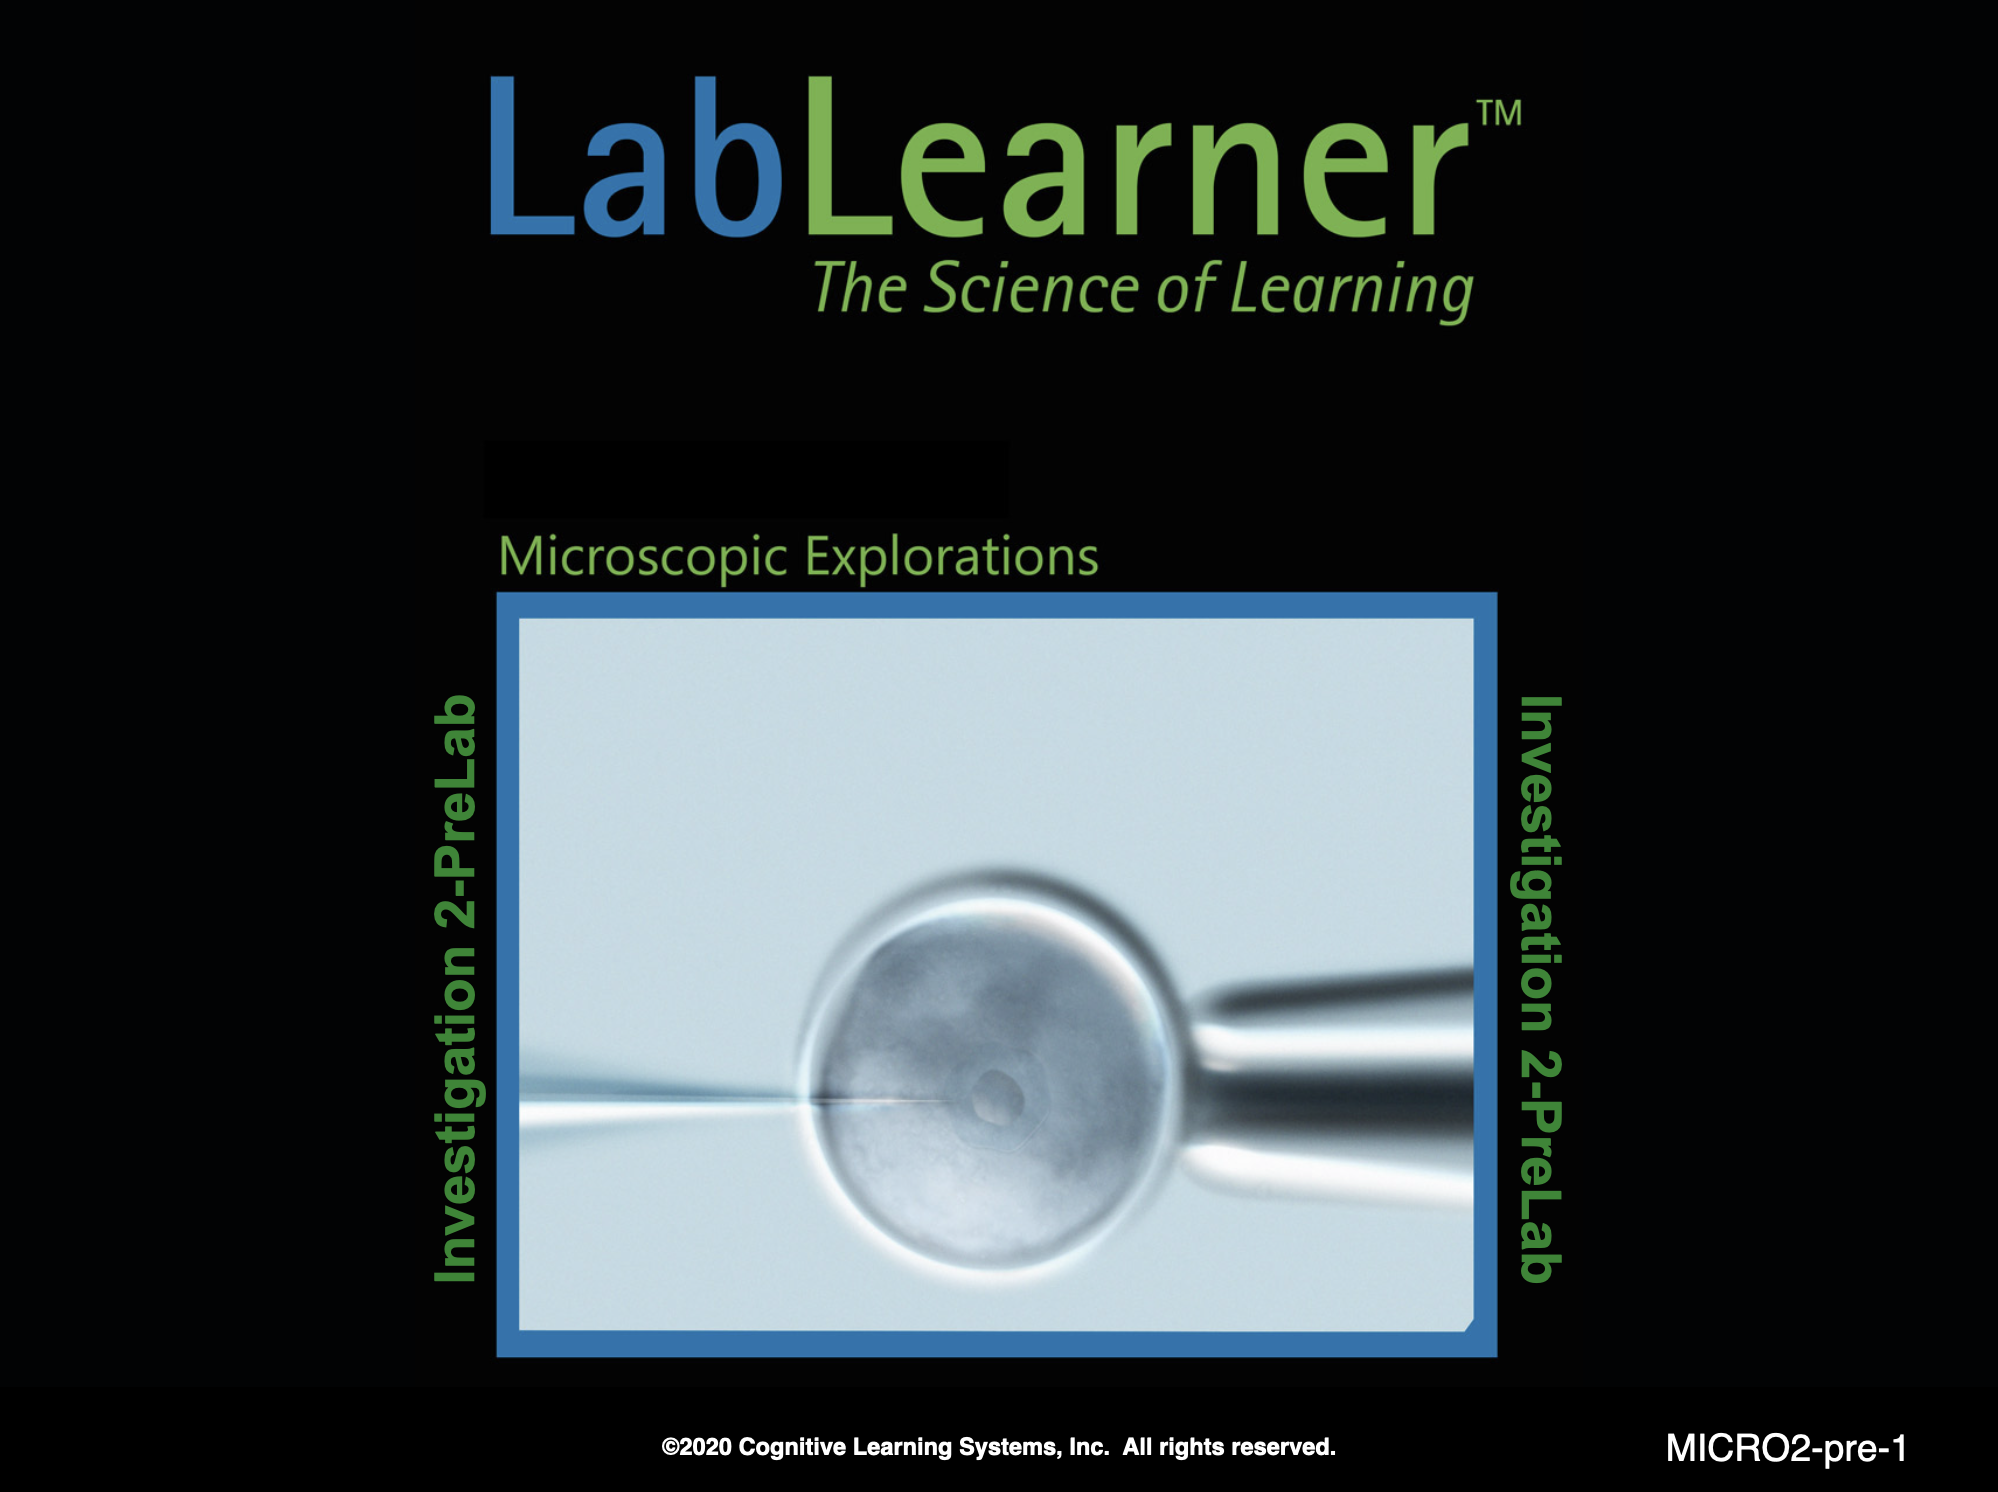
SLIDE MICRO2-pre-2
This slide shows the size of various objects in the Universe from smallest on the left to largest on the right. As you can see, the human (1.3×10o m) is somewhere in between the smallest of subatomic particles (at about 2.0×10⁻²⁴ m) and the entire known Universe (about 8.8×1026 m). There is obviously a tremendous difference in size between a human and either the very large Universe or the very small subatomic particles.
______________________________________________
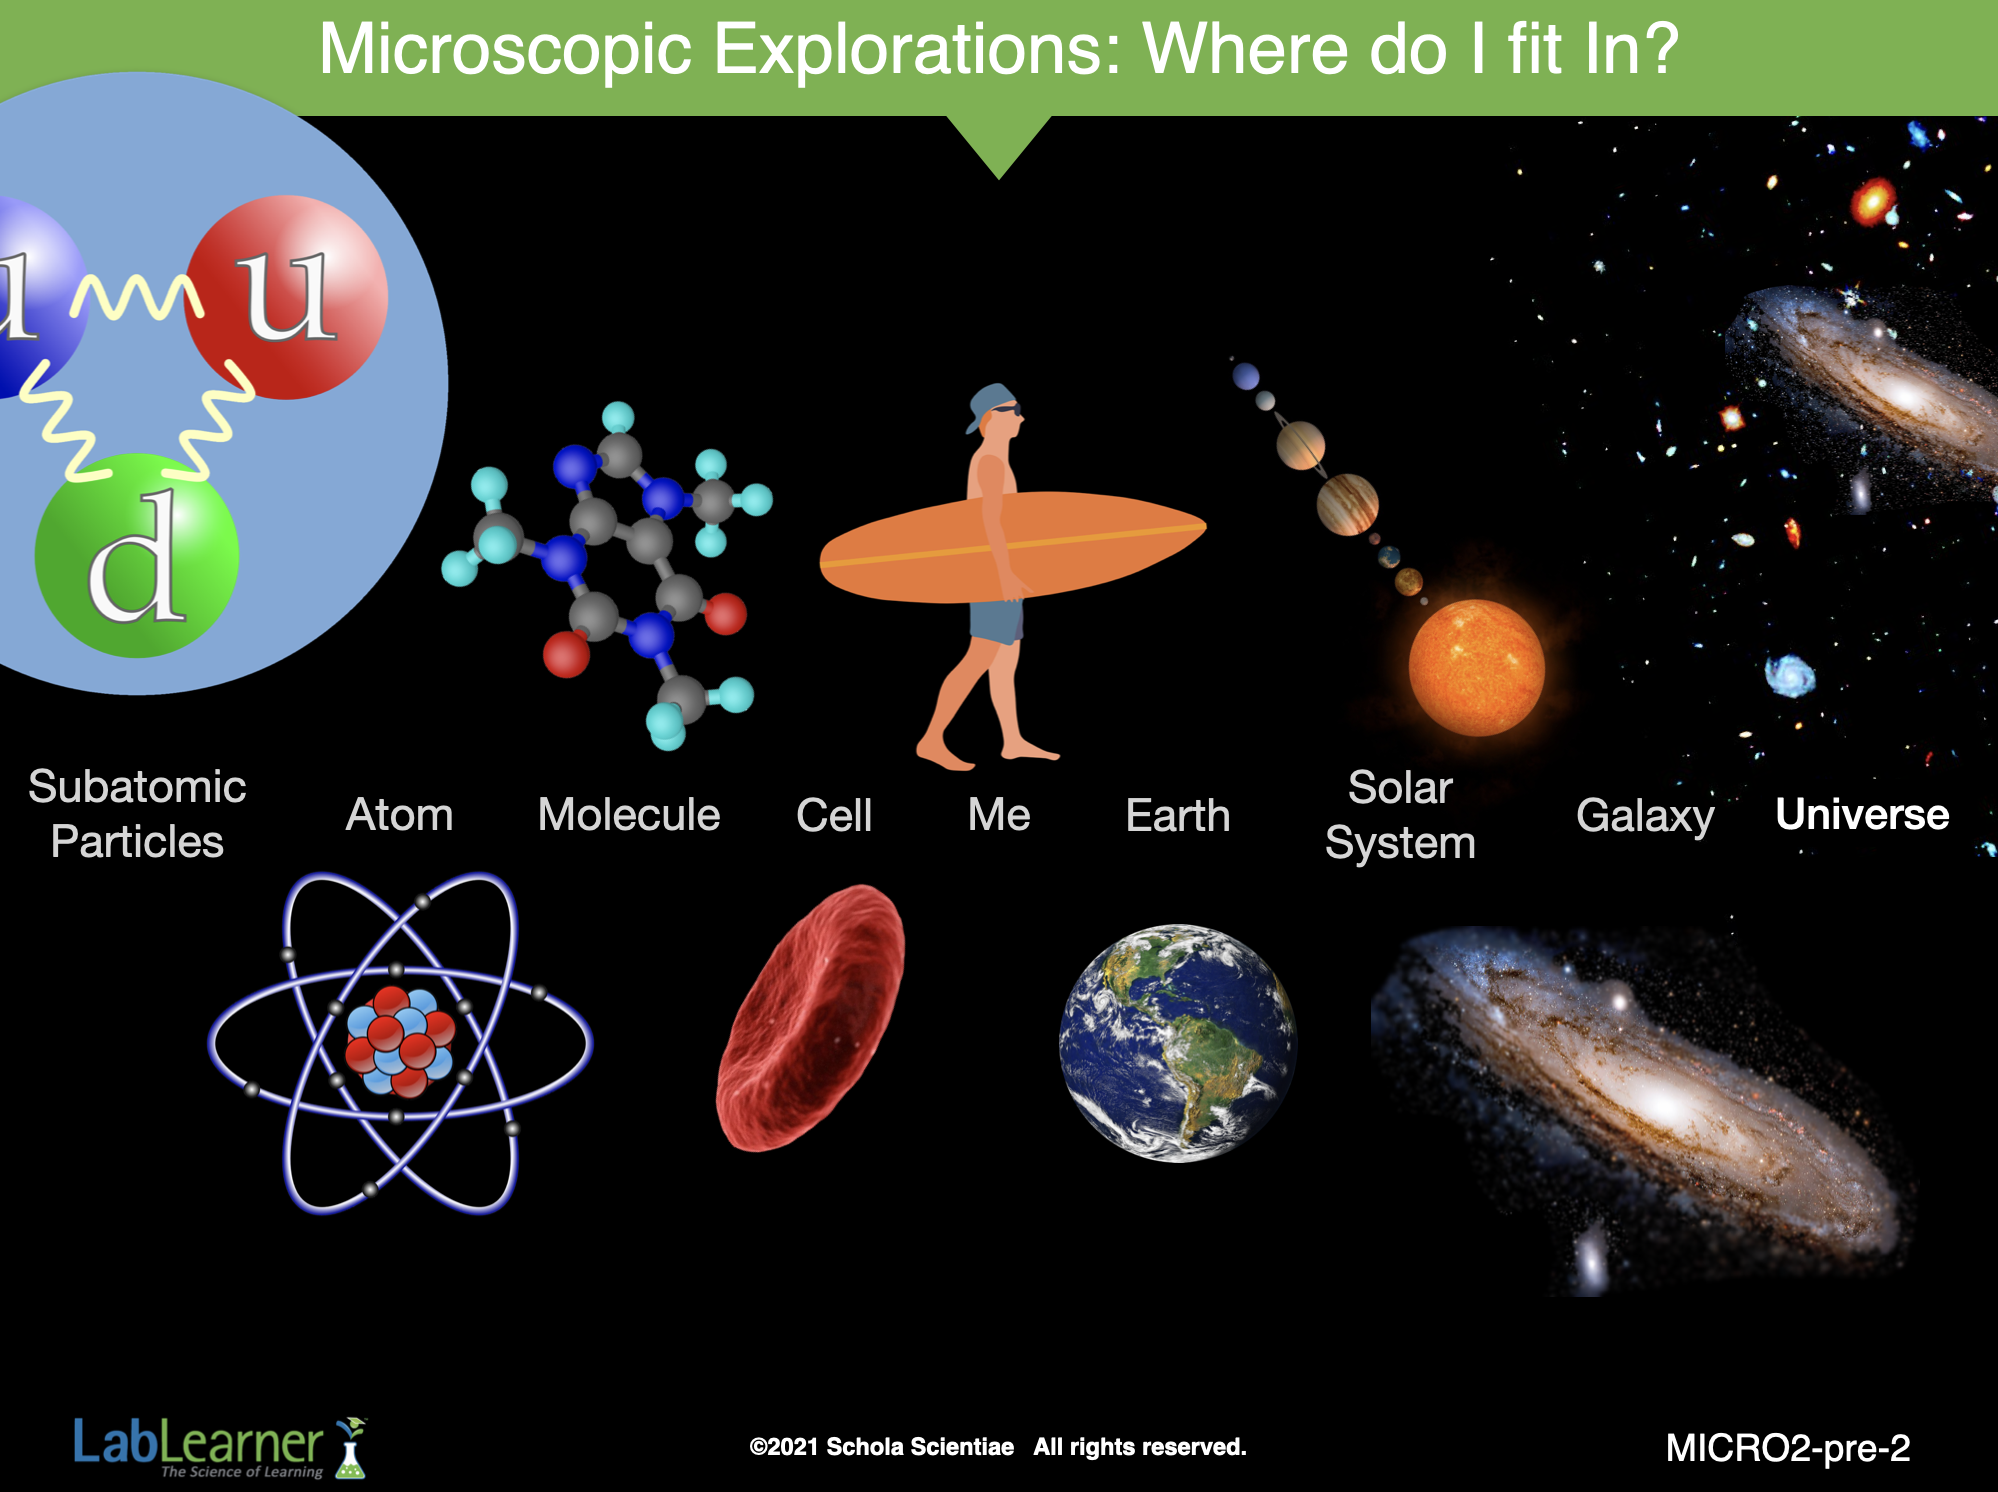
SLIDE MICRO2-pre-3
Fun with numbers: While students may not thoroughly understand scientific notation at this point, it is interesting to consider that on a scale of all things in the Universe, humans occupy a position approximately halfway between the two extremes. Therefore, even considering all of the stars, solar systems, galaxies, and the entire Universe, the smallest of particles (quarks and strings) are as many times smaller than a human than the Universe is larger than a human! Amazing.
______________________________________________
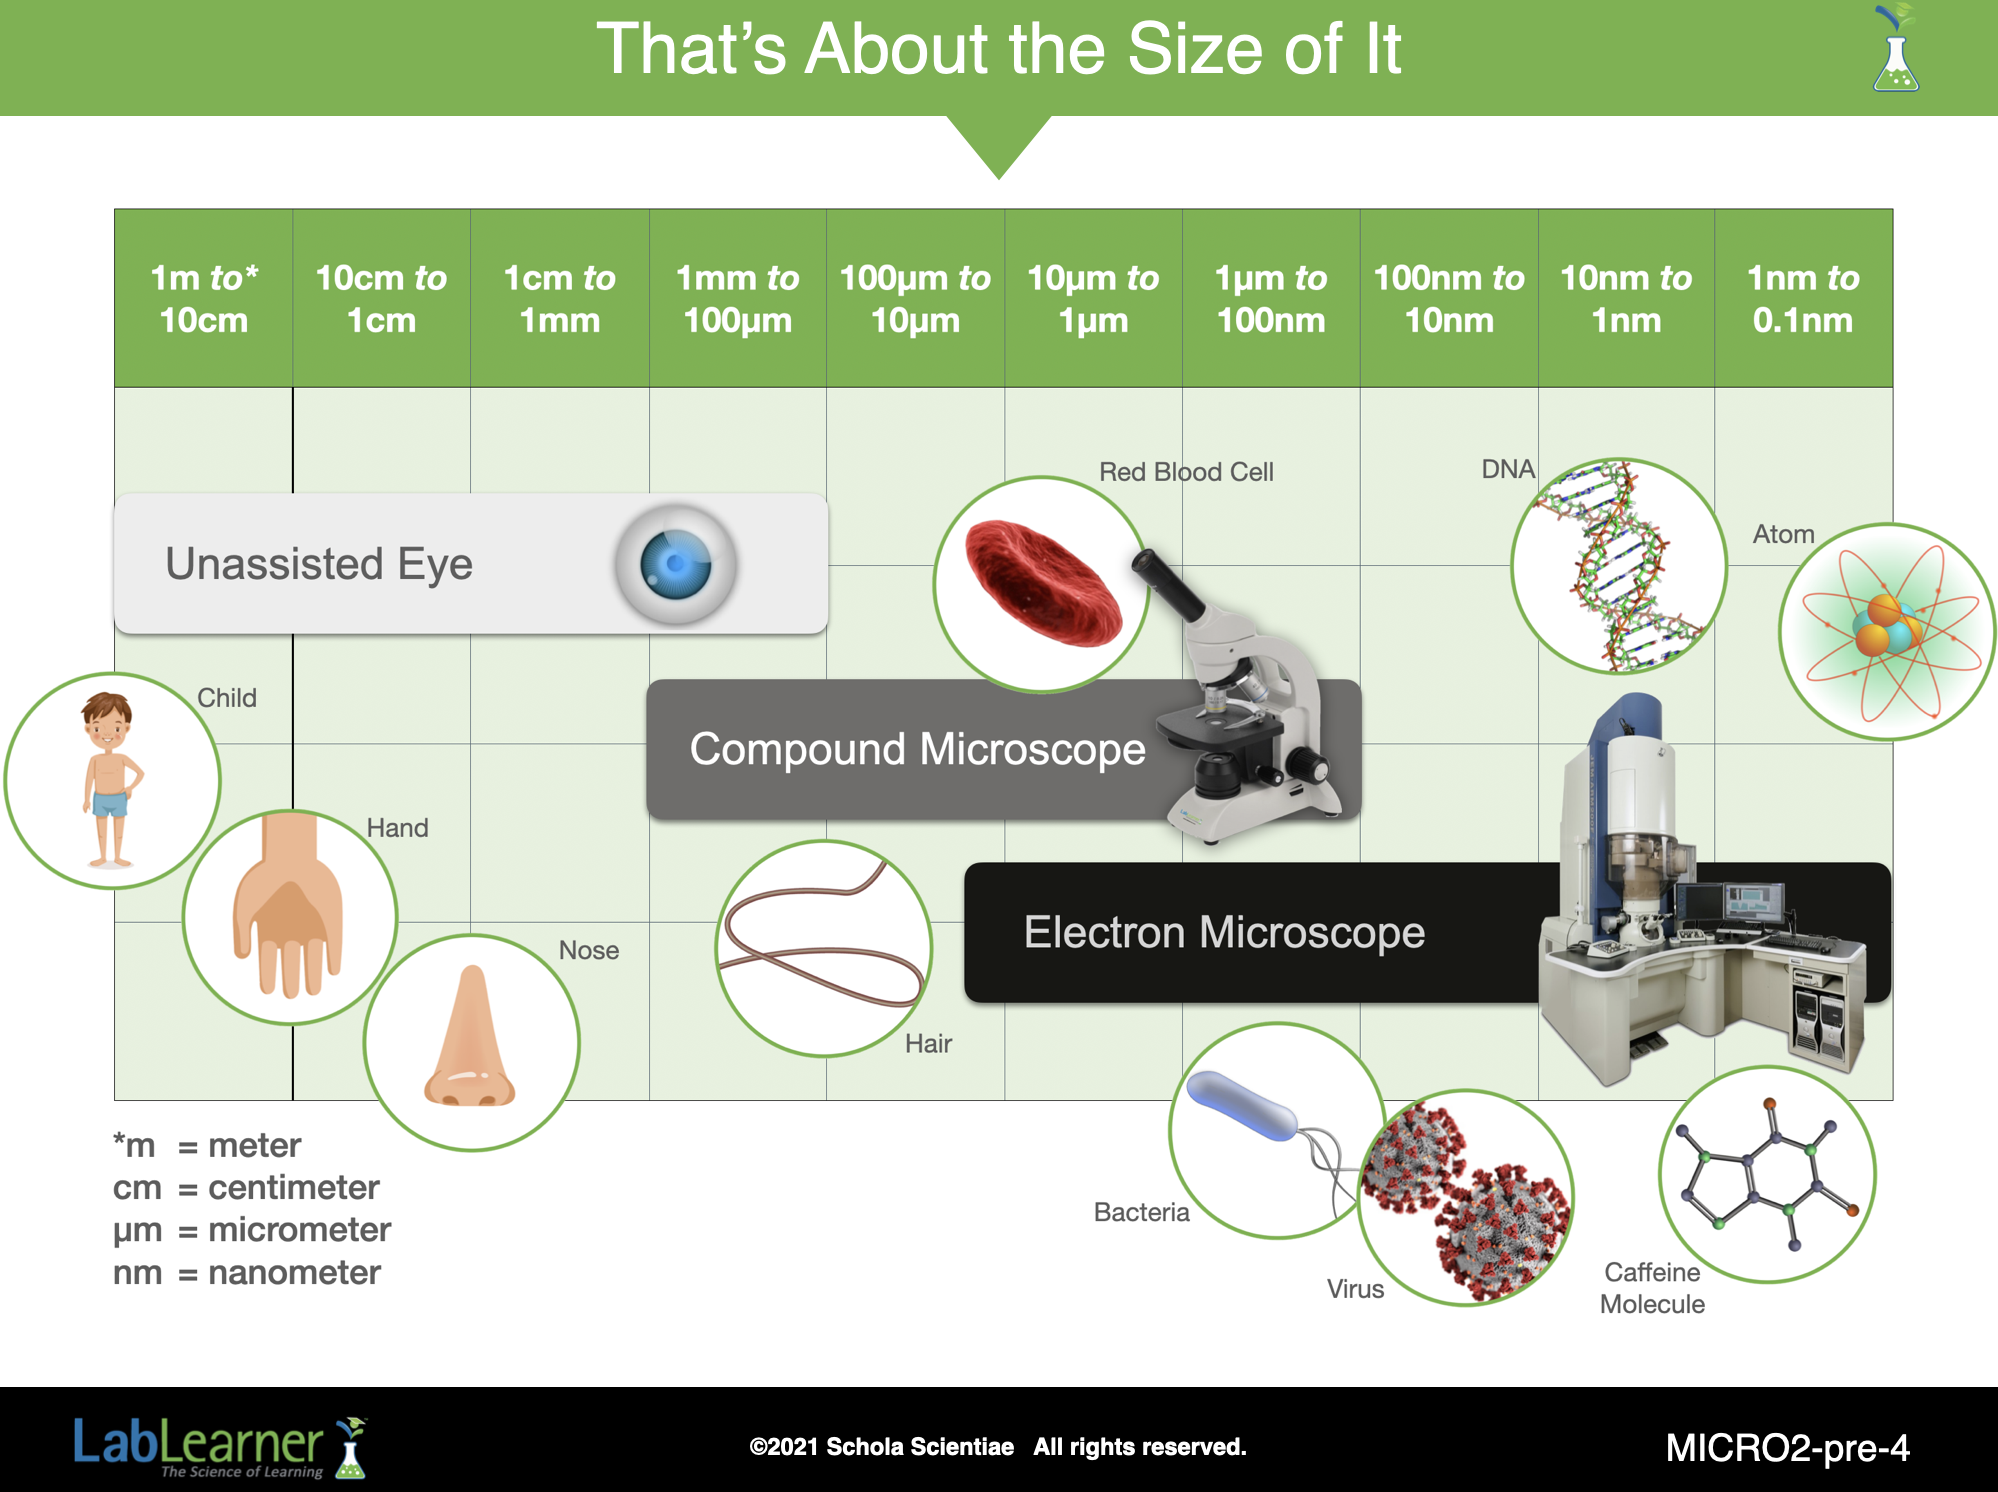
SLIDE MICRO2-pre-4
This slide focuses attention on the smaller objects of the previous two slides. It shows objects that are observable with the unassisted human eye, a compound microscope, and an electron microscope. Notice that the eye can not see things a great deal smaller than the width of a human hair. For example, we can not see individual cells without the use of microscopes.
A compound microscope can observe objects down to about the size of a bacterial cell, but can not see virus particles. An electron microscope, on the other hand, can easily see virus particles, large and small molecules, and even larger atoms. Subatomic particles, like electrons, protons, quarks, and strings, are so small that they are beyond the range of even electron microscopes.
NOTE: Students at this point do not need to understand the importance of subatomic particles. They are only included in this discussion in terms of their minuscule size.
In LabLearner, students use compound microscopes that can easily see plant and animal cells and even bacterial cells (middle school LabLearner microscopes).
______________________________________________
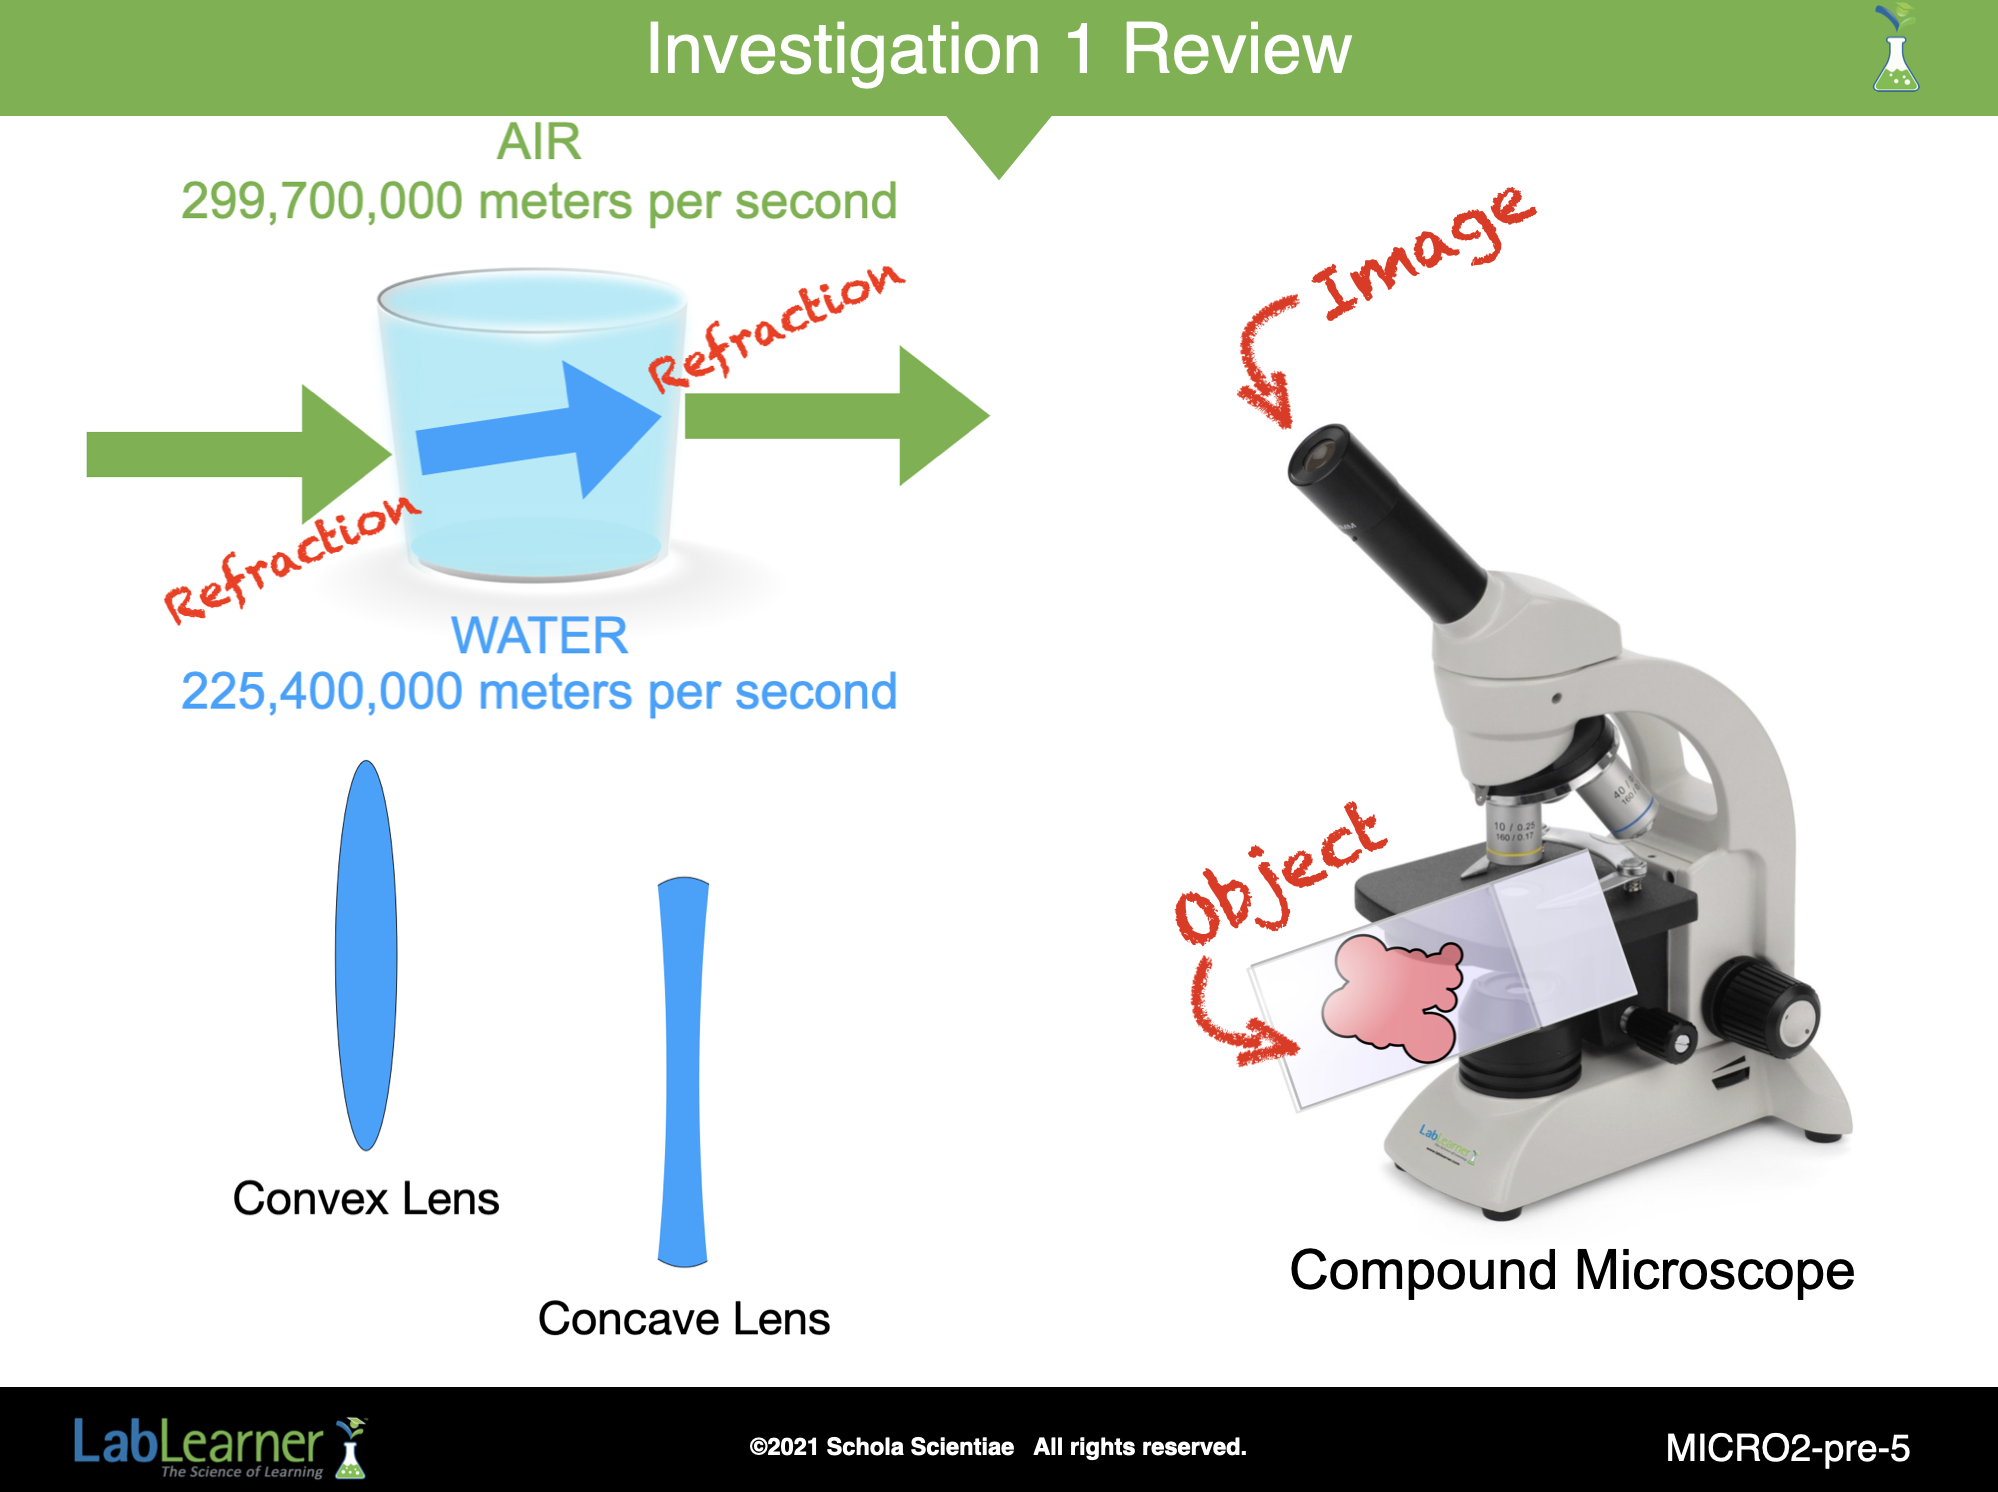
SLIDE MICRO2-pre-5
This slide begins with a quick review of important aspects of Investigation 1. The following questions should promote a lively classroom discussion.
What happens when light is refracted? Light rays are bent when light is refracted. An image of an object results from the refraction of light. The image often takes on a different appearance than the object. For example, a concave lens refracts light. The image seen with the concave lens is reduced in size compared to the object.
Can you give some examples of lenses? Examples of lenses include convex and concave lenses.
How are convex and concave lenses similar? How are they different? Convex lenses are thicker in the middle and thinner around the edges. Concave lenses are thinner in the middle and thicker around the edges. Convex lenses can produce images that are magnified or reduced in size compared to the object. Concave lenses produce images that are reduced in size compared to the object. Both concave and convex lenses can be constructed from the same materials. Both lenses refract light and produce images. The images from both lenses retain the same proportions of the object that is viewed.
What is the result of the refraction of light by lenses? Images are produced by the refraction of light. Many times the images appear different from the objects viewed. Some images may be reduced in size compared to the object. Other images may be magnified. However, some images may not appear different from the object.
How are objects and their images similar? How are they different? For most images produced by lenses, the images have the same proportions as the objects. In addition, the color and identity of the images match that of the objects. Images often appear different in size as compared to the objects. Some images are larger, while others are smaller than the objects viewed.
How do lenses affect the resolution of the images of an object? Lenses can produce images that have both increased and decreased resolution as compared to the objects viewed. Convex lenses often produced images that have increased resolution as compared to the object viewed. Concave lenses produce images that have decreased resolution as compared to the object viewed.
______________________________________________
PRELAB EXERCISE
Supplies and Preparation:<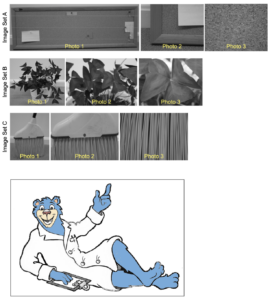
Class materials:
- 5 copies of Image Set A
- 5 copies of Image Set B
- 5 copies of Image Set C
Pair Materials:
- 1 LabLearner Bear sheet
- 1 Circle Viewing Sheet A
- 1 Circle Viewing Sheet B
- 1 pair of scissors
1. Instruct students to locate the terms resolution and field of view in their Scientist’s Glossary and read the definition of each. Once students have read the definition, ask students:
How would you describe field of view?
Student answers will vary. Field of view describes the portion of an object that is visible through a microscope, lens, or other viewing devices.
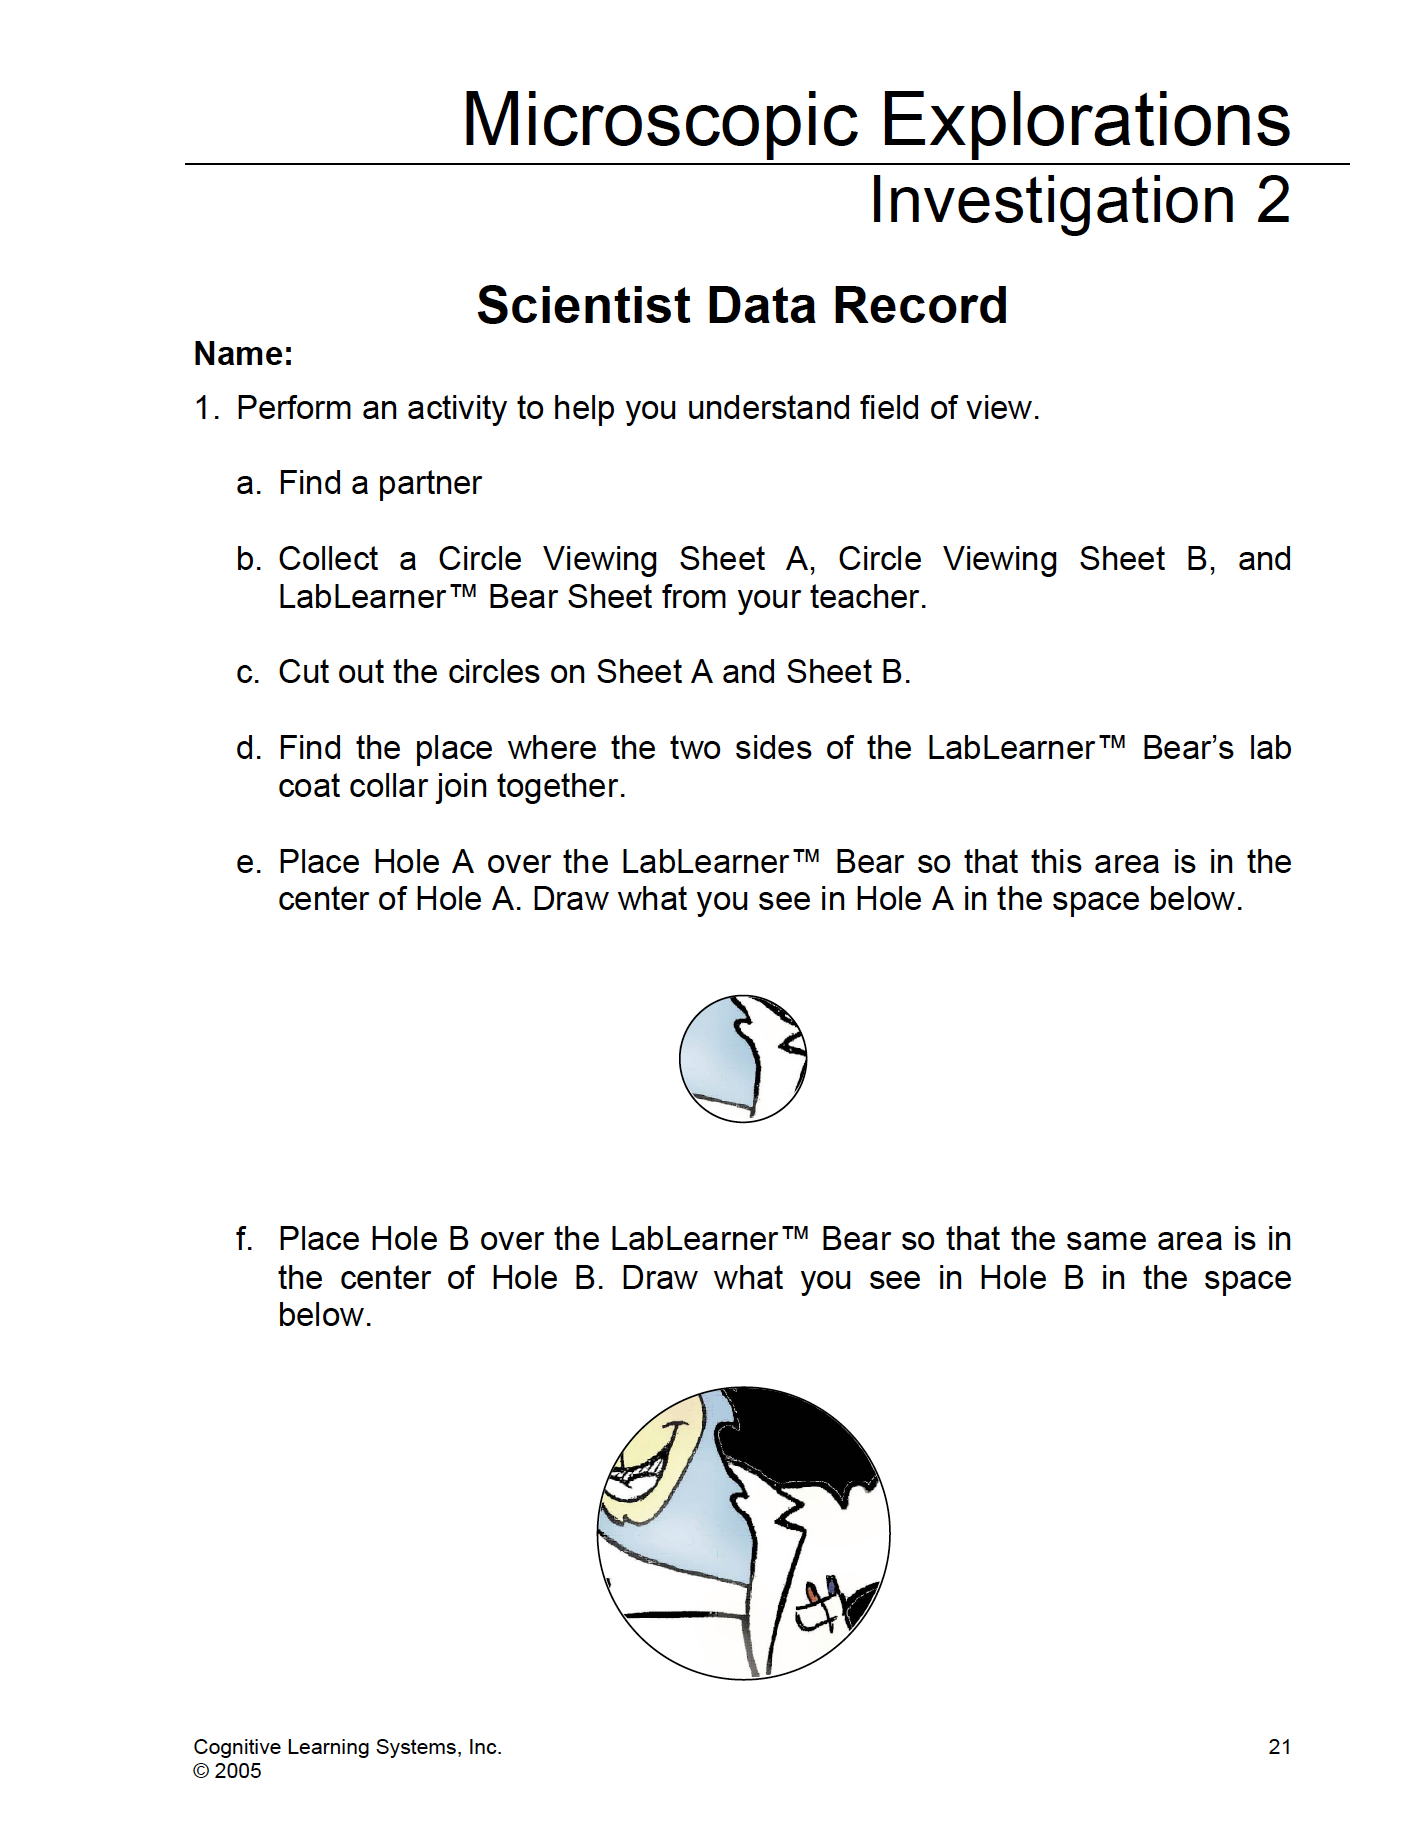
2. In order to help students better understand the concept of field of view direct students to problem 1 in their Scientist Data Record. Tell students that they will complete an activity using the LabLearner™ Bear in which they will describe changes in their field of view.
3. Instruct each student to find a partner. One person in each pair should then come to the front of the room and obtain Circle Viewing Sheets A and B and a pair of scissors. Once students have obtained their Circle Viewing Sheets instruct them to cut out the circle or circles on each piece of paper. When students have completed this task they should have two pieces of paper with three different size holes: Hole A (smallest hole), Hole B (medium size hole), and Hole C (largest size hole).
4. Encourage students to complete the activity by reading the directions in problem 1 of their Scientist Data Record. Explain to students that they will need to answer the questions in problem 1h-k after they have completed the activity. Students will then be expected to discuss the results of their activity with their classmates.
KEYS: PRELAB EXERCISE
SHARE IT (Continued)
SLIDE MICRO2-pre-6
After students have completed the activity, discuss the observations they made as a class.
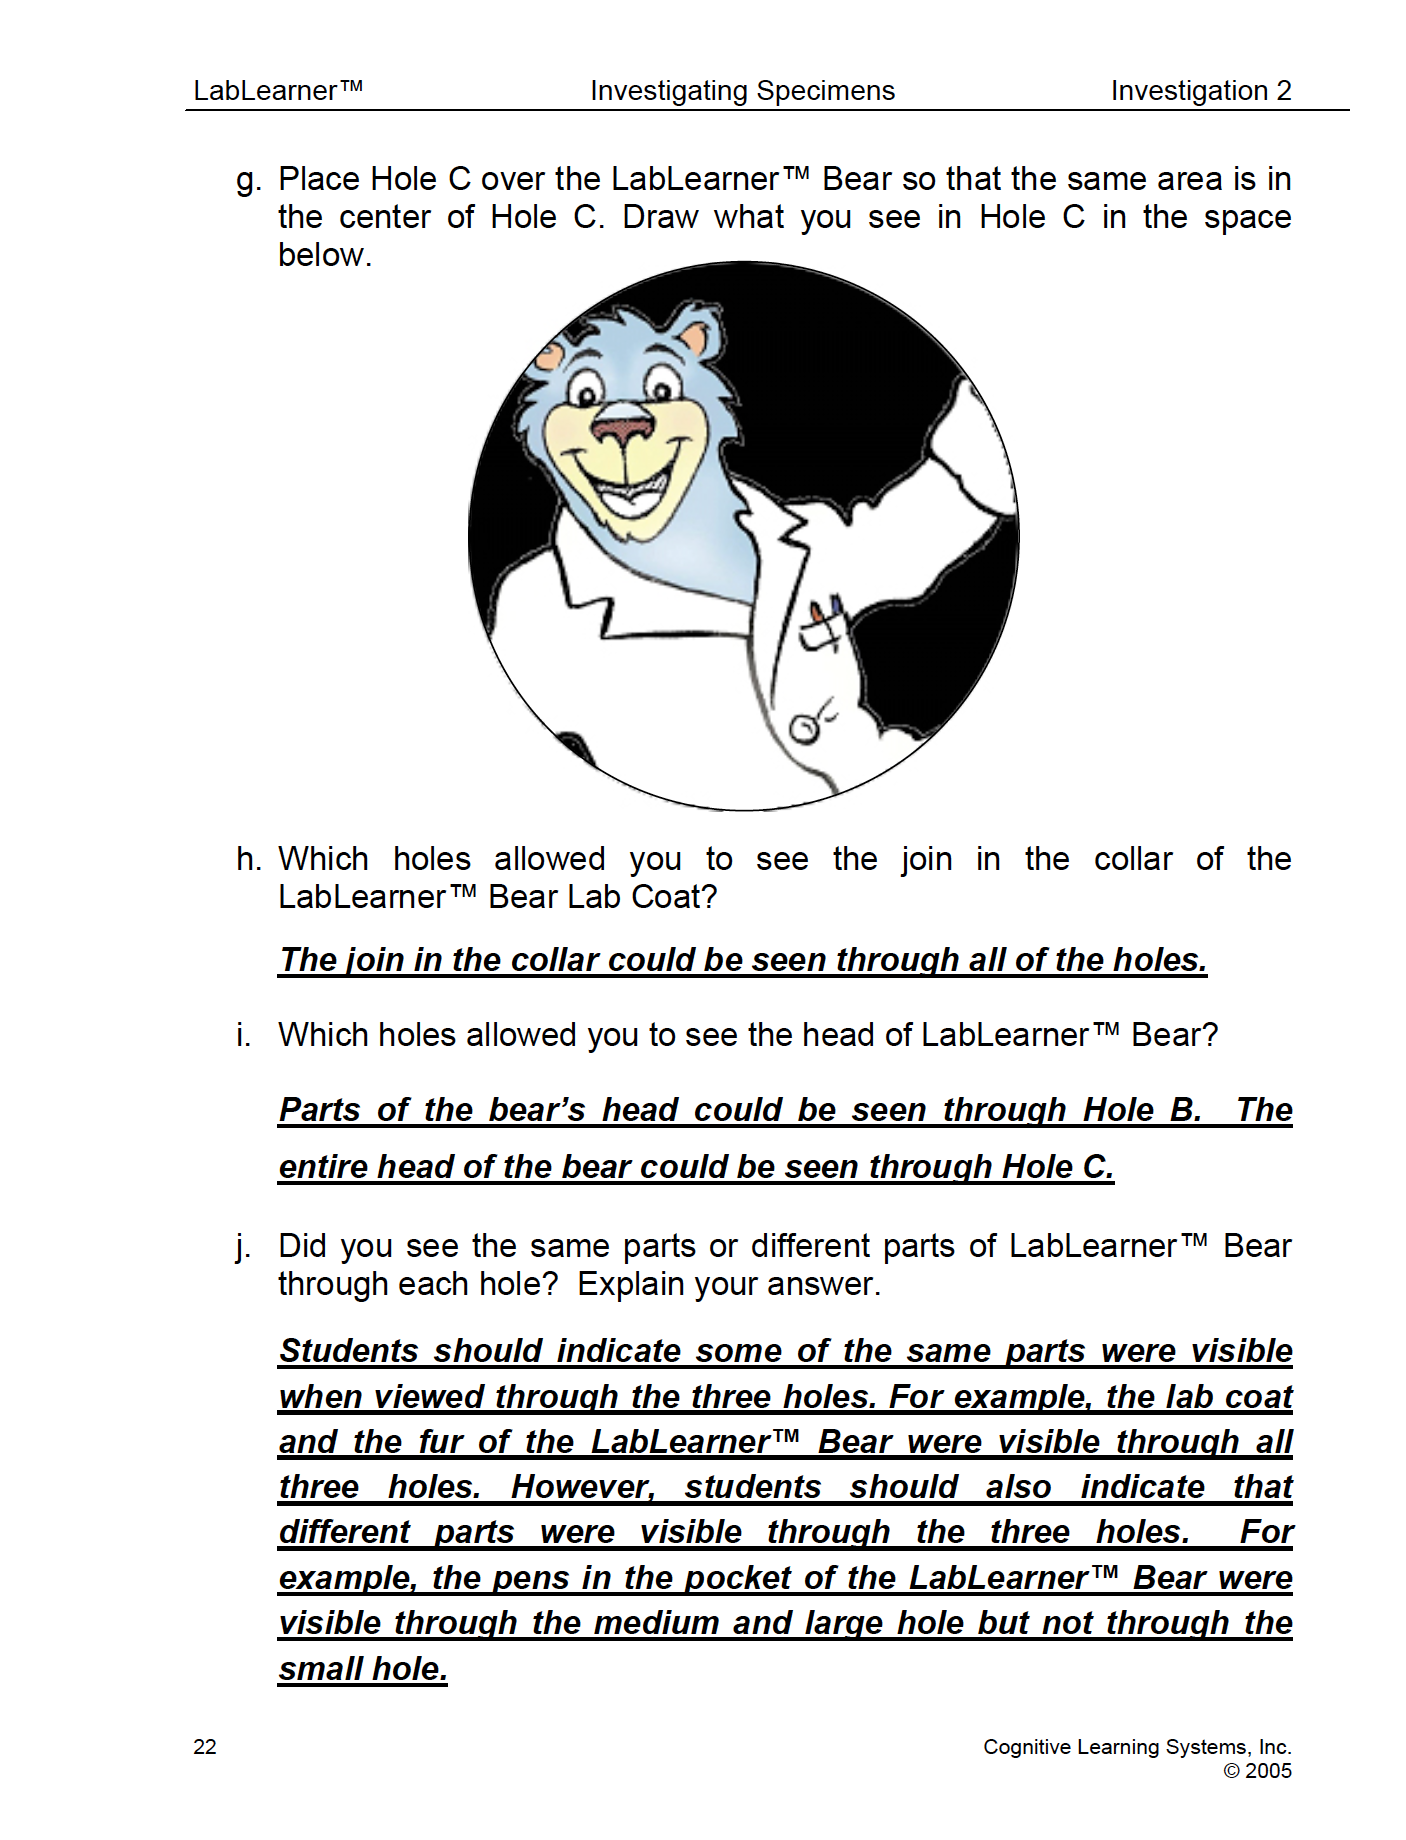
Could you see the same things in the picture when viewing it through all three holes? Students should indicate some of the same things as well as that were visible when viewed through the three holes. For example, the lab coat and the fur of the LabLearner™ Bear were visible through all three holes. However, students should also indicate that different things were visible through the three circles. For example, the pens in the pocket of the LabLearner ™ Bear were visible through the medium and large hole but not through the small hole.
What could you see when you viewed the LabLearner™ Bear with Hole C that you could not see with Hole A? Student answers will vary. However, it is likely that students will indicate some of the following items that could be seen with Hole C that could not be seen with Hole A: face of LabLearner™ Bear, pens in the lab coat, button on the lab coat, black background of the picture, ears of the LabLearner™ Bear, arms of the LabLearner™ Bear.
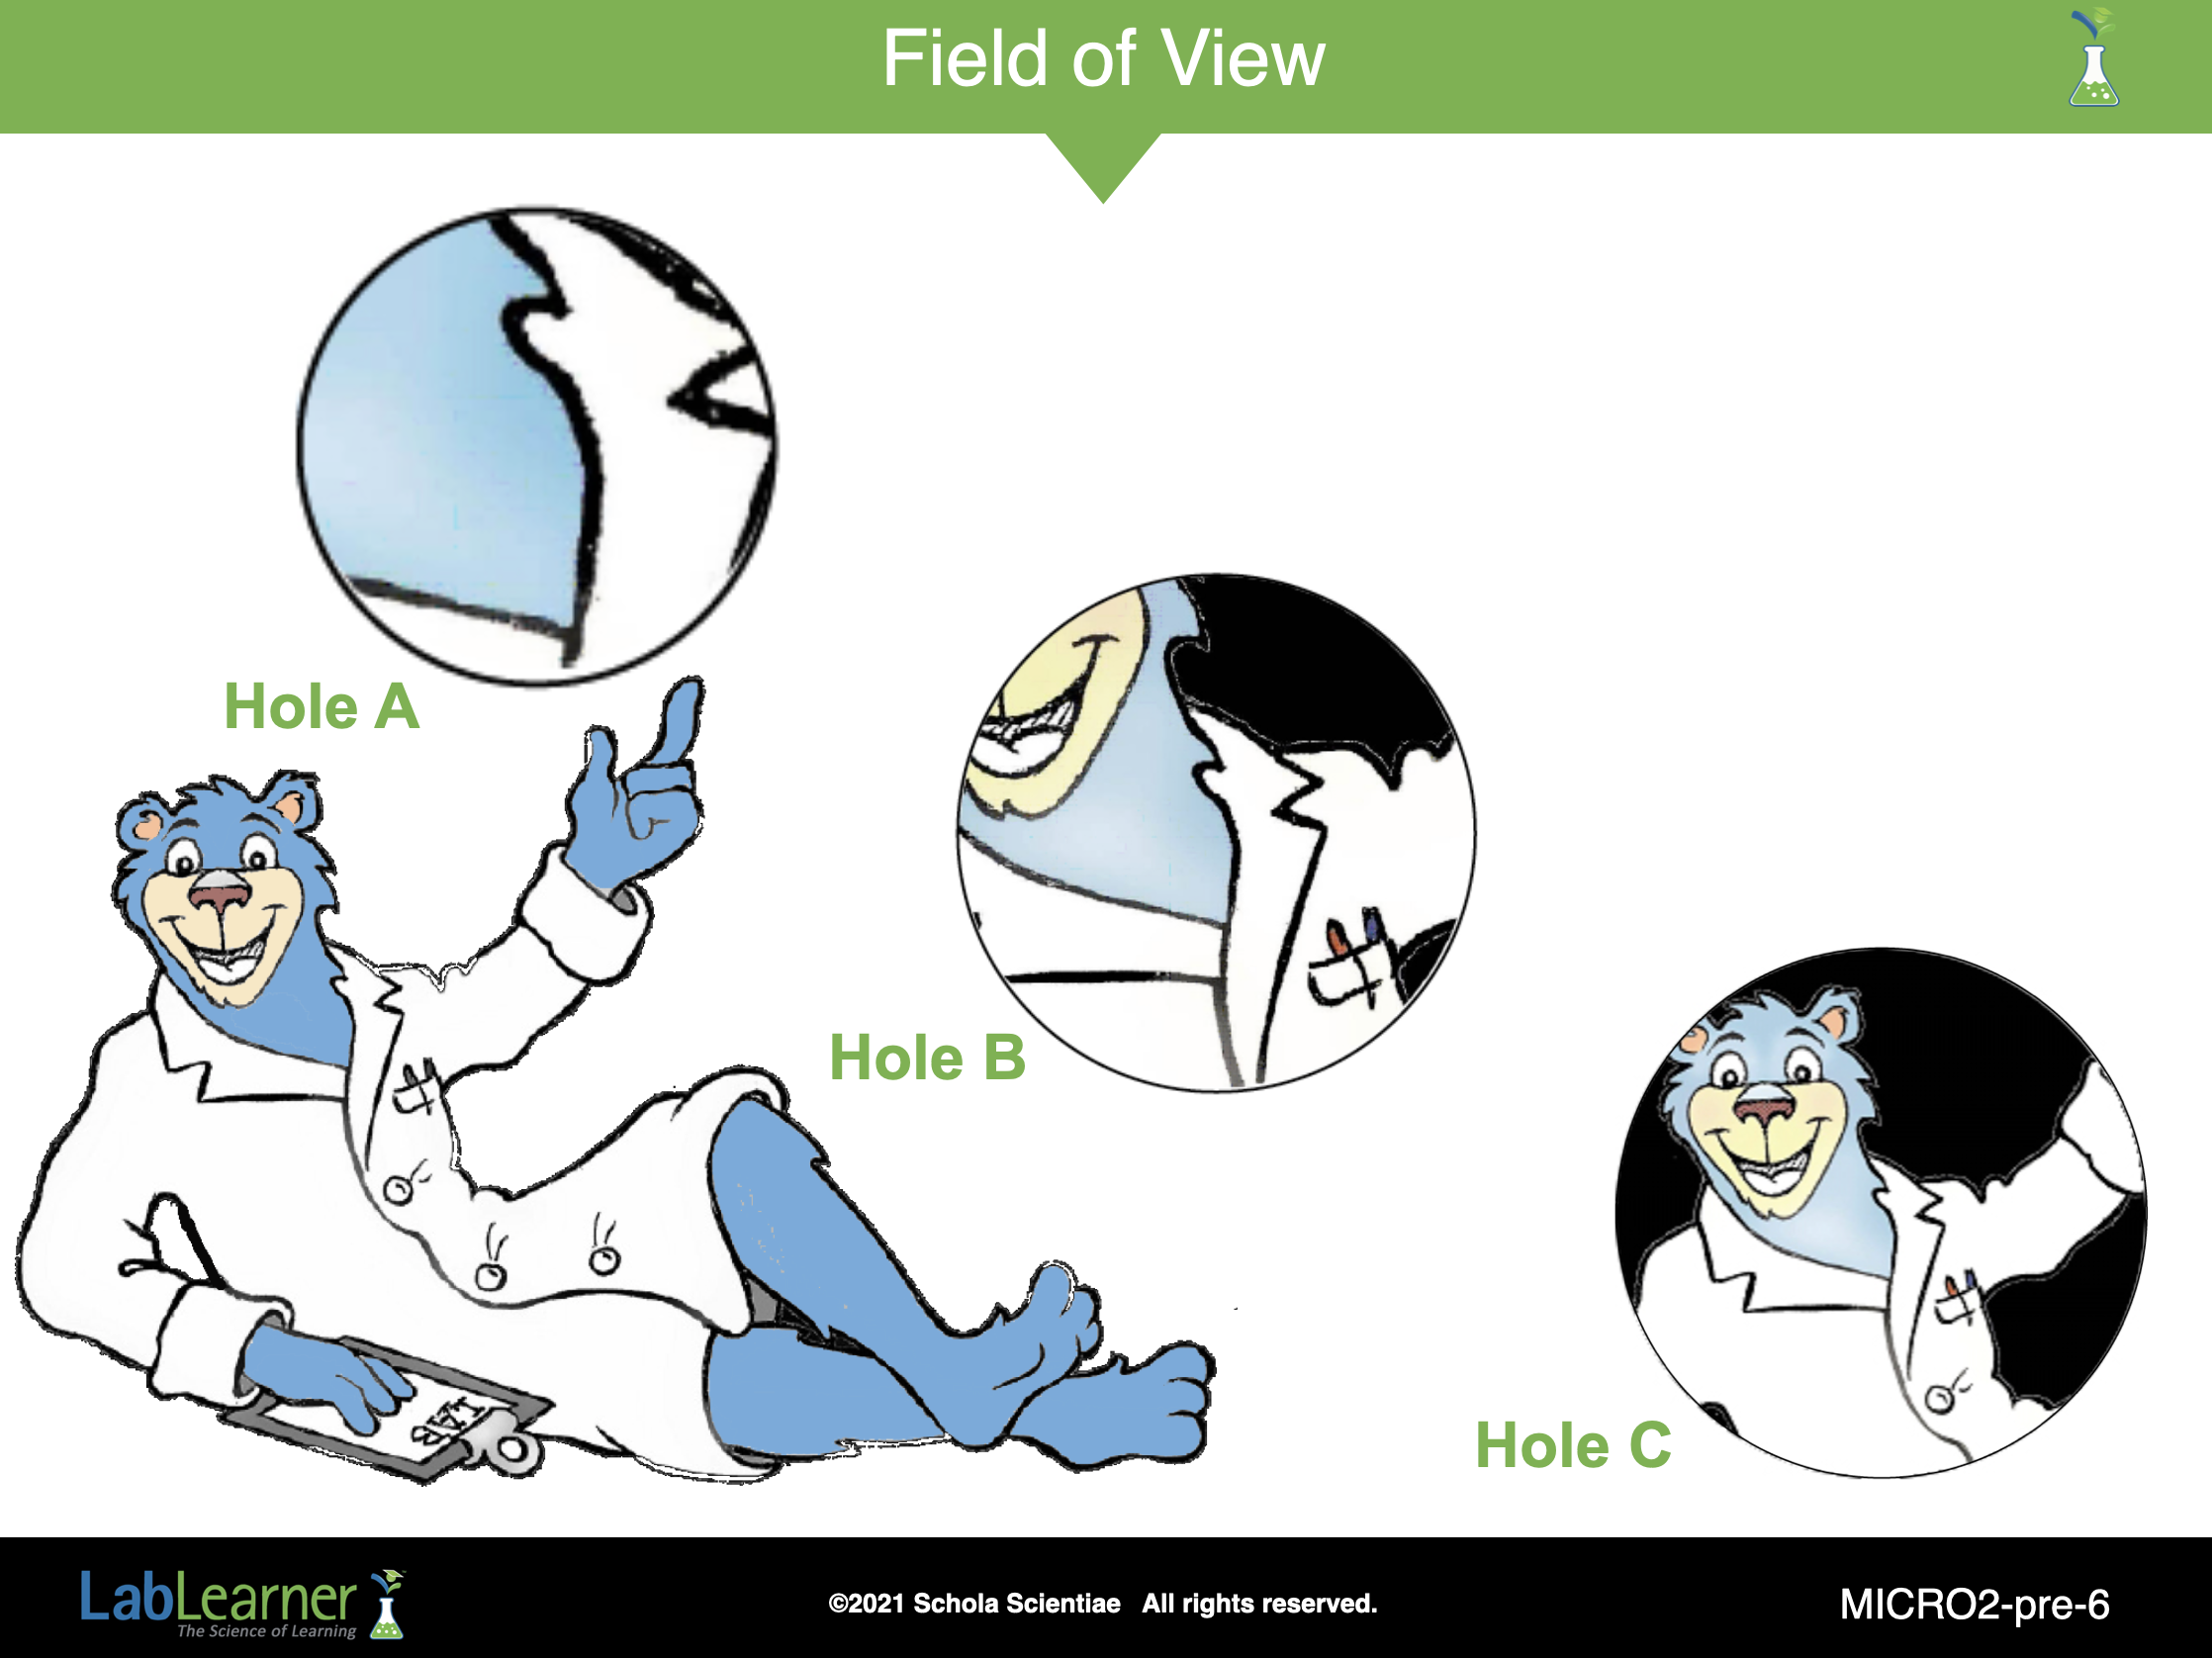
How did the amount of the picture you could view change as the size of the holes increased? As the size of the holes increased, more of the picture was visible.
Think about the term field of view. Which hole provided the largest field of view? Which hole provided the smallest field of view? Hole C, the large hole, provided the largest field of view because almost all of the LabLearner™ Bear was visible. Hole A, the small hole, provided the smallest field of view. Very little of the picture could be seen when viewed through the small hole.
How did the field of view affect your observations of the LabLearner™ Bear picture? Student answers will vary. The smaller the field of view, the harder it was to identify the object being viewed. When the picture was viewed with Hole A, there was a very small field of view. All that could be seen was a white area, with some black lines and some blue color. Based on these observations, the object viewed could have been the sky with clouds, a swimming pool with towels beside it, a kite flying in the sky, etc. As the holes increased in size and the field of view increased, more objects in the picture were visible, providing more information about the structure of the picture to the viewer. As the field of view increased, it because easier to identify the picture as that of a bear wearing a lab coat.
______________________________________________
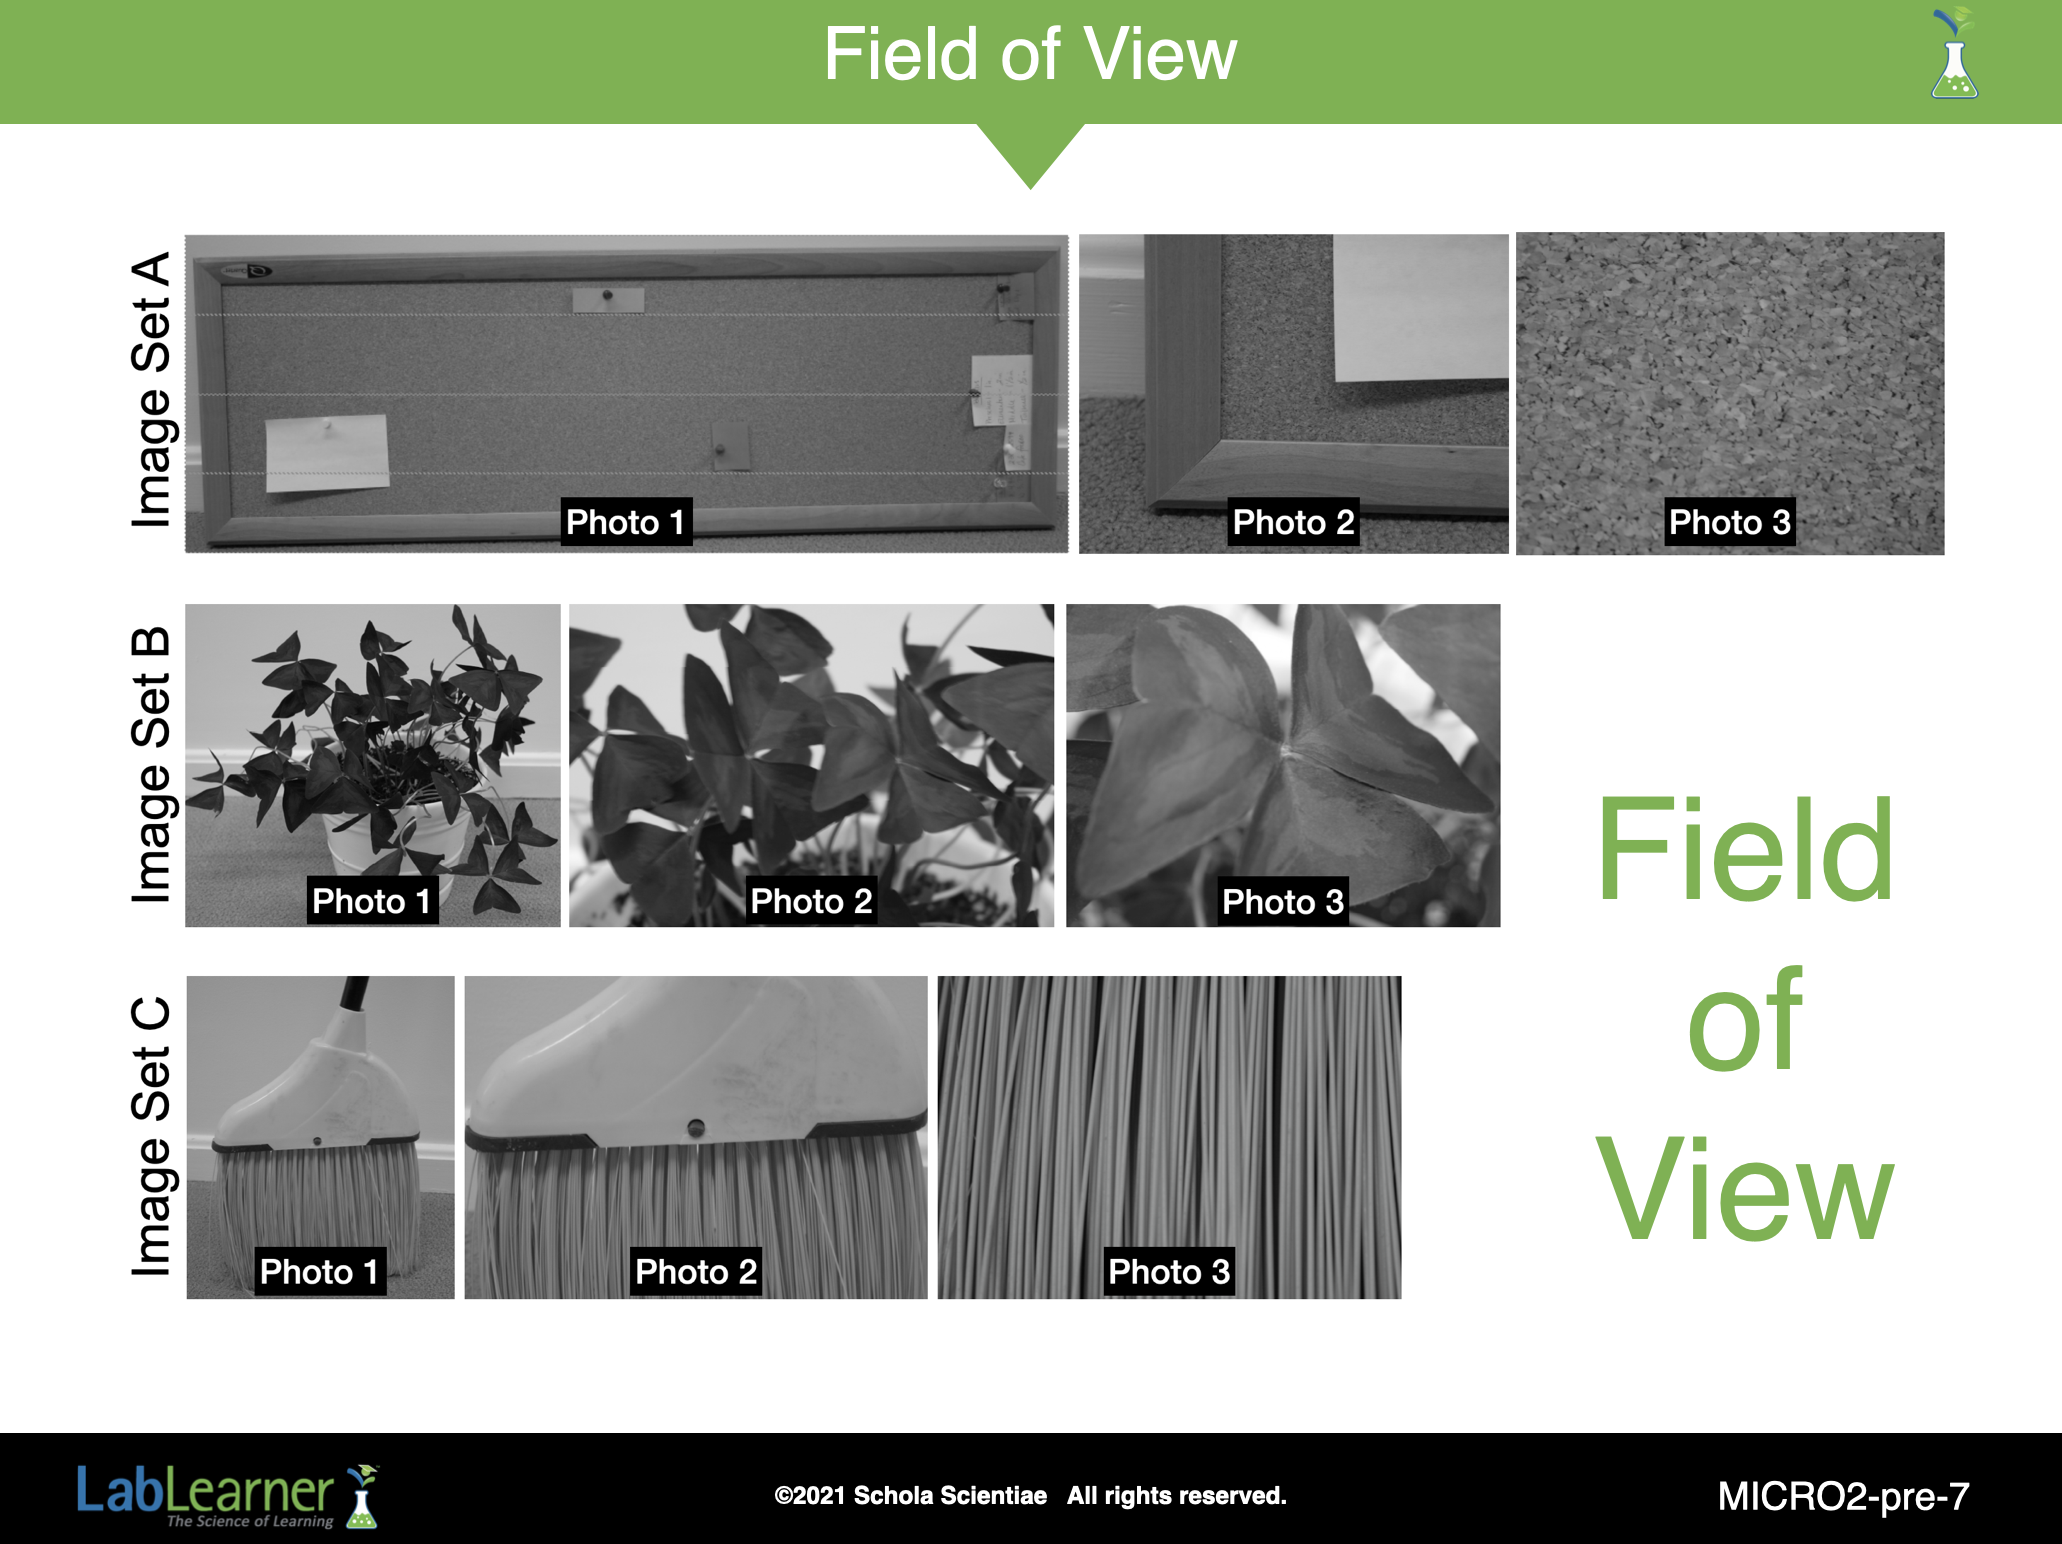
SLIDE MICRO2-pre-7
This is the first of two slides that present results using Image Sets A-C. This slide simply shows the original images.
______________________________________________

SLIDE MICRO2-pre-8
This slide shows results that students likely obtained by viewing the three photos of each set at increasing magnification. Use these results for a classroom discussion, considering the following questions:
How did the three images in each set differ in their field of view? The field of view increased from Image A to Image C. Image A had the smallest field of view. Image C had the largest field of view.
Which image in each set was taken with the greatest magnification? Image A in each set was taken with the greatest magnification.
How did the three images in each set differ in their resolution? The resolution of the images decreased from Image A to Image C. More fine details were clearly visible in Image A as compare to Images B or C.
Describe the changes in the field of view and resolution of the images as the magnification of the images decreased. Image A in each set was more magnified than Images B or C. The resolution of Image A in each set was greater than the resolution of Images B or C because more fine details could be seen in Image A of each set than Images B or C. However, Image A in each set had the smallest field of view, while Image C had the largest field of view. Therefore, as the magnification of the images decreased, the resolution of the images decreased, but the field of view of the images increased.
Did you obtain the same information about the object from all three images? Describe any differences. Student answers may vary. However, students should suggest the following observations in the answers:
Some of the same information was obtained from the three images such as the color of the objects. Much of the information gained from the three images were different. Image A in each set provided more information about the texture of each object and any variations in shade. The increased resolution of Image A also provide details of each object that were not apparent from Images B or C such as the difference in the length of the bristles on the broom, the difference in the thickness in each cork piece of the corkboard, and slight variations in shade between the stem and the leaves on the plant.
Image B in each set, however, provided additional information about the overall structure of the object, providing additional perspective for the objects. For example, multiple leaf shapes and stems were visible, the straw pieces were bound together inside a plastic piece and the cork pieces were held inside wood pieces.
Image C in each set had the largest of the fields of view. The field of view for these images was such that the entire object was within the field of view. As a result, the identity of the object was apparent when the image was first viewed.
As a scientist studying the make-up of all three objects, would it be better to have only one image of each object or all three? Why? What would you be able to learn about each object by looking at all three images versus only one image? Student answers will vary. Students should indicate that more information could be learned by viewing all three images versus a single image. Image A in each set would provide details such as bristle length, variation in the cork pieces, and variation in the depth of the pigments on the leaf. Image C in each set would provide the identity of each object. Image B in each set would provide additional details as to how each structure was organized. For example, the number of bristles bound together by the plastic piece, the alignment of the pieces of wood to form the frame of the corkboard, and the orientation of the leaves of the plant in relation to one another and in relation to the stems of the plant.
How would you describe the differences between the field of view and resolution? Students should indicate that field of view refers to how much of an object or image can be seen in relation to its entire structure or viewing area. Resolution refers to the extent to which the fine details of an object are visible. When dealing with lenses, increased resolution is often accompanied by a decrease in the field of view. Therefore, although more detail about the structure of an object is available, less of the entire object can be observed.
Do you think that it is better to have an increased field of view or an increased resolution when looking at images? Why? Student answers may vary. However, they should reflect that students have considered that both an increased field of view and increased resolution provide beneficial information about an object and that often in order to gain the most information about an object or image, it is helpful to have both. Students should record their answers in problem 2d of their Scientist Data Record.
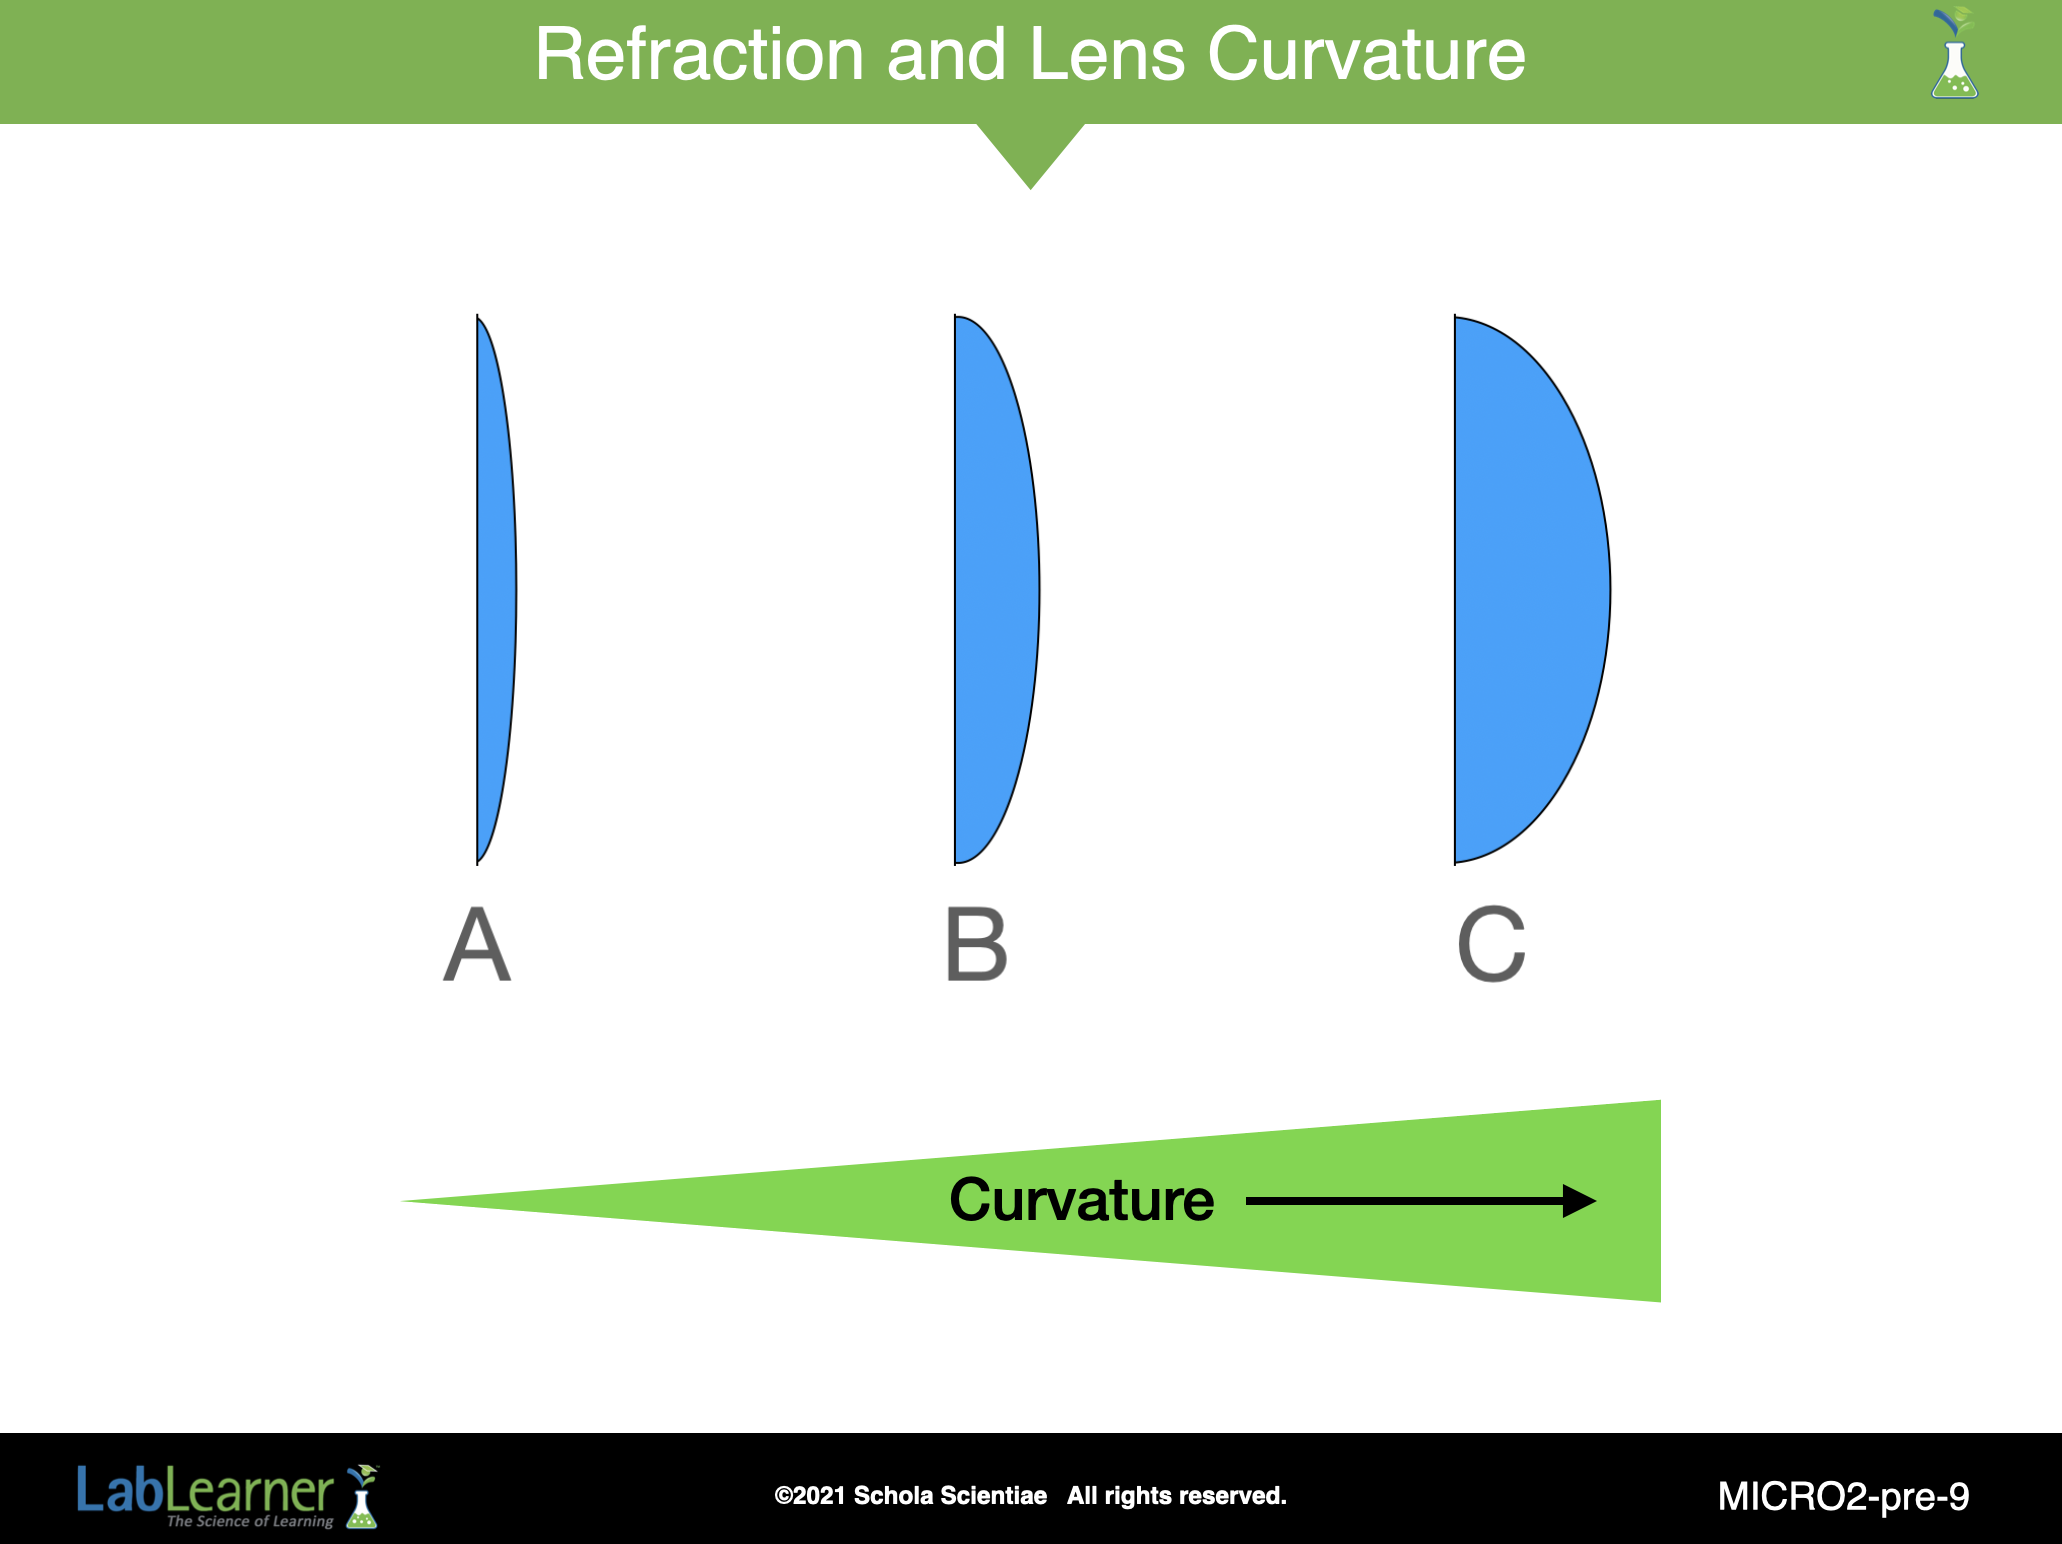
SLIDE MICRO2-pre-9
This slide show three lenses with increasing curvature. Explain to students that the images in the preceding field of view activity (Slide MICRO2-pre-7 and MICRO2-pre-8) were taken using different “zoom” settings on a camera. However, the effect of using the zoom is similar to using three different lenses to look at the objects.
To help answer this question, “Which lens in this slide do you think would produce the most magnified image? The least magnified image?”, discuss the following question:
Think about what you know about the refraction of light. Would a piece of glass refract light? Why? Students should indicate that a piece of glass would refract light because refraction occurs when light rays travel from one transparent medium to another. Light passing from air to glass is an example of light traveling from one transparent medium to another.
Think about what you see when you look out a window. Do the objects you see look different than when you view them without looking through a window? Students should indicate that in most circumstances, the objects appear similar when viewed through a pane of glass in a window and when viewed without a pane of glass.
Think about what you observed when you look at objects in Investigation One through a convex and concave lens. Did the images you see appear different than the objects? Students should indicate that the images they viewed through the convex and concave lenses appeared different from the object as seen with the unassisted eye.
What is the difference in shape between a pane of glass and the convex and concave lenses you used in Investigation One? Student answers may vary. Help students understand that one of the differences is the shape of lenses versus a pane of glass. A pane of glass is flat whereas the convex and concave lenses are curved pieces of glass.
The ability of a substance to refract light is called the refractive power. Which would have greater refractive power, a pane of glass or a convex lens? How does refractive power affect the types of images seen by the pane of glass and the convex lens? Students should infer that because the images of objects appear different when viewed through convex and concave lenses, but often do not appear different when viewed through a flat pane of glass, that more refraction occurs as light passes through the convex and concave lenses than the flat pane of glass. Therefore, the lenses have more refractive power than the flat pane of glass. The refractive power of the concave lens produces images that are reduced in size as compared to the object. The convex lens can produce images that are magnified as compared to the original object. The lower refractive power of a flat pane of glass results in images that appear very similar to the original object.
Look at the three examples of lenses on this slide. Which of the lenses would have the greatest refractive power? Student answers will vary. Students should be able to infer from their experiments in Investigation One and through the series of answers to the preceding questions that the lens with the greatest curvature would have the greatest refractive power.
Which of the lenses would produce the most magnified image? The least magnified image? Students should indicate that all of the images above illustrate convex lenses. Based on their experience in using a convex lens in Investigation One, students should indicate that convex lenses produce magnified images. Therefore, students should conclude based on their experiments from Investigation One and their answers to the preceding questions that the convex lens with the greatest curvature is most likely to produce the most magnified image. The convex lens with the least curvature of the three is most likely to produce the least magnified image.
______________________________________________
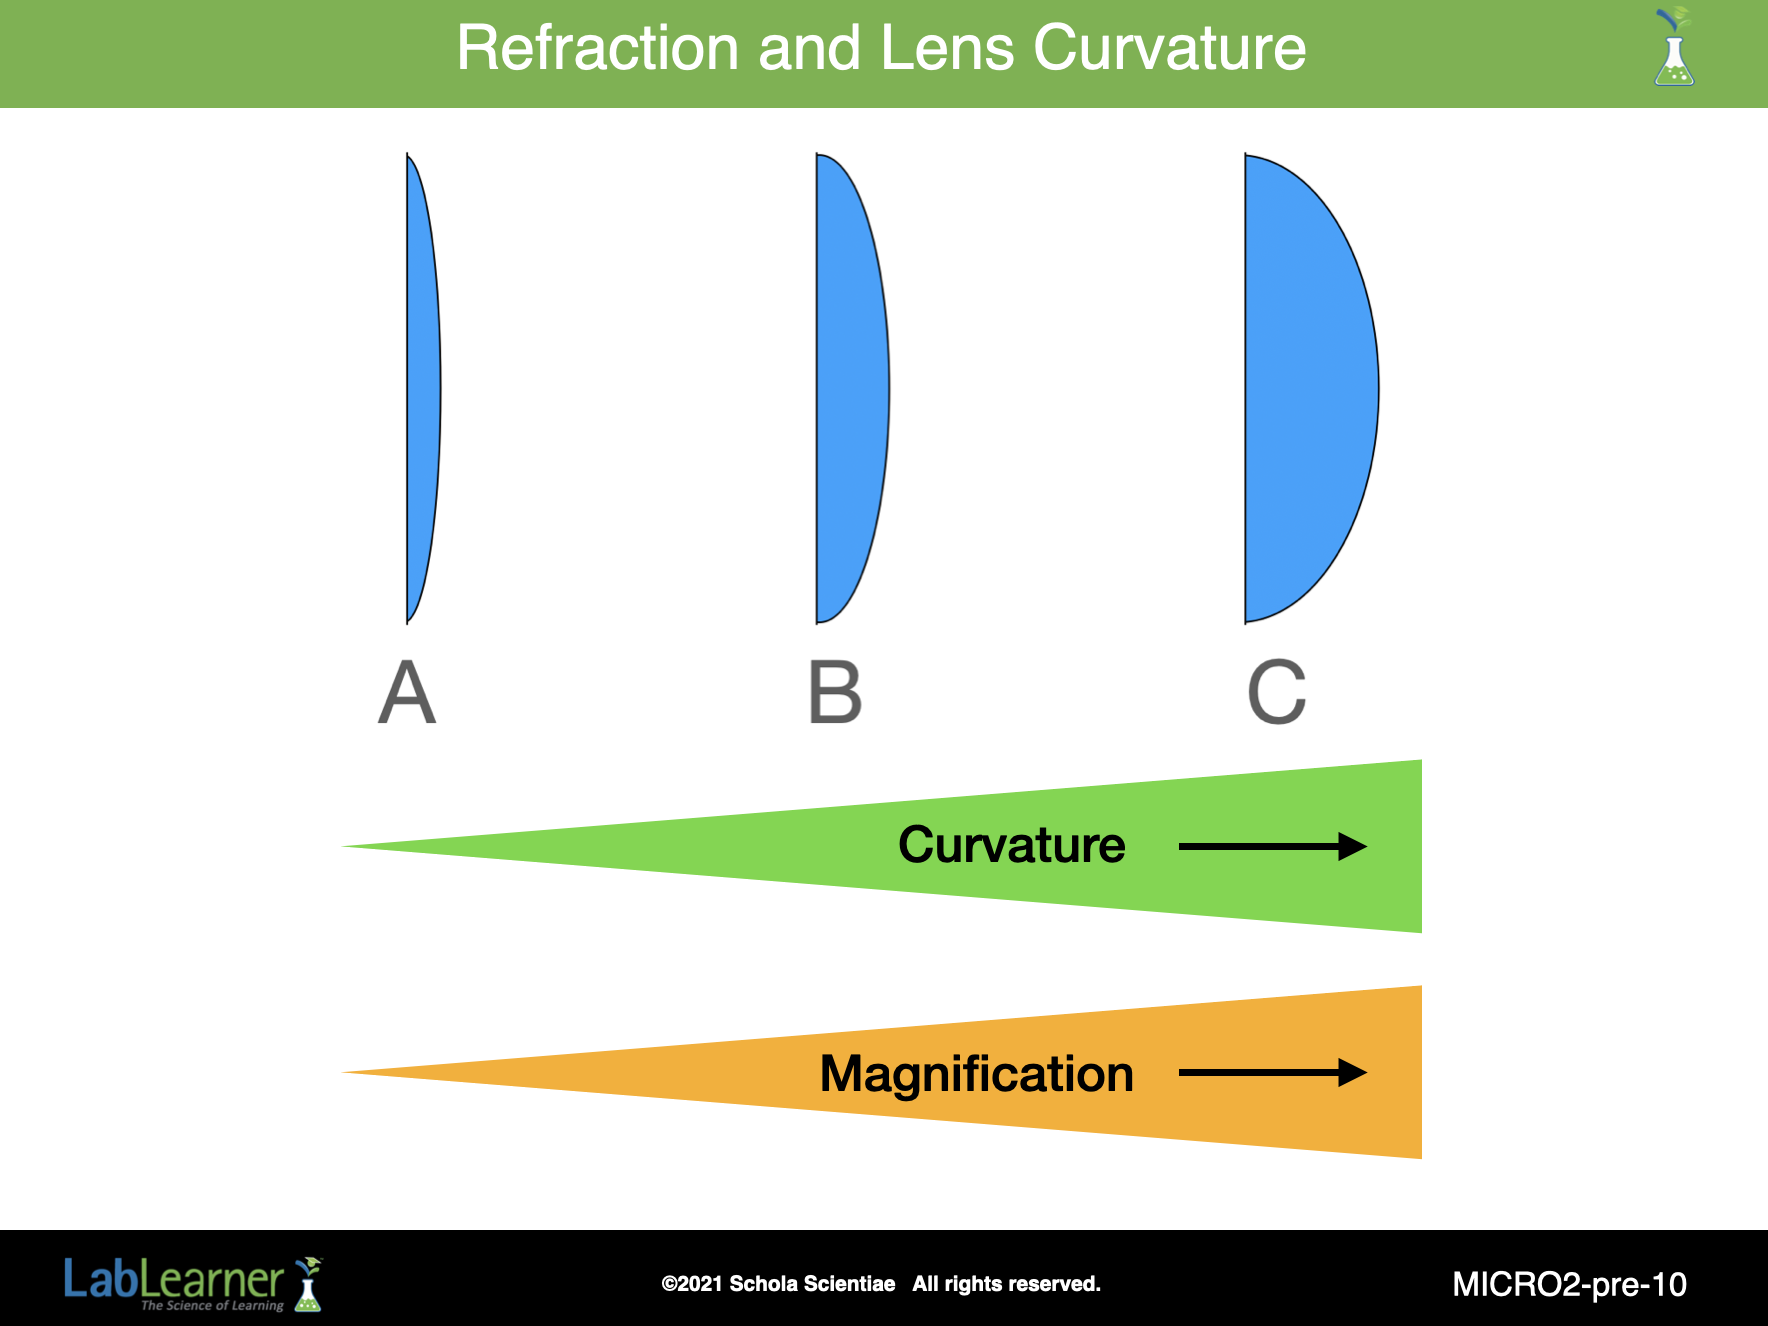
SLIDE MICRO2-pre-10
This final slide simply relates the curvature of a lens to its magnifying power.
______________________________________________
WATCH IT
Play the following Student Video in preparation for the lab. Discuss as necessary to answer student questions.