Teacher Portal:
Watersheds
Investigation 3 – Lab

ZERO-IN
The italicized font represents information to be shared orally or physically completed with the students at this time.
The non-italicized font represents additional information included supporting the teacher’s understanding of the content being introduced within the CELL.
MINDSET
This Investigation is designed to:
- allow students to investigate the effects of water temperature, salinity, and water velocity on the dissolved oxygen content of water,
- build an understanding of the importance of dissolved oxygen in a watershed,
- allow student discovery of the ways that salinity, temperature, and water velocity can affect the dissolved oxygen content of water, and
- introduce students to the use and operation of oxygen meters.
BE PREPARED
Teacher Preparation for the Investigation includes the following. This preparation should be done prior to students arriving in the lab.
- At least 24 hours before the Investigation, prepare the salt solutions (see directions below). Salt solutions must be prepared in advance to be sure that any degassing caused by the addition of salt to the water does not interfere with the dissolved oxygen readings. Salt solutions can be stored in plastic bottles until needed. The teacher may wish to prepare enough salt solutions for this Investigation and the Performance Assessment at one time. Note: Salt solutions must be prepared with distilled water and pickling salt or reagent grade sodium chloride (NaCl) for this Investigation. Pickling salt and reagent grade sodium chloride does not contain additives found in table salt that can interfere with obtaining accurate dissolved oxygen readings.
- Prepare 2 L of 15% salt solution.
A. Fill a 2 L flask to the 1500 ml mark with distilled water.
B. Add 300 grams of pickling salt or reagent grade NaCl to the flask.
C. Stir with a stir bar and hotplate/stirrer until all of the salt is in solution and most of the gas bubbles have dissipated.
D. Pour the solution into two 1L graduated cylinders. Fill the first graduated cylinder to 1000 ml and pour the remainder of the salt solution in the second 1L cylinder. Add distilled water to the second cylinder until it reaches the 1000 ml mark.
E. Remove the stir bar from the 2L flask and pour the contents of both graduated cylinders back into the flask.
F. Cover the flask with plastic wrap or aluminum foil and label the flask “15% salt.” Place the flask at the distribution center.
- Prepare 2 L of 30% salt solution.
A. Fill a 2 L flask to the 1500 ml mark with distilled water.
B. Add 600 grams of pickling salt to the flask.
C. Stir with a stir bar and hotplate/stirrer until all of the salt is in solution and most of the gas bubbles have dissipated.
D. Pour the solution into two 1L graduated cylinders. Fill the first graduated cylinder to 1000 ml and pour the remainder of the salt solution in the second 1L cylinder. Add distilled water to the second cylinder until it reaches the 1000 ml mark.
E. Remove the stir bar from the 2L flask and pour the contents of both graduated cylinders back into the flask.
F. Cover the flask with plastic wrap or aluminum foil and label the flask “30% salt.” Place the flask at the distribution center.
- For Trial 3, students will need boiled water. Before the class begins, fill a 2L flask with water and boil the water on a hotplate/stirrer. Once the water temperature reaches 90ºC, boil for 10 minutes. After 10 minutes, shut the hotplate/stirrer off and let the water cool on the hotplate until needed.
- Obtain ice and keep it in a freezer or cooler until needed. Place the ice at the distribution center at the beginning of class. You will need approximately two bags of ice per class.
- Place 6L of distilled water at the distribution center.
- Place the remaining materials at the distribution center
- Divide the class into five cooperative groups.
Student Preparation for the Investigation includes having students gather the following materials. This preparation takes place on lab day after student lab groups have settled at their assigned lab tables.
Note: The materials are listed in students’ SDRs. They are also listed below for your reference.
- (6) beakers, 400 ml
- (1) stir bar
- (1) hot plate/stirrer
- (1) oxygen meter
- (1) ring stand with clamp
- (1) stopwatch
- (1) thermometer (-20ºC – 150ºC)
- (1) hot hand protectors
- (1) small bucket
- (1) graduated cylinder, 1 L
- (2) plastic droppers
- ice
- 900 ml distilled water
- 300 ml 15% salt solution
- 300 ml 30% salt solution
- 300 ml boiled water
- (1) water bottle with water
Direct one student from each lab group to collect the materials listed in their SDRs.
INVESTIGATE
- Explain to students that the Investigation consists of two Trials.
- In Trial 1, students combine three different materials to form their sample of model soil.
- In Trial 2, students will investigate the different particle sizes found in their soil samples.
- Encourage students to reflect on the PreLab video as they move through the procedural steps.
- Explain to students that during the Experiment, every procedural step is important. If one step is skipped, data can become invalid. To help students keep on track, direct them to read each step thoroughly, complete the step, then check it off (Read it – Do it – Check it off).
- Direct students to complete the procedural steps in their SDRs.
Note: The procedural steps are listed below for your reference. Teacher “Notes” are inserted, as needed, to help facilitate the lab.
Trial 1:
1. In this trial, you will investigate the effect of temperature on dissolved oxygen content.
A. Fill the bucket with ice until it is about half full. Add 200 ml of water to make an ice bath.
B. Fill 2 of the 400 ml beakers to the 300 ml mark with distilled water.
C. Place one of the beakers in the ice bath to chill. The other beaker will remain at room temperature.
D. Use the thermometer to find the temperature of the water in the beaker at room temperature.
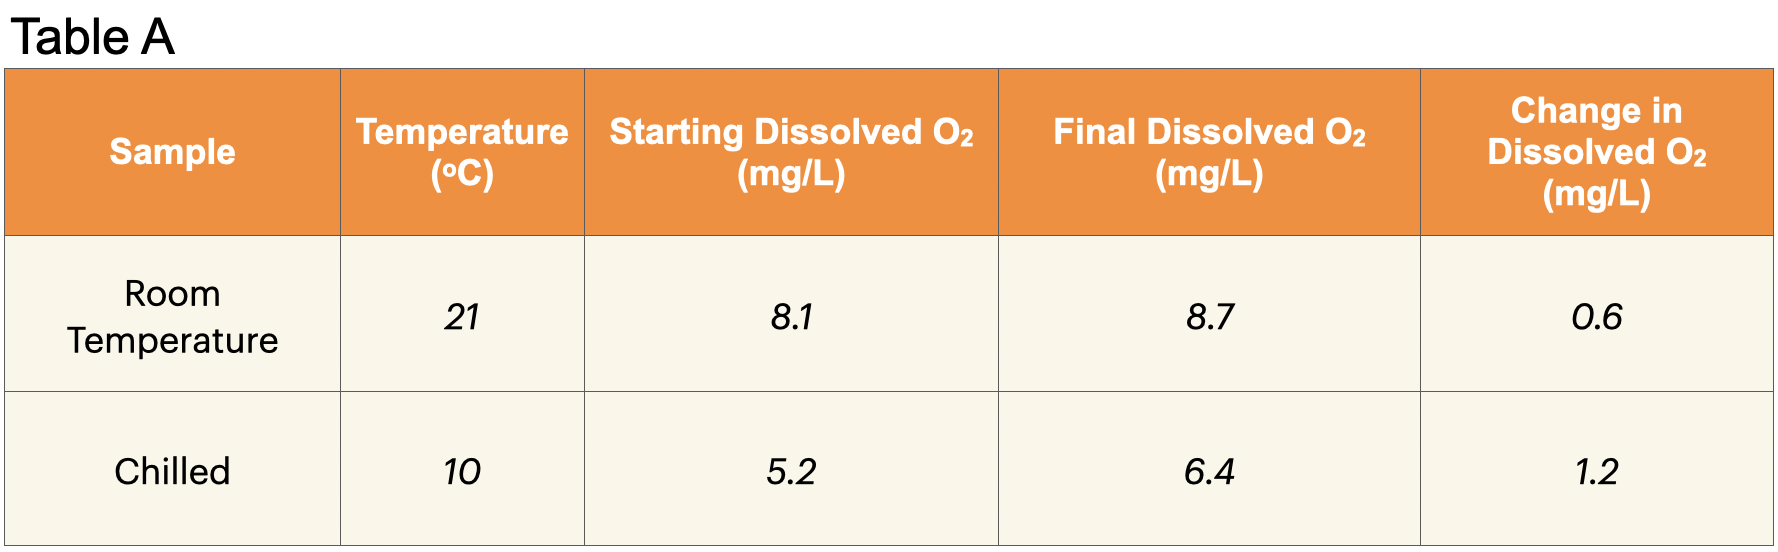
2. Record: Write the temperature of the room temperature water in Table A.
3. Remove the thermometer.
4. Calibrate the oxygen meter. Refer to the Oxygen Meter Calibration procedure if you need help.
5. Put a stir bar in the beaker and put the beaker on the hot plate/stirrer. Make sure that both the heat and stir knobs are on “off.” If you need help, refer to the procedure, Hot Plate/Stirrer Use and Operation.
6. Place a ring stand with a clamp attached next to the hot plate/stirrer.
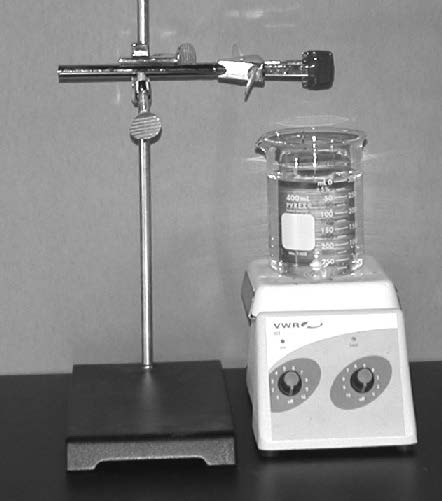
7. Attach the oxygen meter probe to the ring stand with the clamp. Tighten the clamp around the top of the probe so that it does not move.
8. Lower the probe into the water by lowering the clamp on the ring stand.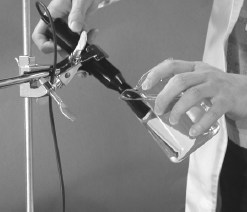
A. Loosen the probe and tip the beaker so that the probe enters the water at an angle.
B. Once the probe is in the water, straighten the probe and tighten the clamp. The beaker should be sitting on the hot plate/stirrer.
C. Lower the probe into the water until it is approximately 1 cm from the bottom of the beaker. The probe should be next to the edge of the beaker. Make sure the hole for the temperature sensor is covered by the water.
D. Make sure that there are no large air bubbles on the tip of the oxygen probe. If there is a bubble, remove the probe from the water and lower it in the water at an angle. Place the probe back in the clamp.
9. Measure the dissolved oxygen content of the water at room temperature.
A.. Turn the stir knob on the hot plate/stirrer to 200 rpm (Setting 3) and stir for 2 minutes. Keep time with the stopwatch.
B. After 2 minutes press the record button on the oxygen meter. Record the oxygen measurements for 30 seconds.
C. After 30 seconds, press the recall (CALL) button. Press the button three times to get the average measurement. AVG will show on the screen.
D. Record: Write the average dissolved oxygen concentration in Table A under “Starting Dissolved Oxygen.”
E. Press the record button again to setup the oxygen meter for the next reading.
10. Turn off the stirrer.
11. Bubble air into the water for 3 minutes.
A. Use 2 plastic droppers to make bubbles in the water. Transfer water out of and into the beaker as quickly as possible using the droppers.
B. Use the stopwatch to keep time.
12. After 3 minutes, remove the plastic droppers.
13. Turn the stir knob on the hot plate/stirrer to 200 rpm (Setting 3). Stir for 2 minutes.
14. Measure the dissolved oxygen content of the water after bubbling.
15. Record: Write the average dissolved oxygen concentration in Table A under “Final Dissolved Oxygen.”
16. Calculate: Find the change in dissolved oxygen concentration. Subtract the starting concentration from the final concentration.
17. Record: Write the change in dissolved oxygen concentration in the final column of Table A.
18. Remove the beaker of water from the ice bath. Use the thermometer to find the temperature of the water.
19. Record: Write the temperature of the chilled water in Table A.
20. Measure the oxygen content of the chilled water before and after bubbling. Use the same steps as for the room temperature water.
Trial 2:
1. In Trial 2 you will investigate the effect of salinity (salt concentration) on dissolved oxygen content.
A. Fill a clean 400 ml beaker to the 300 ml mark with distilled water.
B. Put the stir bar in the beaker and put the beaker on the hot plate/stirrer. Make sure that both the heat and stir knobs are set to “off.”
C. Lower the probe into the water until it is approximately 1 cm from the bottom of the beaker. The probe should be next to the edge of the beaker. Make sure the hole for the temperature sensor is covered by the water.
2. Measure the dissolved oxygen content of the distilled water.
A. Make sure the switch on the oxygen meter is on the dissolved oxygen (DO) setting.
B. Turn the stir knob to 200 rpm (Setting 3) and stir for 2 minutes. Keep time with the stopwatch.
C. Press the record button on the oxygen meter. Record the oxygen measurements for 30 seconds.
D. After 30 seconds press the recall (CALL) button on the oxygen meter. Press the button three times to get the average measurement. AVG will show on the screen.
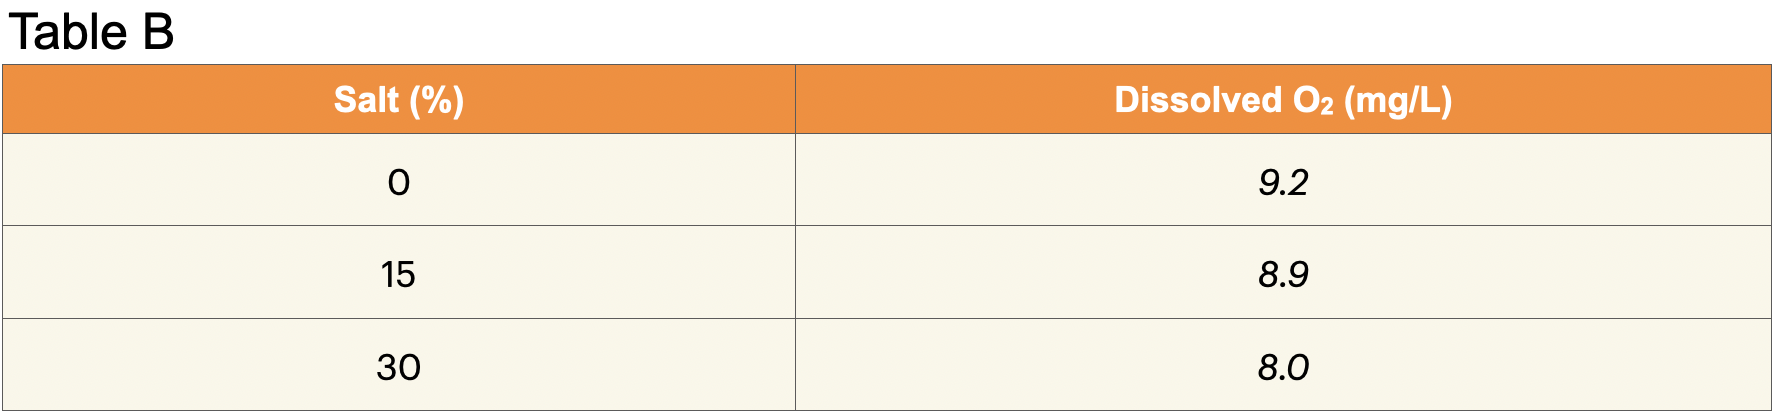
E. Record: Write the average dissolved oxygen concentration in Table B in the row labeled “0%.”
F. Press the record button again to set up the oxygen meter for the next reading.
3. Fill a clean 400 ml beaker with 300 ml of 15% salt solution.
4. Measure the dissolved oxygen content of the 15% salt solution.
5. Record: Write the average dissolved oxygen concentration for the 15% salt solution in Table B.
6. Rinse the tip of the oxygen probe with water from the water bottle to remove all of the salt.
7. Fill a clean 400 ml beaker with 300 ml of 30% salt solution.
8. Measure the dissolved oxygen content of the 30% salt solution.
9. Record: Write the average dissolved oxygen concentration for the 30% salt solution in Table B.
10. When you are finished with the salt solutions, rinse the tip of the oxygen meter probe with water to remove all traces of salt.
Trial 3:
1. In Trial 3 you will investigate the effect of water velocity on dissolved oxygen content.
A. Fill the bucket with ice until it is about half full. Add 200 ml of water to make an ice bath.
B. Your teacher will fill the beaker with boiled water. Using hot hand protectors, carefully place the beaker of boiling water into the ice bath.
C. Put the thermometer into the boiled water. Gently stir the water to get an accurate temperature reading.
D. Locate 30ºC on the thermometer. When the water has cooled to 30ºC, remove it from the ice. Gently stir the water to get an accurate temperature reading.
E. Remove the thermometer from the beaker. Put the beaker on the hot/plate stirrer.
F. Set the heat knob to 100 ºC (Setting 2) to keep the water temperature constant at 30 °C.
G. Place the stir bar in the beaker.
H. Lower the probe into the water until it is approximately 1 cm from the bottom of the beaker. The probe should be next to the edge of the beaker. Make sure the hole for the temperature sensor is covered by the water.
2. Measure the dissolved oxygen content of the water at the stir velocity of 200 rpm (Setting 3). This represents water with a low velocity.
A. Make sure the switch on the oxygen meter is on the dissolved oxygen (DO) setting.
B. Stir for 5 minutes. Keep time with the stopwatch.
C. Press the record button on the oxygen meter. Record the oxygen measurements for 30 seconds.
D. After the 30 seconds, press the recall (CALL) button on the oxygen meter. Press the button three times to get the average measurement. AVG will show on the screen.
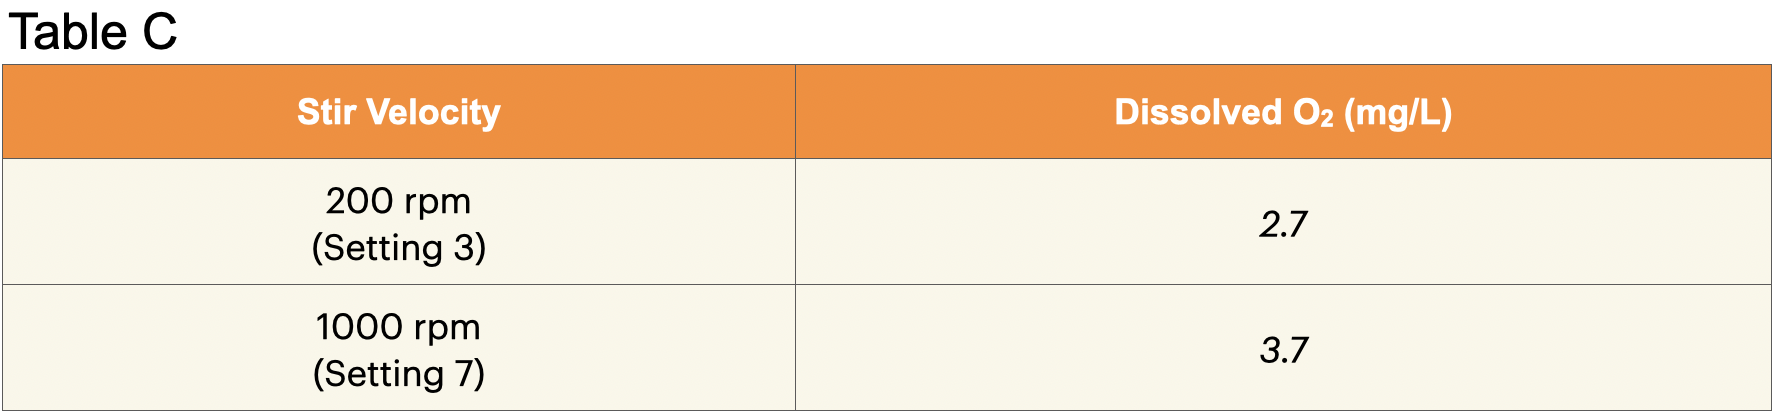
E. Record: Write the average dissolved oxygen concentration for 200 rpm (Setting 3) in Table C.
3. Measure the dissolved oxygen content at the stir velocity of 1000 rpm (Setting 7) in the same way. This represents water with a higher velocity.
4. Record: Write the average dissolved oxygen concentration for 1000 rpm (Setting 7) in Table C.
CLEAN UP
Let students know your expectations for clean up. Ask them to clean up.