Teacher Portal:
Sound Waves and Pressure
Investigation 1 – Lab

ZERO-IN
Italicized font represents information to be shared orally or physically completed with the students at this time.
The non-italicized font represents additional information included to support the teacher’s understanding of the content being introduced within the CELL.
MINDSET
This Investigation is designed to:
- demonstrate to students that the back and forth movement of objects are the vibrations that create sound,
- allow students to create sounds by causing matter to vibrate in standing waves,
- allow students to experience how vibrations and the resulting sounds can be transferred from one object to another,
- demonstrate that vibrations consist of nodes and antinodes,
- demonstrate to students the relationship between wavelength and frequency, and
- allow students to create sounds in a recognizable way.
BE PREPARED
Teacher Preparation for the Investigation includes the following. This preparation should be done prior to students arriving in the lab.
- Cut six 1 meter lengths of string.
- Place all materials at a central location.
- Divide students into five cooperative groups.
Note: Each student lab group will need the materials listed below.
Student Preparation for the Investigation includes having students gather the following materials. This preparation takes place on lab day after student lab groups have settled at their assigned lab tables.
Note: The materials are listed in students’ SDRs. They are also listed below for your reference.
- (1) meter stick
- (1) metric ruler
- (1) length of string one meter long
- (1) lab marker
Direct one student from each lab group to collect the materials listed in their SDRs.
INVESTIGATE
- Explain to students that all matter is able to vibrate and that these vibrations are what cause sound.
- Ask students to place their forefinger and thumb on either side of the front of their throat and hum.
- Ask students what they hear and feel. Students should be able to feel their vocal cords vibrating and hear their humming.
- Explain to students that the back and forth vibrations of their vocal cords cause the sound that they hear.
- Explain to students that the vibrations of their vocal cords cause the surrounding air to vibrate and that the vibrations of the gas molecules in the air cause their ear drums to vibrate. This allows them to hear the sound of their humming or of any other sound.
- Explain to students that they will demonstrate the nature of the vibrations that cause sound.
- Encourage students to reflect on the PreLab video as they move through the procedural steps.
- Explain to students that during the Experiment, every procedural step is important. If one step is skipped, data can become invalid. To help students keep on track, direct them to read each step thoroughly, complete the step, then check it off (Read it – Do it – Check it off).
- Direct students to complete the procedural steps in their SDRs.
Note: The procedural steps are listed below for your reference. Teacher “Notes” are inserted, as needed, to help facilitate the lab.
Trial 1:
- Place the meter stick on the lab table with the first 10 cm (from the 0 mark to the 10 cm mark) extending over the edge.
- One group member should place their hand on the meter stick at the 10 cm mark and press down firmly.
- Another group member should grasp the free end of the meter stick and bend it up slightly. They should then let go so that the meter stick vibrates.
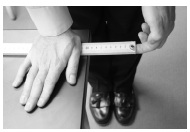
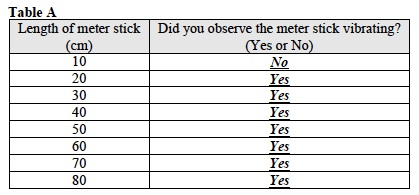
- Observe the motion of the free end of the meter stick as it vibrates. If necessary, repeat the procedure. Record your observations in Table A.
- Repeat the same procedure with 20, 30, 40, 50 and 60 cm of the meter stick extending over the edge of the table. If necessary, repeat the procedure for each length. Record your observations in Table A.
- Answer the following questions.
- As you increased the length the meter stick extended over the edge of the table from 20 cm to 80 cm, did the meter stick vibrate more slowly or more rapidly? The meter stick vibrated more slowly.
- As you increased the length of the meter stick further over the edge of the table did the frequency of the vibrations increase or decrease? The frequency of the vibrations decreased as the length of the meter stick increased.
- When the meter stick was extended only 10 cm over the edge of the table why do you think that it was difficult to see the vibrations? It was difficult to see the vibrations because the meter stick was vibrating too rapidly.
- As you increased the length the meter stick extended over the edge of the table, why did it vibrate with lower frequencies? Student answers may vary. As more of the meter stick was extended over the edge of the table, the amount or mass of wood that was allowed to move increased. The increased mass could not vibrate as quickly so the frequency decreased.
Trial 2:
- In this Trial, you will analyze the frequencies and wavelengths of different standing waves in vibrating lengths of string.
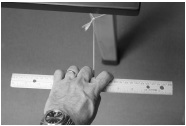
- Tie one end of the string around the top of one of the legs of the lab table.
- Using the meter stick, measure 10cm from the knot that you used to tie the string. Mark the 10cm length on the string with the lab marker.
- Measure and mark the string 20, 30, 40 and 50 cm from the knot.
- Wrap the free end of the string around the center of the metric ruler so that 50cm of string extends from the knot to the ruler. The 50 cm mark on the string should be close to the edge of the ruler.
- Grasp the ruler in the center with your fingers on either side of the string but not touching it. Pull on the string and pluck or strum the string with the fingers of your other hand.
- All members of the lab group should observe the motion of the string and listen to the sound.
- Continue wrapping the free end of the string around the center of the metric ruler so that 40 cm of string extends from the knot to the ruler. The 40 cm mark on the string should be close to the edge of the ruler.
- Grasp the center of the ruler with your fingers on either side of the string but not touching it. Pull on the string with the same amount of force that you used before. Pluck the string with the fingers of your other hand.
- All members of the lab group should observe the motion of the string and listen to the sound.
- Repeat the same procedure for the 30, 20 and 10 cm lengths of string. Remember to pull on the string with same amount of force.
- Repeat the procedure for each length so every group member takes a turn.
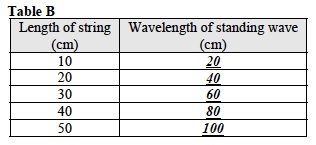
- Calculate the wavelength of each wave by multiplying the length of each length of string by 2. Record the wavelengths in Table B.
- Answer the following questions.
- As you decreased the wavelength of the standing wave did the string vibrate more slowly or more rapidly? The string vibrated more rapidly as the wavelength of the standing wave was decreased.
- As you decreased the wavelength of the standing wave did the frequency of the vibrations increase or decrease? The frequency of the vibrations increased as the wavelength of the standing wave was decreased.
- As you decreased the wavelength of the standing wave, why did it vibrate with higher frequencies? Student answers will vary. As the wavelength of the standing wave was decreased, the frequency increased because there is an inverse relationship between wavelength and frequency.
- In Trial 1 you used different lengths of a vibrating meter stick to generate sounds of different frequencies. In Trial 2, you used different lengths of string to generate sounds of different frequencies. What is the relationship of the wavelength of the standing wave in the meter stick and the length it extended over the edge of the table? As the length the meter stick that was extended over the edge of the table increased, the wavelength of the standing wave also increased.
Trial 3:
- In this Trial, you will analyze a sequence of sounds generated by a vibrating meter stick.
- Place the meter stick on the lab table, with the first 15 cm (from the 0 mark to the 15 cm mark) extending over the edge. Place one hand on the meter stick at the 15 cm mark and press down.
- Move the meter stick so that different lengths of extend over the edge of the lab table. You will use the sequence of lengths shown in Table B.
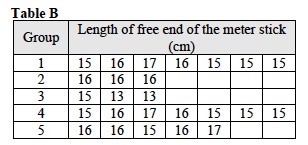
- There are five groups of lengths. There are three, five or seven lengths in each group. Read the sequence of lengths from left to right starting with Group 1 and then go to Group 2, Group 3, etc., until you have finished with Group 5. Pause after you have finished each Group.
- For each length in Table B, pluck the free end of the meter stick once.
- As you pluck the meter stick, listen to the sequence of frequencies and try to determine what song you are playing.
- What song did you just play? Mary Had a Little Lamb
CLEAN UP
Let students know your expectations for clean up. Ask them to clean up.