Teacher Portal:
Light
Investigation 3 – Lab
ZERO-IN
Italicized font represents information to be shared orally or physically completed with the students at this time.
The non-italicized font represents additional information included to support the teacher’s understanding of the content being introduced within the CELL.
MINDSET
This Investigation is designed to
- show students how the absorption, transmission, and reflection of different wavelengths of light affect the way in which they perceive the color of objects, and
- introduce students to a new tool in their Procedural Toolbox determination of absorbance spectra.
BE PREPARED
Teacher Preparation for the Investigation includes the following. This preparation should be done prior to students arriving in the lab.
- Fill two-liter pitchers with 1000 ml of water.
- Place the materials at the distribution center.
- Divide the class into five cooperative groups.
Note: Note: In this experiment, each group of students should be divided into Team A and Team B. Team A will perform Trial 1 and then Trial 3. Team B will perform Trial 3 and then Trial 2. Trials 1 and 3 will run simultaneously. Students will then reverse roles and perform Trials 2 and 3 simultaneously.
Note: Each student lab group will need the materials listed below.
Student Preparation for the Investigation includes having students gather the following materials. This preparation takes place on lab day after student lab groups have settled at their assigned lab tables.
Note: The materials are listed in students’ SDRs. They are also listed below for your reference.
- (1) spectrophotometer
- (1) cuvette
- (10) gram blocks: 1 orange, 1 yellow, 1 light green, 1 brown, 1 blue, 1 black, and 1 white
- (1) 400 ml beaker
- (3) 100 m beakers each filled with 100 m of water
- (1) set of color filters (red, green, and blue)
- (1) sheet of white paper
- (1) flashlight
- (1) metric ruler per student
- (1) 100 ml graduated cylinder
- (1) water bottle
- (1) glass stir rod
- (1) small red bear
- (1) box of Kim wipes
- red food coloring, green food coloring, blue food coloring
- paper towels
Direct one student from each lab group to collect the materials listed in their SDRs.
INVESTIGATE
- Explain to students that in this third Investigation they will investigate the relationship between the light reflected, transmitted, or absorbed by an object and the object’s color.
- Explain to students that as they conduct the investigation they should ask themselves whether there is a difference in the wavelengths of light that are absorbed, reflected, and transmitted through or by different colored objects.
- Instruct students to record the order they will be performing the trials in the first question of the Investigation Three Data Record. Point out to students that they should read the instructions that correspond with the trial they are performing.
- Encourage students to reflect on the PreLab video as they move through the procedural steps.
- Explain to students that during the Experiment, every procedural step is important. If one step is skipped, data can become invalid. To help students keep on track, direct them to read each step thoroughly, complete the step, then check it off (Read it – Do it – Check it off).
- Direct students to complete the procedural steps in their SDRs.
Note: The procedural steps are listed below for your reference. Teacher “Notes” are inserted, as needed, to help facilitate the lab.
The Experiment includes the following:
- Which trial are you performing first? __ Which trial are you performing second? __
- You will use a spectrophotometer as a part of your experiment. Turn on the spectrophotometer so that it can warm up and will be ready for use later in the Investigation.
- Prepare three solutions of colored water (green, red, and blue) as follows:
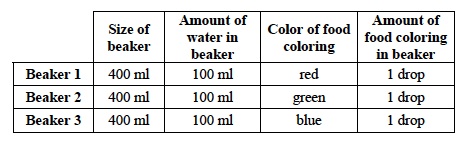
- Stir each solution until completely mixed.
Trial 1: Determination of Absorbance Spectra from 400 nm – 550 nm
- If necessary, review the procedures Spectrophotometer Use and Operation and Determination of an Absorbance Spectra, if you need help.
- Prepare the spectrophotometer for use:
A. Set wavelength to 400 nm.
B. Make sure the sample compartment is empty and the lid is closed.
C. Fill a cuvette with water (the blank) and wipe carefully. Place in the sample compartment.
D. Zero the spectrophotometer. e. Remove cuvette and empty water back into the beaker.
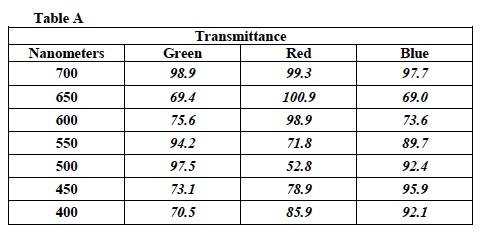
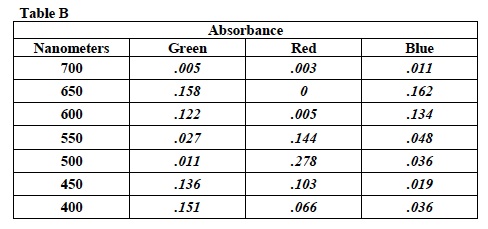
3. Determine the transmittance and absorbance for the solutions in Beakers 1 through 3 at 400 nm:
A. Fill the cuvette with the sample and wipe it clean of fingerprints and solution.
B. Place the cuvette in the sample compartment.
C. Close the lid and record the percent transmittance for the sample in Table A.
D. Change the mode to “Absorbance” and record the absorbance in Table B.
E. Remove the sample from the chamber and pour it back into its beaker.
F. Rinse the cuvette thoroughly and make sure it is as dry as possible.
G. Repeat steps a through f for the remaining two samples.
Note: Students MUST use the same cuvette to test the entire spectra in order to produce accurate results.
- Change the wavelength to 450 nm and repeat the procedure to zero the spectrophotometer.
Note: Students MUST zero the spectrophotometer each time the wavelength is changed.
- Repeat the procedure to collect data at 450 nm.
- Zero the spectrophotometer and repeat the procedure to collect data at 500 nm.
- Zero the spectrophotometer and repeat the procedure to collect data at 550 nm.
Trial 2: Determination of Absorbance Spectra from 600 nm – 700 nm
- In this trial, you will continue to determine the absorbance and transmittance values for the solution at wavelengths of 50 nm intervals. Begin with light of 600 nm wavelength and end with light of 700 nm wavelength.
- Zero the spectrophotometer and repeat the procedure to collect data at the following wavelengths:
A. 600 nm
B. 650 nm
C. 700 nm
Trial 3: Test the absorbance and reflection of opaque objects
- Verify the wavelengths of light that pass through each filter. Locate the red, green, and blue filters. The color of the filter indicates the wavelength that passes through it. For example, the red filter only permits red wavelengths of light to pass through it, not
 green or blue wavelengths of light.
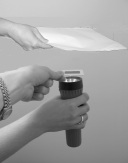
A. Turn on the flashlight and hold it so that the light shines toward the ceiling.
B. Hold the red filter above the light that is projected from the flashlight.
C. Hold a piece of white paper approximately 10 cm above the red filter.
D. Repeat steps a-c for the green and blue filters. e.
F. Record: Write the color you see reflected on the paper in Table C.

2. Look through each filter at different opaque objects.
A. If an object is viewed through a red filter and appears black, the object absorbs red wavelengths of light.
B. If an object is viewed through a red filter and appears red, the object reflects red wavelengths of light.
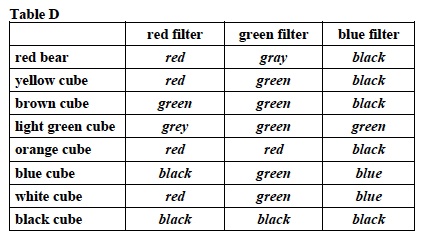
3. Look at the red bear and colored gram cubes through the red, green, and blue filters.
4. Record: The color of each object when viewed through the different filters should be recorded in Table D.
- Compile: Share your data from Trials 1 and 2 with the other members of your group. Use the data to complete Table A and Table B.
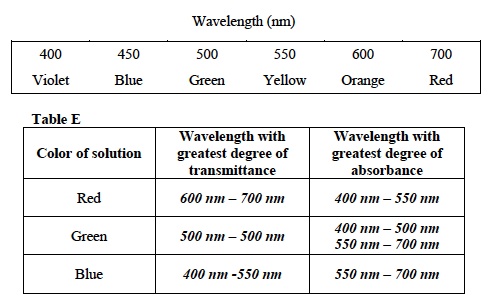
- The figure below lists the wavelengths of several different “colors” of light. Which wavelength had the greatest percent transmittance for each color of solution? Record your answer in Table E below.
- Which wavelength had the greatest absorbance for each color of solution? Record your answer in Table E below.
CLEAN UP
Let students know your expectations for clean up. Ask them to clean up.