Teacher Portal:
Light
Investigation 2 – Lab
ZERO-IN
Italicized font represents information to be shared orally or physically completed with the students at this time.
The non-italicized font represents additional information included to support the teacher’s understanding of the content being introduced within the CELL.
MINDSET
This Investigation is designed to:
- introduce students to a third way in which light interacts with a medium or object, reflection,
- introduce students to the Law of Reflection,
- provide students with experience in measuring angles of incidence and reflection, and
- assess student understanding of the Law of Reflection as they apply its principles in order to solve a problem
BE PREPARED
Teacher Preparation for the Investigation includes the following. This preparation should be done prior to students arriving in the lab.
- Photocopy one copy of the protractor sheet for each student group. The protractor sheet can be found on the last page of Investigation Two lesson plans.
- Place the materials at the distribution center.
- Divide the class into five cooperative groups.
Note: Each student lab group will need the materials listed below.
Student Preparation for the Investigation includes having students gather the following materials. This preparation takes place on lab day after student lab groups have settled at their assigned lab tables.
Note: The materials are listed in students’ SDRs. They are also listed below for your reference.
- (1) protractor sheet
- (1) 49 cm. x 57 cm. piece of paper
- (4) wood blocks
- (4) small mirrors
- (1) 5 cm ball of clay
- (1) large (12 g) bear
- (1) metric ruler
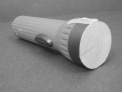
- (1) flashlight
- (2) note cards
- (1) protractor
- (2) pieces of scotch tape
- (3) blank sheets of paper
- (1) scissors
Note: Please note that the protractor sheets have the right side labeled as “A” and the left side labeled as “B”. These are reference points for the students.
Direct one student from each lab group to collect the materials listed in their SDRs.
INVESTIGATE
- Remind students that in the second Investigation they will explore a third way in which light interacts with matter: reflection.
- Encourage students to reflect on the PreLab video as they move through the procedural steps.
- Explain to students that during the Experiment, every procedural step is important. If one step is skipped, data can become invalid. To help students keep on track, direct them to read each step thoroughly, complete the step, then check it off (Read it – Do it – Check it off).
- Direct students to complete the procedural steps in their SDRs.
Note: The procedural steps are listed below for your reference. Teacher “Notes” are inserted, as needed, to help facilitate the lab.
The Experiment includes the following:
- Place the flashlight on top of the index card. The light should face the index card.
- Trace around the head of the flashlight so that you see a circle on the index card. Cut out the circle.
- Cut a slit in the index card circle approximately 2.5 cm long and 1 mm wide from the edge of the index card to the center of circle
- Tape the index card circle to the head of the flashlight.
- Locate your protractor sheet.
A. Use the metric ruler to measure and mark the middle of the protractor along the 180° angle.
B. Mark the center of the line and draw a line from the halfway point to the 90-degree point on the protractor arch. 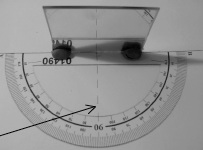 The perpendicular line is referred to as the normal line. Label the normal line on your protractor sheet.
C. Place a small piece of clay at both ends of the small mirror.
D. Place the mirror with the clay so it is centered along the 180° angle.
E. During the experiment, make sure the mirror stays upright and the clay does not interfere with the path of the light.
6. Place the flashlight at three angles from reference point A or side A of the mirror and protractor.
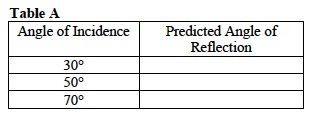
7. Record: Think about the Law of Reflection. Predict the angle at which light will be reflected off the mirror. Student predictions may vary.
Trial 1: Measure the Angle of Reflection
- Position the flashlight as follows:
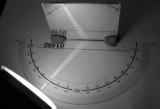
A. Place the flashlight at the 60° mark on the protractor. This produces a 30° angle of incidence.
B. Make sure the slit in the index card is flush against the protractor sheet.
C. The beam of light should shine along the 60° mark.
2. Use a pencil to trace the incident beam of light from the flashlight to the center of the mirror.
3. Trace from the center of the mirror along the reflected beam of light.
4. Remove the flashlight.
5. Record: Observe the lines and record the angle at which the light hits the mirror. Record the angle at which the beam of light was reflected from the mirror. Measure the angle from the normal line.
- Angle of Incidence = 30°
- Angle of Reflection = 30°
- Repeat the procedure to measure the angle of reflection for the following angles of incidence:
- Angle from side A= 40°
- Angle of Incidence = 50°
- Angle of Reflection = 50°
- Angle from side A= 20°
- Angle of Incidence = 70°
- Angle of Reflection = 70°
- What effect will turning the mirror have on the angles of incidence and reflection? Student answers will vary.
- Place the flashlight at a 90° mark from side A.
- Rotate the mirror 20° from reference point A.
- What should happen to the perpendicular reference line when you rotate the mirror? When the mirror is rotated 20°, the perpendicular line also rotates 20°.
- Record: Measure the angles of incidence and reflection before and after the mirror is rotated. Record your results in Table B.

Trial 2: Applying the Law of Reflection
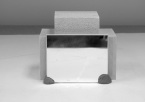
- Build a cave for the gram bear.
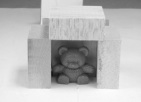
A. Place three wood blocks in the center of the large 49 cm x 57 cm piece of paper so that they form a U shape.
B. Place a fourth wood block on the top of the other wood blocks so as to form a roof for the “cave.”
C. Place the bear inside the cave.
2. Place one small mirror behind the cave. 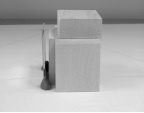
A. Put a small piece of clay on the bottom edge of the mirror to stand the mirror upright.
B. The mirror should face away from the cave.
3. Manipulate the remaining mirrors so that an image of the bear can be seen in the mirror at the back of the cave using the following directions:
- You may use all or some of the mirrors on your table.
- You must be able to see the image of the bear in the mirror. Use the mirror located on the back of the cave to see the bear. To do so, you must look directly at the mirror and not at the angle.
- Think about the Law of Reflection when creating your design.
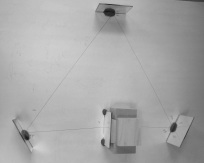
- Once the mirrors have been placed so that you can see the bear in the mirror placed on the back of the cave, draw a line along of the bottom of each mirror.
- Mark the location of the bear in the cave.
- Mark the location of the image of the bear in the mirror in the back of the cave.
- After the lines have been drawn, remove the mirrors.
A. Locate and mark the center of where each mirror stood.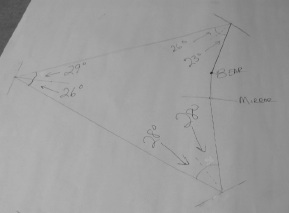
B. Draw a line connecting the dot that marked the position of the bear to the center of the first mirror.
C. Draw a line connecting the center of each mirror to the next mirror.
D. End by connecting the center of the last mirror used to the dot that marked the location of the image of the bear in the back mirror.
E. Using the protractor, measure the angles of incidence and reflection created as the image of the bear was reflected from the front to the back of the cave.
8. Create a chart or table that shows your results. A sample table is provided.

CLEAN UP
Let students know your expectations for clean up. Ask them to clean up.