Teacher Portal:
Kinetic and Potential Energy
Investigation 2 – Lab
ZERO-IN
Italicized font represents information to be shared orally or physically completed with the students at this time.
The non-italicized font represents additional information included to support the teacher’s understanding of the content being introduced within the CELL.
MINDSET
This Investigation is designed to:
- illustrate the conversion of energy from one form to another,
- introduce students to energy in the forms of electrical energy, light energy, and heat, and
- reinforce understanding of the Law of Conservation of Energy as it relates to the conversion of energy.
BE PREPARED
Teacher Preparation for the Investigation includes the following. This preparation should be done prior to students arriving in the lab.
- Place all materials at a central location.
Note: Each student lab group will need the materials listed below.
- Divide students into cooperative groups of five students.
Note: The first time the Styrofoam coolers are used, cut a hole in the bottom of each cooler for the thermometer. The hole should be made on one of the short sides of the cooler, as close to the edge as possible so that the thermometer bulb will be next to the inside wall of the cooler. The hole should be slightly smaller in diameter than the thermometer so that the thermometer fits snugly.
Student Preparation for the Investigation includes having students gather the following materials. This preparation takes place on lab day after student lab groups have settled at their assigned lab tables.
Note: The materials are listed in students’ SDRs. They are also listed below for your reference.
- (1) Light Meter
- (1) light socket
- (1) 40 W light bulb
- (1) 60 W light bulb
- (1) 75 W light bulb
- (1) 100 W light bulb
- (1) Styrofoam cooler
- (2) thermometers (-20ºC – 150ºC)
- (1) meter stick
- (1) stopwatch
- (1) small piece of clay
- (1) clear metric ruler
- (1) hot hand protector
- masking tape
- (1) calculator
Direct one student from each lab group to collect the materials listed in their SDRs.
INVESTIGATE
- Remind students that kinetic and potential energy are the two main types of energy.
- Remind students that in Investigation One, they looked at a kinetic and potential energy in the form of mechanical energy.
- Explain that there are many other forms of energy – elastic, chemical, electrical, thermal.
- Explain that many of these forms can be both kinetic and potential. For example, electrical potential energy depends on the position of charges in relation to each other. When the charges begin to move, it becomes electrical kinetic energy.
- Tell students that in this Investigation they will be looking at several different forms of energy.
- Encourage students to reflect on the PreLab video as they move through the procedural steps.
- Explain to students that during the Experiment, every procedural step is important. If one step is skipped, data can become invalid. To help students keep on track, direct them to read each step thoroughly, complete the step, then check it off (Read it – Do it – Check it off).
- Direct students to complete the procedural steps in their SDRs.
Note: The procedural steps are listed below for your reference. Teacher “Notes” are inserted, as needed, to help facilitate the lab.
Trial 1
- In this experiment, you will measure the light energy from a light bulb using the Light Meter.
Note: If students have not used Light Meters previously, begin the experiment by introducing the equipment and demonstrating how to read light intensity with the Light Meter. Remind students that the unit for light intensity in lux. Refer students to the procedure, Light Meter Use and Operation.
Note: Students will obtain more accurate light intensity readings if the lights in the classroom are turned off for the first part of the experiment. If it is a very sunny day, you may need to close the blinds in your classroom as well.
Note: Caution students that they should never touch a hot light bulb without hot hand protectors.
- Place the light socket on the lab table. Be sure that it is in a position where you can easily plug it in.
- Put a piece of masking tape on the lab table at the back of the light socket base.
- Place a second piece of masking tape on the lab table 40 cm away from the first piece.
- Place the light sensor on the second piece of masking tape. Stand the light sensor on the table so that the light sensor is facing the light socket. Clay can be used to steady the light sensor if it won’t stand by itself.
- Put the 40 watt light bulb in the light socket. Plug in the light socket, and turn on the light.
- Turn on the Light Meter and set it to measure light intensity according to the Procedure, Light Meter Use and Operation.
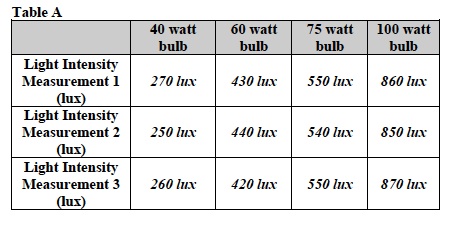
- Measure the light intensity in units of lux three times.

- Record: Write your measurements in the “40-watt bulb” column of Table A below. Sample data is shown below. Student answers may vary.
- Using the hot hand protectors remove the light bulb from the socket. Caution: The light bulb will be very hot.
- Measure the light intensity of the 60 W, 75 W, and 100 W light bulbs in the same way. If needed, use steps 1e through 1g to remind you.
- Record: Write your data in Table A.
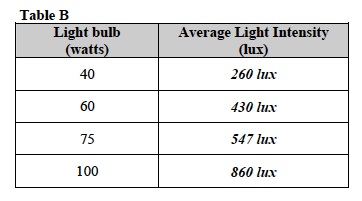
- Calculate the average lux for each light bulb. To find the average, add the values for the three measurements together. Then divide that number by 3. Write the averages in Table B.
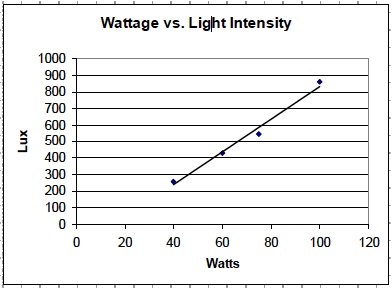
- Graph: Use the grid on the next page to make a graph that compares wattage with light intensity.
- Label the x-axis with the name and units of the independent variable.
- Label the y-axis with the name and units of the dependent variable.
- Determine how many tick marks you need for each axis. Label the tick marks.
- Plot your data.
- Draw a line of best fit through your data points. The line should pass near as many points as possible. There should be roughly the same number of points above and below the line. If you need help, refer to the procedure, Drawing of a Best Fit Line.
Trial 2
- Continue the experiment to investigate the conversion of light energy to other forms of energy.
- Place the 40 watt light bulb back in the light socket. Make sure that the light is turned off.
- Remove the Light Meter.
- Move the first piece of masking tape to the 10cm mark. Place the bulb and socket on the edge of the tape.
- Turn the Styrofoam cooler upside down and place the cooler over the light bulb and socket. The edge of the cooler should be touching the edge of the tape at the 40cm mark. The hole in the bottom of the cooler should be on the opposite edge from the light socket.
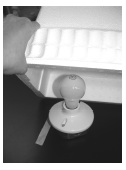
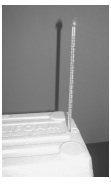
- Push a thermometer into the hole in the cooler so that the line on the bottom of the thermometer is at the top edge of the hole.
- Mold a small piece of clay around the thermometer to keep it in place.
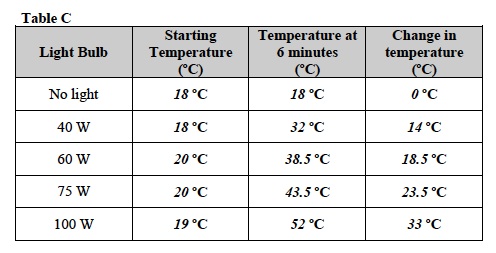
- Record: Read the temperature on the thermometer. Write the temperature in Table C under “Starting Temperature” for no light.
- Do not turn on the light. Start a stopwatch.
- Record: At the end of 6 minutes, read the temperature on the thermometer. Record the data in Table C. Put the temperature reading under “Temperature at 6 minutes” for no light and also under “Starting Temperature” for 40W.
- Turn on the light. The light should still be under the cooler.
- Start a stopwatch. Keep the light on for 6 minutes.
- Record: At the end of 6 minutes, read the temperature on the thermometer. Record the data in Table C.
- Shut off the light, and remove the cooler. Using hot hand protectors, remove the light bulb.
- Remove the thermometer and replace it with the other thermometer.
- Repeat the experiment for the 60 W, 75 W, and 100 W light bulbs. Switch thermometers after each trial.
- Record: Write the starting temperature and the final temperature for the remaining light bulbs in Table C.
CLEAN UP
Let students know your expectations for clean up. Ask them to clean up.