Teacher Portal:
Heat and Heat Transfer
Investigation 2 – Lab

ZERO-IN
The italicized font represents information to be shared orally or physically completed with the students at this time.
The non-italicized font represents additional information included supporting the teacher’s understanding of the content being introduced within the CELL.
MINDSET
This Investigation is designed to:
- allow students to investigate the relationship between the changes in thermal energy and the freezing and boiling point of water,
- allow students to explore physical changes in matter that accompany changes in thermal energy
- correlate heat transfer with changes in volume rather than temperature, and
- allow students to discover how the addition of a solute changes the freezing and boiling point of water.
BE PREPARED
Teacher Preparation for the Investigation includes the following. This preparation should be done prior to students arriving in the lab.
- For each student group, place approximately 300 g NaCl in a weigh dish.
- Put all materials at the distribution area.
- Divide the students into five cooperative groups then subdivide students into pairs at each lab table. Some trials will be performed as a table. Some trials will be performed as student pairs.
Student Preparation for the Investigation includes having students gather the following materials. This preparation takes place on lab day after student groups have settled at their assigned lab tables.
Note: The materials are listed in students’ SDRs. They are also listed below for your reference.
- Students at each table should obtain the following materials:
- (1) hot plate/stir plate
- (1) 400 ml beaker
- (1) liter pitcher filled with water
- (1) liter graduated cylinder
- (1) triple beam balance
- (1) weigh dish filled with NaCl
- (1) magnetic stir bar
- (1) test tube rack
- (1) bag of ice (approximately 5 liters)
- (1) stopwatch
- (4) weigh dishes
- (1) 5.6 L plastic container
- (1) pair of hot hands protectors.
- Students in each pair should obtain the following materials:
- (1) pair of goggles for each student
- (1) 100 ml graduated cylinder
- (3) test tubes
- (1) lab marker
- (1) metric ruler
- (1) weigh dish
- (1) glass thermometer
- (1) glass stir rod
- (1) stopwatch
- (3) 100 ml beakers
Direct one student from each lab group to collect the materials listed in their SDRs.
INVESTIGATE
- Inform students that during the Investigation they will compare the freezing point of pure water and water that contains increasing amounts of salt.
- Inform students that during the Investigation they will compare the boiling point of pure water and water that contains increasing amounts of salt.
- Encourage students to reflect on the PreLab video as they move through the procedural steps.
- Explain to students that during the Experiment, every procedural step is important. If one step is skipped, data can become invalid. To help students keep on track, direct them to read each step thoroughly, complete the step, then check it off (Read it – Do it – Check it off).
- Direct students to complete procedural steps in their SDRs.
Note: The procedural steps are listed below for your reference. Teacher “Notes” are inserted, as needed, to help facilitate the lab.
Note: In Trial 1 each student pair will prepare three different samples of water to test. However, all student pairs will work together to create the saltwater ice bath that will be used to cool the liquid samples.
Trial 1
- Work in pairs to prepare the following three solutions. Each pair should prepare the solutions below.
Pure water
- Use the 100 ml graduated cylinder to pour 50 ml of water into an empty 100 ml beaker.
- Use a piece of masking tape to label the beaker “Water (0 g NaCl /100 ml water).”
2.5 g NaCl in 100 ml water
- Use a weigh dish to obtain 1.25 g of NaCl.
- Pour 50 ml water into an empty 100 ml beaker.
- Stir the solution for 3 minutes with the glass stir rod to completely dissolve the NaCl.
- Label the beaker “2.5 g NaCl/100 ml water” with masking tape.
7.5 g NaCl in 100 ml water
- Use a weigh dish to obtain 3.75 g of NaCl
- Pour 50 ml water into an empty 100 ml beaker.
- Stir the solution for 3 minutes with the glass stir rod to completely dissolve the NaCl.
- Label the beaker “7.5 g NaCl /100 ml water” with masking tape.
- Prepare 3 test tubes.
- Place a glass thermometer in one empty test tube.
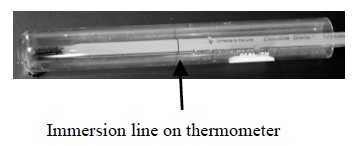
- Use the lab marker to place a line 1 cm above the immersion line of the thermometer.
- Repeat the procedure for the other two empty test tubes.
- Place a piece of masking tape at the TOP of each test tube.
- Label the three test tubes with the initials of one person in each pair and with information about the amount of NaCl in the three solutions. Use the diagram and table below for help.
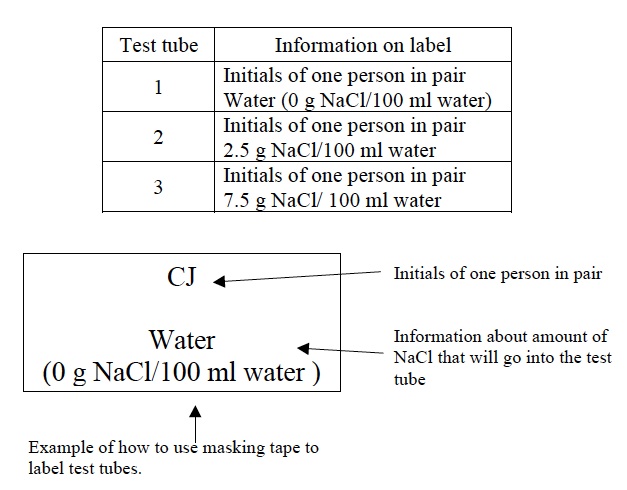
- Pour water from the 100 ml beaker into the test tube labeled “Water (0 g NaCl/ 100 ml water). Pour the water up to the black line on the test tube.
- Repeat the procedure using the 2.5 g NaCl/ 100 ml water and 7.5 g NaCl/100 ml water solutions for the test tubes labeled 2.5 g NaCl /100 ml water and 7.5 g NaCl/100 ml water.
- Place the 3 test tubes in the test tube rack.
- Work with the other student pairs to prepare one (1) saltwater ice bath for the TABLE. All student pairs will use the same saltwater ice bath for the experiments.
- Use the triple beam balance and two weigh dishes to obtain two samples of NaCl: 150 g of NaCl and 10 g of NaCl.
- Pour the 150 g of NaCl into the bottom of an empty 1 liter pitcher.
- Use the graduated cylinder to measure 250 ml of water.
- Pour the water into the liter pitcher containing the NaCl.
- Place the stir bar in the bottom of the liter pitcher.
- Place the liter pitcher on top of the hotplate/stir plate. Adjust the stir knob on the hotplate/stir plate so that the stir bar rotates quickly on the bottom of the liter pitcher.
- Stir the solution with the stir bar for 3 minutes.
- The NaCl will NOT completely dissolve.
- Place the liter pitcher into a plastic container.
- Add ice into the plastic container so that it surrounds the liter pitcher.
- Add 1 liter of ice into the liter pitcher. The ice should come to the 1000 ml mark on the liter pitcher.
- Pour the 10 g of NaCl over the top of the ice in the beaker.
- Each student pair should place the “Water (0 g NaCl/100 ml water” test tube into the saltwater ice bath. Make sure the level of the liquid in the test tube is BELOW the ice but that NO water from the ice bath moves into the test tube.
- Begin timing. Observe the level of the liquid in the thermometer.
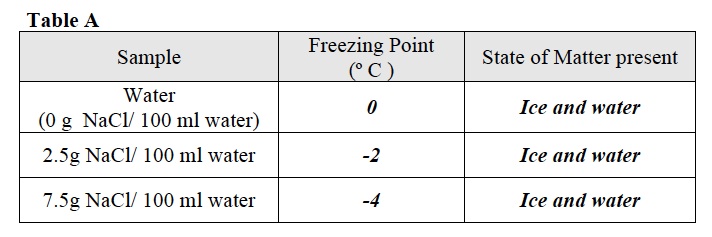
- Record: After 6 minutes record the temperature of the water inside the test tube in Table A.
- Remove the test tube from the saltwater ice bath. Gently shake the test tube. Observe the contents of the test tube.
- Question: What states of matter do you see in the test tube? Record your answer in Table A.
- Place the “water” test tube in the test tube rack.
- Place the 2.5 g NaCl/ 100 ml water test tubes in the saltwater ice bath. Repeat the same procedure, observing and then recording the temperature of the liquid after 6 minutes.
- Record the temperature of the 2.5 g/ 100 ml water solution and your observations in Table A.
- Remove the 2.5 g NaCl /100 ml water test tube from the saltwater ice bath.
- Place the 7.5 g NaCl/100 ml water test tube in the saltwater ice bath. Repeat the same procedure used for the other samples.
- Record the temperature and appearance of the 7.5 g NaCl/ 100 ml water solution after 6 minutes in Table A.
- Place all test tubes in the test tube rack and set the liter pitcher aside.
Trial 2
Note: In Trial 2 students will compare the boiling point of pure water and water than contains increasing amounts of salt.
Note: Students will work together as a table to perform Trial 2.
- Combine student pairs and work as a group for Trial 2.
- Prepare one beaker of boiling water for use at the table.
- Fill a 400 ml beaker with 300 ml of water.
- Place the beaker on the hot plate/stir plate.
- Turn the heat dial to the highest setting.
- Begin timing with the stopwatch.
- Check the water after approximately 10 minutes. It should have begun to boil.
- While waiting for the water to boil, use the triple beam balance and weigh dishes to obtain the following two samples of NaCl.
- 30 g NaCl in one weigh dish
- 30 g NaCl in a second weigh dish.
- If there is still time before the water boils, answer the questions in the Analysis section that follows Trial 2.
- Observe: After approximately 10 minutes, observe the water on the hot plate. Look for bubbles that have formed on the bottom of the water to rise to the top of the water.
- Observe: Once bubbles have been observed rising to the top of the beaker, re-set the stopwatch and wait 10 minutes.
- After 10 minutes, place the glass thermometer into the beaker.
- Observe the liquid in the glass thermometer. Wait until the liquid in the thermometer has stopped moving. This should take about 2 minutes.
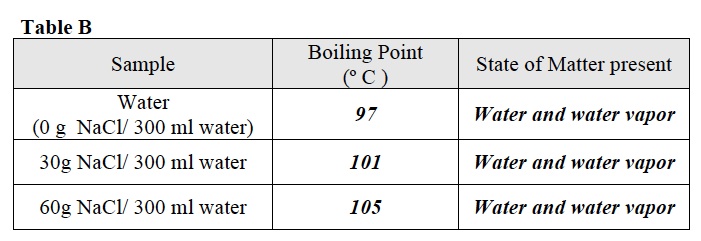
- Record the temperature in Table B. This is the boiling point of “water.
- Carefully add the 30 g sample of NaCl to the beaker of boiling water to create a 30 g NaCl/ 300 ml water solution. When the NaCl is added, there will be a large release of bubbles. Be careful to add the 30 g slowly and keep the face and eyes as far from the beaker as possible.
- Use a glass stir rod to stir the solution for approximately 30 seconds until the NaCl dissolves. The thermometer should remain in the beaker. Be careful not to hit the thermometer when stirring.
- Set the stopwatch. Begin timing for approximately 2 minutes.
- Record observations.
- After 2 minutes observe the liquid in the beaker and its temperature. If the liquid is boiling and the temperature is no longer changing, record your observations in Table B. If not, wait until the liquid boils and the temperature stabilizes, then record your data in Table B.
- Carefully add the second 30 g sample of NaCl to the beaker of boiling water to create a 60 g NaCl/ 300 ml water solution. When the NaCl is added, there will be a large release of bubbles. Be careful to add the 30 g slowly and keep the face and eyes as far from the beaker as possible.
- Use a glass stir rod to stir the solution for approximately 30 seconds. Most, if not all of the NaCl should dissolve. The thermometer should remain in the beaker. Be careful not to hit the thermometer when stirring.
- Set the stopwatch. Begin timing for approximately 2 minutes.
- Record observations.
- After 2 minutes observe the liquid in the beaker and its temperature. If the liquid is boiling and the temperature is no longer changing, record your observations in Table B. If not, wait until the liquid boils and the temperature stabilizes, then record your data in Table B.
- Turn the heat control on the hot plate to “off.” Remove the plug from the hot plate.
- Use the hot hands protectors to remove the beaker of liquid from the hot plate and place in the center of the table to cool.
CLEAN UP
Let students know your expectations for clean up. Ask them to clean up.