Teacher Portal:
Heat and Heat Transfer
Investigation 1 – Lab
 ZERO-IN
 ZERO-IN
The italicized font represents information to be shared orally or physically completed with the students at this time.
The non-italicized font represents additional information included supporting the teacher’s understanding of the content being introduced within the CELL.
MINDSET
This Investigation is designed to:
- introduce students to the concepts of heat, heat transfer, kinetic energy, and temperature,
- allow students to determine the physical changes in matter that occur with changes in, kinetic energy, heat, and temperature,
- allow students to calibrate their own thermometer,
- allow students to compare the accuracy of a thermometer they calibrate to a commercially made and calibrated thermometer, and
- allow students to discover how the thermometer utilizes the expansion and contraction of a liquid as a measure of the average kinetic energy of a substance or environment.
BE PREPARED
Teacher Preparation for the Investigation includes the following. This preparation should be done prior to students arriving in the lab.
- For each student group, place approximately 300 g NaCl in a weigh dish.
- Put all materials at the distribution area.
- Divide the students into five cooperative groups then subdivide students into pairs at each lab table. Some trials will be performed as a table. Some trials will be performed as student pairs.
Student Preparation for the Investigation includes having students gather the following materials. This preparation takes place on lab day after student groups have settled at their assigned lab tables.
Note: The materials are listed in students’ SDRs. They are also listed below for your reference.
- Students at each table should obtain the following materials:
- (1) hot plate/stir plate
- (1) 400 ml beaker
- (1) liter pitcher filled with water
- (1) liter graduated cylinder
- (1) triple beam balance; one weigh dish filled with NaCl
- (1) bag of ice (approximately 5 liters)
- (5) paper towels; and one (1) pair of hot hands protectors
- Students in each pair should obtain the following materials:
- (1) pair of goggles for each student
- (1) 400 ml beaker
- (1) liquid filled glass tube
- (1) white bucket
- (1) 100 ml graduated cylinder
- (1) test tube
- (1) lab marker
- (1) metric ruler
- (2) weigh dishes
- (1) glass thermometer
- (1) glass stir rod
- (1) stopwatch
- (2) 100 ml beakers
Direct one student from each lab group to collect the materials listed in their SDRs.
INVESTIGATE
-
- Inform students that the Investigation consists of four Trials.
- Explain that in the Trials students will create a thermometer from a glass tube then test the accuracy of their thermometer.
- Encourage students to reflect on the PreLab video as they move through the procedural steps.
- Explain to students that during the Experiment, every procedural step is important. If one step is skipped, data can become invalid. To help students keep on track, direct them to read each step thoroughly, complete the step, then check it off (Read it – Do it – Check it off).
- Direct students to complete procedural steps in their SDRs.
Note: The procedural steps are listed below for your reference. Teacher “Notes” are inserted, as needed, to help facilitate the lab.
- In this Trial, you will compare the height of room temperature liquid in a sealed glass tube when it is placed in an environment with greater kinetic energy or higher heat (boiling water).
- Work with the other students at the table to choose a partner. Once a partner is chosen, each student pair should obtain one (1) liquid-filled glass tube.
Note: Students may need assistance in determining which piece of equipment is the liquid-filled glass tube. The liquid-filled glass tube does NOT have any graduations or numbers on it. Although it is not necessary to tell students at this time, the liquid-filled glass tube is an ungraduated thermometer. Students will use the ungraduated thermometer to explore the expansion and contraction of the liquid inside the tube in response to changes in heat in Trials 1 and 2. After completing Trial 3, students will have added their own graduations to the thermometer.
Note: In Trials 1 and 2 students will also designate the upper and lower reference lines for the ungraduated thermometer. The upper line is the boiling point of water. The lower line is the freezing point of water. Students may notice a small black line on the glass tube (may not be present). This line was place on the tube during the manufacturing process. It was used to orient the manufacturer to the center of the tube. Students should be told to disregard this line.
Trial 1
- Cut a small piece of masking tape approximately 0.5 cm wide.Place the masking tape at the top of the glass tube.
- Label the masking tape with the initials of one student in the pair.
- Prepare one beaker of boiling water for use at the table.
- Fill a 100 ml beaker with 60 ml of water.
- Place the beaker on the hot plate/stir plate.
- Turn the heat dial to the highest setting.
- Begin timing with the stopwatch.
- Check the water after approximately 8-10 minutes. It should have begun to boil.
- While waiting for the water to boil, begin to set-up for Trial 2.
- Observe: After approximately 8-10 minutes, observe the water on the hot plate. Look for bubbles that have formed on the bottom of the water to rise to the top of the water.
- Observe: Once bubbles have been observed rising to the top of the beaker, reset the stopwatch and wait 3-5 minutes.
- After 3-5 minutes, EACH STUDENT PAIR should place the glass filled tube into the boiling water.
- Observe the liquid in the glass tube. Wait until the liquid in the tube has stopped moving. This should take about 2 minutes.
- Carefully use a paper towel to remove any water on the glass tube that is around the level of the liquid. Mark the level of the liquid in the glass tube after it has stopped moving. Use the lab marker to draw a line on the glass tube at the level of the liquid.
- Carefully remove the glass tubes from the boiling water. Be careful not to touch the line made by the lab marker.
- Record: Measure the distance from the bulb at the bottom of the glass tube to the mark made with the lab marker. Record the distance. This is the level of the red liquid when the glass tube was in BOILING WATER.
- Use a paper towel to dry the glass tube. If the line from the lab marker is removed, use the distance recorded above to re-draw the line.
- Turn the heat control on the hot plate to “off.” Remove the plug from the hot plate.
- Use the hot hands protectors to remove the beaker of boiling water from the hot plate and place in the center of the table. The water in this beaker will be used in Trial 4.
Trial 2
- In this Trial, you will compare the level of room temperature liquid in the sealed glass tube when it is placed in an environment with less kinetic energy or “lower heat” (freezing water).
- Prepare a saltwater ice bath. One saltwater ice bath should be prepared by EACH STUDENT PAIR.
- Use the triple beam balance and two weigh dishes to obtain two samples of NaCl: 70 g of NaCl and 5 g of NaCl.
- Pour the 70 g of NaCl into the bottom of an empty 400 ml beaker.
- Use the graduated cylinder to measure 120 ml of water.
- Pour the water into the 400ml beaker containing the NaCl.
- Use the glass stir rod to stir the contents of the beaker for 3 minutes.
- The NaCl will NOT completely dissolve.
- Place the beaker in the center of the white bucket.
- Use the liter pitcher to obtain 1 liter of ice.
- Add ice to the white bucket so that the ice surrounds the beaker with the salt water.
- Check the liter pitcher. The next step uses 500 ml of ice. Obtain more ice if necessary.
- Pour approximately 500 ml of ice into the beaker with the saltwater mixture.
- Pour the 5 g of NaCl over the top of the ice in the beaker.
- Obtain 1 empty test tube. Make a line on the test tube 2 cm from the bottom using the lab marker.
- Fill the test tube up to the line with water.
- Place the liquid-filled glass tube into the test tube with the water.
- Place the test tube into the saltwater ice bath.
- Observe the liquid in the glass tube for approximately 6 minutes.
- Pull the test tube out of the saltwater ice bath only enough to see where the level of the liquid is in the glass tube. You will NOT be able to make a mark directly on the glass tube. You will need to make a mark on the TEST TUBE instead.
- Try to keep as much of the test tube in the saltwater ice bath as possible.
- Use a paper towel to wipe the water off the outside of the test tube.
- Quickly mark the level of the red liquid inside the glass tube. To do this use the lab marker to make a line on the outside of the TEST TUBE.
- Be careful to hold the test tube at the top so as not to smear the line.
- Record: Measure the distance from the bottom of the TEST TUBE to the line. Record the distance below. This is the level of the liquid when the glass tube was in FREEZING WATER.
- Carefully remove the glass tube from the TEST TUBE. Hold the glass tube at the top so that any lines on the glass tube are not smeared.
- Mark the level of the liquid that corresponds to insertion in FREEZING WATER directly on the GLASS TUBE using the distance recorded above.
- Record your observations.
Trial 3
- In this trial, you will create the graduations for your thermometer.
- Observe the two reference lines on your thermometer: the boiling point of water (highest line) and the freezing point of water (lowest line).
- If the reference lines became smudged or were rubbed off, use the distances you recorded in Trials 1 and 2 to re-apply the lines.
- Label the two reference lines.
- Label the highest line, the boiling point of water, 100 ºC.
- Label the lowest line, the freezing point of water, 0 ºC.
- Measure the distance in centimeters between the two reference lines. Record the distance.
- Divide the distance by 10. This number will be used to create the graduations or marks between the two reference lines. Record the answer.
- Use the metric ruler and the lab marker to make the graduations on your thermometer. Decide whether you will begin at the 0 º C or 100 º C reference line. Assign a numerical value to each line as a certain “degree C.”
Trial 4
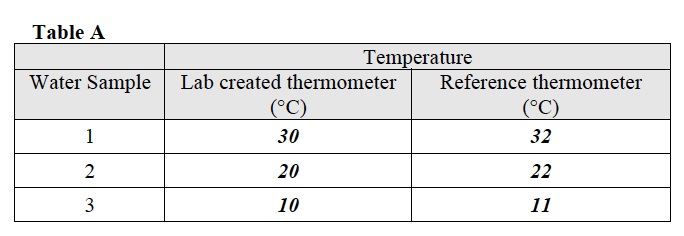
Note: In Trial 4 students will create water of different temperatures using a “Reference thermometer” and their “Lab-created thermometer.” By comparing the temperature of the water with both thermometers, students will assess the accuracy of the thermometer they created in Trials 1-3.
- In this trial, you will use the thermometer you calibrated to bring a beaker of water to three (3) different temperatures.
- Obtain an empty 100 ml beaker.
- Locate the following:
- 100 ml beaker with hot (boiled) water from Trial 1
- Ice
- Your “Lab-created thermometer”
- A commercially made, calibrated, reference thermometer.
- Metric ruler
- Use the metric ruler and lab marker to draw a line on the empty 100 ml beaker that is 2 cm from the bottom of the beaker.
- Using an empty 100 ml beaker, the hot water, the ice, and the “Lab-created thermometer” prepare water with a temperature of 30 º C.
- When preparing the water, keep the level of the water AT or BELOW the line on the beaker. This will help make sure that the graduations on the “Lab-created thermometer” will not get wet and come off in the water.
- Record the temperature of the water in Table A under “Lab-created thermometer”.
- Use the thermometer “Reference thermometer” to measure the temperature of the water.
- Record the temperature of the water in Table A under “Reference thermometer.”
- Repeat the procedure, making water with a temperature of 20 º C and 10 º C. Record the temperatures taken with the “Lab-created thermometer” and the “Reference thermometer” in Table A.
CLEAN UP
Let students know your expectations for clean up. Ask them to clean up.