Student Portal:
Genes and Proteins
Investigation 3 – Lab

ZERO-IN
Italicized font represents information to be shared orally or physically completed with the students at this time.
The non-italicized font represents additional information included to support the teacher’s understanding of the content being introduced within the CELL.
MINDSET
This Investigation is designed to:
- promote student understanding of the process and phases of mitosis,
- build proficiency in using the microscope to view prepared slides,
- provide students with the opportunity to model mitosis and identify cells in different phases of mitosis, and
- promote student understanding of the process by which DNA mutations can be transferred to new cells.
BE PREPARED
Teacher Preparation for the Investigation includes the following. This preparation should be done prior to students arriving in the lab.
- Place one prepared mitosis slide, one bottle of immersion oil, and lens paper next to each microscope.
- Cut twenty (20) 30 cm pieces of string (four for each group).
- Place the string and the remaining materials at the distribution center.
Note: To facilitate classroom management, you may want to count the colored gram cubes for each group before the class begins. Gram cubes can be placed in a weigh dish at each group’s table.
Note: If desired, make colored pencils available for students to draw the mitosis models.
- Divide students into five cooperative groups.
Note: Each student lab group will need the materials listed below.
Student Preparation for the Investigation includes having students gather the following materials. This preparation takes place on lab day after student lab groups have settled at their assigned lab tables.
Note: The materials are listed in students’ SDRs. They are also listed below for your reference.
- (12) dark green gram cubes
- (8) light green gram cubes
- (10) red gram cubes
- (2) orange gram cubes
- (1) small piece modeling clay
- (2) large red rubber bands
- (1) sheet of lens paper
- (4) 40 cm pieces of string
INVESTIGATE
- Remind students that in this Investigation they will model the different phases of mitosis. They will also view cells undergoing mitosis under the microscope.
- Encourage students to reflect on the PreLab video as they move through the procedural steps.
- Explain to students that during the Experiment, every procedural step is important. If one step is skipped, data can become invalid. To help students keep on track, direct them to read each step thoroughly, complete the step, then check it off (Read it – Do it – Check it off).
- Direct students to complete the procedural steps in their SDRs.
Note: The procedural steps are listed below for your reference. Teacher “Notes” are inserted, as needed, to help facilitate the lab.
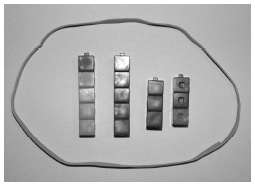
- Build a model of a body cell with two chromosome pairs in the nucleus. Use the picture below as a guide.
- Make your first chromosome by attaching 5 dark green gram cubes together in a straight line.
- Make a homologous chromosome by attaching 4 light green gram cubes and 1 dark green cube together in a straight line.
- Make a second pair of homologous chromosomes. Attach 3 red gram cubes together in a straight line. Then, attach 2 red gram cubes and one orange gram cube together in a straight line to make a homologous chromosome.
- Place a red rubber band on the lab table so that it is in the shape of a circle. This represents the nuclear membrane.
- Put both pairs of homologous chromosomes, into the nucleus.
- Draw and color (or label) your model in the space below. Label the following parts of your drawing:
- each homologous chromosome pair
- the nuclear membrane
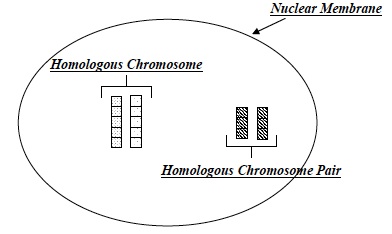
- Are both chromosomes in the homologous pair exactly the same? Explain your answer. No. In this model, the chromosomes are the same size, but the colors of the gram cubes are different.
- Duplicate each of the chromosomes in the model cell. Use the picture as a guide.
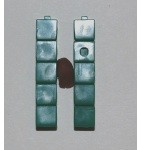
- Make one new dark green chromosome by connecting 5 dark green gram cubes. Attach the new chromosome to the first dark green chromosome with a small piece of clay at the center to form an H. The two dark green copies represent sister chromatids. The clay represents the centromere.
- Repeat with the remaining three chromosomes.
- Put all of the duplicated chromosomes in the nucleus.
- The model cell is now ready for mitosis.
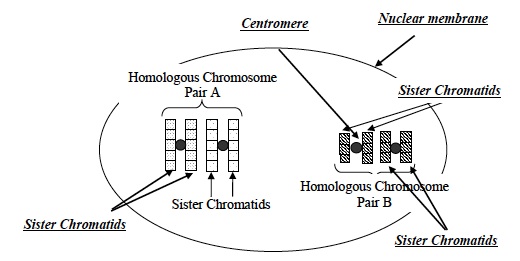
- Look at the drawing below. Your model should look similar to it. Label the following parts of the drawing:
- any other sister chromatids
- one centromere
- the nuclear membrane
- In prophase, the nuclear membrane dissolves. The chromosomes condense into rod-like structures that can be seen with a microscope. Model prophase by removing the rubber band.
- Why did you remove the rubber band to model prophase? The rubber band represents the nuclear membrane. It was removed because the nuclear membrane dissolves in prophase.
- In metaphase, spindle fibers have formed in the cell. Model spindle fibers by placing four pieces of string in parallel lines on the lab table. Use the picture as a guide.
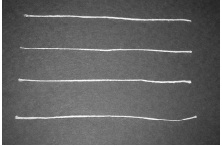
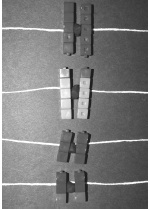
- In metaphase, the chromosomes line up as pairs of duplicated homologous chromosomes in the center of the cell. Use the picture as a guide. Model metaphase by lining the duplicated chromosomes up on the spindle fibers:
- Put the dark green sister chromatids on the top string with the centromere on the center of the string.
- Put the light/dark green sister chromatids on the string directly below the first with the centromere on the center of the string.
- Place the red and red/orange sister chromatids on the remaining two strings in the same way.
- In anaphase, the chromatids separate and move down the spindle fibers to opposite ends of the cell. Model anaphase:
- Pinch each centromere in half.
- Move each sister chromatid on the left approximately 5 cm to the left. Keep the centromere on the string.
- Move each sister chromatid on the right approximately 5 centimeters to the right. Keep the centromeres on the string.
- In telophase, the chromatids have moved to the ends of the spindle fibers, and the spindle fibers disappear. Nuclear membranes form around each set of chromosomes. The cell is now prepared to divide. Model telophase:
- Move all of the chromatids on the left to the left ends of the strings.
- Move all of the chromatids on the right to the right end of the strings.
- Remove the clay centromeres.
- Remove the strings
- Put a rubber band around the chromosomes on the left. Put a second rubber band around the chromosomes on the right. The rubber bands represent the new nuclear membranes.
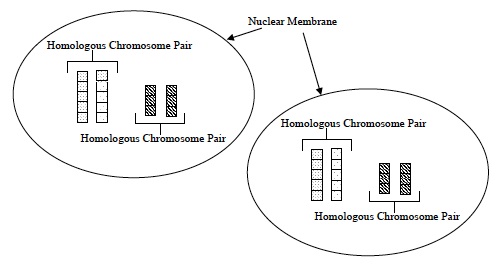
- Draw and color (or label) your model in the space below. Label the following parts of your drawing:
- each homologous chromosome pair in each nucleus
- two nuclear membranes
- In the model of mitosis, how many cells were present at the start? 1
- In the model of mitosis, how many cells were present at the end? 2
- How did the chromosomes in the first cell compare with the chromosomes in the cells at the end of mitosis? (Hint: Compare your drawings for question 2 and question 12). The cells at the end of mitosis had the same number and type of chromosomes as the first cell. The chromosomes in both of the new cells (daughter cells) were identical to the chromosomes in the original cell (parent cell).
- When body cells divide, how do the new cells get the same amount and type of DNA as the original cells? Body cells copy (duplicate) their chromosomes. Then, through the process of mitosis, these chromosomes are separated so that two new body cells are formed that have the same DNA and the same number of chromosomes as the original body cell.
- Set up the microscope according to the procedure Microscope Use and Operation.
- Place the animal mitosis slide on the microscope stage.
- Focus first on the lowest power, and then focus with each higher power objective.
- Finally, view the slide using the oil immersion 100X objective.
- Look at different cells on the slide by moving the microscope stage as needed.
- When you finish viewing the slide, carefully clean the objective with the lens paper and the slide with a paper towel.
Note: Students must use immersion oil to observe the slide under the 100x oil immersion objective. 6.
Note: When students are finished observing the mitosis slide, make sure that they clean any oil of the oil immersion lens with lens paper. Slides can be cleaned with paper towels.
- Most of the cells in your slide are going through mitosis. Are all of the cells at the same point in mitosis? What evidence do you have to support your answer? No, all of the cells are not at the same point in mitosis. The cells look different from one another.
- Do any of the cells have a nucleus? Student answers may vary. There may be some cells in interphase (the part of the cell cycle before mitosis with a visible nucleus). Most cells will not have a nucleus.
- What are the thick rod-shaped or x-shaped objects in the cells? The thick rod-shaped or x-shaped objects are condensed chromosomes.
- Find four cells that are at different stages of mitosis. Draw each cell in the space below. Student drawings will vary.

- Compare your drawings with those of the class. If any of your classmates have drawn an image that you did not see on your slide, make a drawing of it along with the others.
- Can you find cells at all phases of mitosis? Label your drawings with the name of the mitosis phase (prophase, metaphase, anaphase, or telophase) that the cell appears to be in. Students should be able to find all the phases of mitosis. There may be more than one cell drawing per phase. For example, two cells may show anaphase but have the chromosomes at different positions on the spindle fibers.
CLEAN UP
Let students know your expectations for clean up. Ask them to clean up.