Teacher Portal
Friction: Investigation 2 –
Lab

ZERO-IN
Italicized font represents information to be shared orally or physically completed with the students at this time.
The non-italicized font represents additional information included to support the teacher’s understanding of the content being introduced within the CELL.
MINDSET
This Investigation is designed to
- demonstrate to students that velocity does not affect the amount of frictional force between two objects and
- illustrate to students that graphing data shows the relationship between two variables.
BE PREPARED
Teacher Preparation for the Investigation includes the following. This preparation should be done prior to students arriving in the lab.
- Place all materials at a central location.
Note: Each student lab group will need the materials listed below.
- Divide students into cooperative groups of five students.
Student Preparation for the Investigation includes having students gather the following materials. This preparation takes place on lab day after student lab groups have settled at their assigned lab tables.
Note: The materials are listed in students’ SDRs. They are also listed below for your reference.
- (1) roll of masking tape
- (1) woodblock with hook
- (1) meter stick
- (1) 5 N spring scale
- (1) calculator
- (1) stopwatch
Direct one student from each lab group to collect the materials listed in their SDRs.
INVESTIGATE
- Tell students that during the Experiment, they will be testing the influence of velocity on frictional force.
- Before beginning the Experiment, ask students to identify the independent and dependent variables. Velocity is the independent variable and frictional force is the dependent variable in the experiment students will perform.
- Encourage students to reflect on the PreLab video as they move through the procedural steps.
- Explain to students that during the Experiment, every procedural step is important. If one step is skipped, data can become invalid. To help students keep on track, direct them to read each step thoroughly, complete the step, then check it off (Read it – Do it – Check it off).
- Direct students to complete the procedural steps in their SDRs.
Note: The procedural steps are listed below for your reference. Teacher “Notes” are inserted, as needed, to help facilitate the lab.
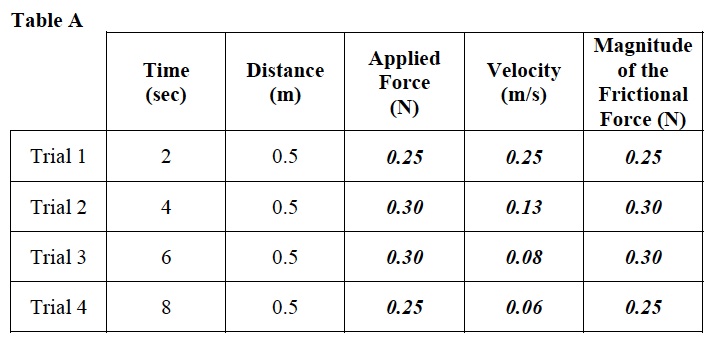
- Place two 5 cm pieces of tape approximately 40 cm from one end of the table.
- Place the other two pieces of tape toward the other end of the table, using the meter stick to measure a distance of 50 cm between each of the two rows of tape.
- Place the front of the woodblock 20 cm behind the starting line.
- Secure the spring scale to the woodblock so that the Newton scale is visible.
- Choose one person from your group to pull the woodblock, one person to be the timekeeper, and one person to read the spring scale.
- If you are pulling the woodblock:
- Pull the woodblock past the first line and at least 20 cm past the second line. It is important that you begin motion before you reach the start line and continue after you cross the finish line.
- Pull the wood block between the starting line and finish line in the number of seconds outlined in Table A. The student pulling the block must pull it at a steady velocity.
Note: Students may have difficulty pulling the block for the exact number of seconds required. Tell students that as long as they are within one second either direction, their results will be accurate enough for this data collection.
Note: Encourage students to perform several practice trials for each time interval until the students can pull the woodblock in the required time, just as they did in Investigation One.
- If you are the timekeeper:
- Begin timing only after the front of the woodblock crosses the start line and will stop timing as soon as the front of the woodblock crosses the finish line.
- This will make sure that the woodblock moves at a constant velocity for the entire time it moves between the two lines.
- If you are reading the spring scale:
- Read the number of Newtons exerted on the spring scale to pull the woodblock across the 50 cm course.
- Practice the trial:
- If after the first run, the block took too long to pass between the lines, practice again, and pull the block more quickly.
- If the block was pulled too quickly during the run, practice pulling more slowly.
- Pull the block several times until the student pulling the block knows the approximate velocity at which to pull it.
- If the student pulling is within 1 second of the required time, your data will be accurate enough for this experiment.
- Perform the trial:
- Measure the force required to pull the woodblock for each trial.
- Record: Write the applied force of each trial in Table A.
- Calculate: Using the times and distance recorded in Table A, calculate the velocity at which the woodblock moved during each trial.
- Record: Write each velocity in Table A.
- Record: Write the magnitude of the frictional force for each trial in the last column of Table A.
Note: In Investigation One, students found that the frictional force was equal and opposite to the applied force.
CLEAR UP
Let students know your expectations for clean up. Ask them to clean up.