Teacher Portal:
Ecosystems
Investigation 2 – Lab
ZERO-IN
Italicized font represents information to be shared orally or physically completed with the students at this time.
The non-italicized font represents additional information included to support the teacher’s understanding of the content being introduced within the CELL.
MINDSET
This Investigation is designed to:
- reinforce for students the concept that energy flow through an ecosystem is unidirectional and inefficient,
- guide students to conclude that a significant cause of inefficiency in energy transfer is due to energy consumption for maintenance of life, and
- illustrate that energy must be stored as biomass to be transferred to the next level of the ecosystem.
BE PREPARED
Teacher Preparation for the Investigation includes the following. This preparation should be done prior to students arriving in the lab.
- Prepare a solution that will be used to eventually model a “live herbivore” and a “dead herbivore.” Use a triple beam balance to obtain a 1 g sample of sugar in one (1) 400 ml beaker.
- Add 150 ml of water to the beaker containing the sugar. Add one (1) stir bar to the sugar and water.
Note: Depending upon the time of year and water source, tap water may be exceptionally cold. If desired, fill an adequate number of liter pitchers with water and allow it to sit overnight at room temperature before use to promote greater respiratory activity by the yeast.
- Place the beaker, one (1) stir plate, one (1) hot hands protector, one (1) thermometer, one (1) package of yeast, and one (1) 100 ml beaker at the teacher demonstration area.
Note: Prior to the introduction, place the beaker of sugar and water on the stir plate. Turn the stir control to 6 (700 rpm) and the heat control to 2 (approximately 100o C). Stir and heat the sugar for 5 minutes until the sugar is dissolved and the temperature of the water is 33-35o C. Continue to stir while the Investigation is introduced. Regulate the heat control as needed to maintain water temperature between 33 and 35o C.
- Place the remaining materials at a central distribution point.
- Divide students into five cooperative groups.
Note: Each student lab group will need the materials listed below.
Student Preparation for the Investigation includes having students gather the following materials. This preparation takes place on lab day after student lab groups have settled at their assigned lab tables.
Note: The materials are listed in students’ SDRs. They are also listed below for your reference.
- (1) test tube rack
- (1) 50 ml beaker
- (1) oxygen meter
- (1) stir plate
- (2) stir bars
- (3) 400 ml beakers
- (2) centrifuge tubes
- (1) ring stand
- (1) clamp
- (1) clamp holder
- (1) stopwatch
- (10 100 ml graduated cylinder
- (1) lab scoop
- (1) weigh dish
- (1) triple beam balance
Direct one student from each lab group to collect the materials listed in their SDRs.
INVESTIGATE
- Explain to students that they will be modeling a live herbivore and a dead herbivore, each represented by yeast. Sugar will represent the herbivores’ food. Dissolved oxygen will represent the amount of energy available for transfer to the herbivore’s consumer. This is because dissolved oxygen is used by the yeast as it respires.
- Encourage students to reflect on the PreLab video as they move through the procedural steps.
- Explain to students that during the Experiment, every procedural step is important. If one step is skipped, data can become invalid. To help students keep on track, direct them to read each step thoroughly, complete the step, then check it off (Read it – Do it – Check it off).
- Direct students to complete the procedural steps in their SDRs.
Note: The procedural steps are listed below for your reference. Teacher “Notes” are inserted, as needed, to help facilitate the lab.
The Experiment includes the following:
- Add sugar to the 50 ml beaker up to the 20 ml mark. The sugar represents the plant biomass eaten by the herbivore.
- Label one (1) empty 400 ml beaker “Live Herbivore”. Label a second empty 400 ml beaker “Dead Herbivore”. Label the remaining beaker “Rinse Water”.
- Prepare a sugar solution in the “Live Herbivore” beaker as follows:
Note: While students are preparing their sugar solution and calibrating their oxygen meters, add the package of yeast to the beaker of water and sugar prepared prior to the beginning of class. Stir gently at level 2 (100 rpm) for approximately 5 minutes to allow the yeast to activate. The yeast is ready to use when it appears foamy. This solution is the “live herbivore” model.
A. Use the graduated cylinder to add 300 ml of water to the beaker.
B. Use the triple beam balance to measure a 3.75 g sample of sugar. Refer to the Procedures, Triple Beam Balance Equilibration, Triple Beam Balance Use and Operation, Measuring Mass Using a Weigh Dish or Beaker, and Hot Plate/Stirrer Use and Operation for assistance if necessary.
C. Place the sugar in the “Live Herbivore” beaker.
D. Add a stir bar to the beaker.
E. Place the beaker on the stir plate and stir for 5 minutes at level 6 (700 rpm).
F. While the sugar solution is stirring, prepare the oxygen meter for use.
- The oxygen meter will be used to measure the amount of oxygen that the herbivore uses. Refer to the Procedures, Oxygen Meter Calibration, and Oxygen Meter Resetting of the CPU for assistance if necessary.
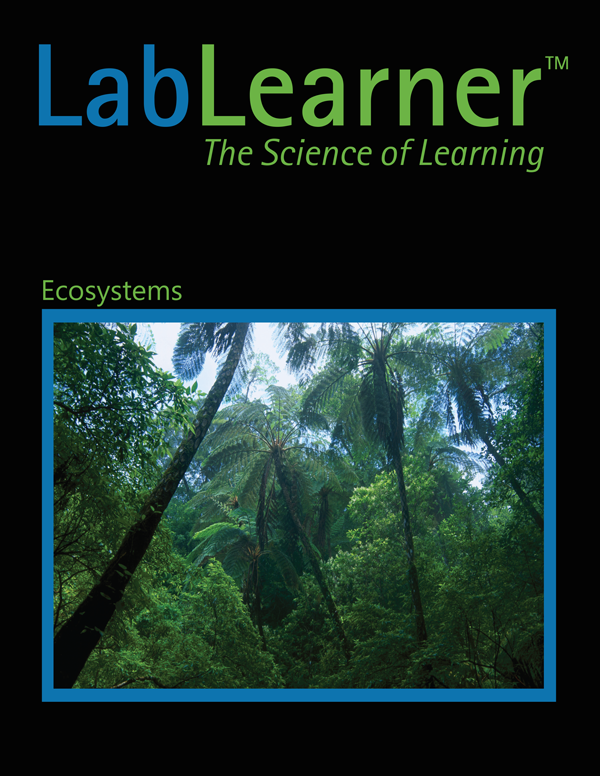
A. Place the ring stand beside the stir plate. 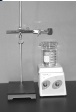
B. Place the clamp into the clamp holder and attach it to the support rod above the beaker.
C. Place the probe of the oxygen meter into the clamp.
D. Calibrate the oxygen meter.
E. Fill the “Rinse” beaker to the 250 ml mark. This will be used to rinse the oxygen probe between models.
5. Carefully insert the oxygen probe into the solution in the “Live Herbivore” beaker as follows:
A. Tilt the beaker.
B. Hold the probe so that the tip enters the solution at an angle. 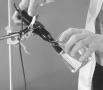
C. Check the tip to see if a large air bubble has formed. If so, remove the probe from the solution and try again. Large bubbles can cause incorrect readings.
D. When there is no bubble at the tip of the probe, place the beaker on the stir plate and secure the clamp in the clamp holder. 
E. Adjust the clamp so that the probe is approximately 2 cm from the bottom of the beaker. Be sure the tip of the probe does not touch the stir bar.
6. Turn the stir control to level 2 (100 rpm). Keep the stir bar moving during the experiment so that you can take oxygen readings repeatedly.
7. Allow the oxygen meter to adjust to the temperature of the water for 1 minute.
Trial 1:
- Determine the amount of energy available in the plant biomass by measuring the amount of dissolved oxygen for 5 minutes. The dissolved oxygen represents the energy consumed by the herbivore that is available to be passed from one level of the ecosystem to the next.
- Refer to the Procedure, Oxygen Meter Use, and Operation in Liquid for assistance if necessary.
A. Start the stopwatch.
B. Every minute, press the “Record” button and record for 15 seconds.
C. Press the “Call” button three times to obtain the average amount of dissolved oxygen.
D. Press the “Record” button once to exit recording.
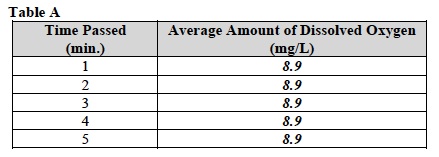
E. Record the average level of dissolved oxygen in Table A.
- While the dissolved oxygen level is being measured use the empty centrifuge tube to obtain a 3.75 ml sample of the live herbivore from the distribution center. Stir the solution in the beaker thoroughly before filling the centrifuge tube.
Note: After students have obtained their yeast samples, prepare the “dead herbivore” model for Trial 2. Pour one-half of the remaining yeast solution into the 100 ml beaker and set aside. This “live herbivore” sample will be used if students experience problems with their Live Herbivore experiment. Turn the heat control on the stir plate to level 10 (500o C) and boil the remaining yeast for 5 minutes.
4. Determine the amount of energy from the plant biomass that is used by the “Live Herbivore” to live. Do this by measuring the amount of oxygen in the beaker after the “Live Herbivore” is added:
A. Add the “Live Herbivore” sample to the beaker on the stir plate.
B. Start the stopwatch.
C. Every 3 minutes, press the “Record” button on the oxygen meter and record for 30 seconds.
D. Press the “Call” button three times to obtain the average amount of dissolved oxygen.
E. Press the “Record” button once to exit recording.
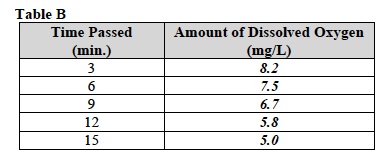
F. Record the average level of dissolved oxygen in Table B.
- Turn off the stir plate and remove the oxygen meter from the solution.
- Rinse the tip of the oxygen meter probe thoroughly in the “Rinse” beaker.
Trial 2:
- Prepare a sugar solution in the 400 ml “Dead Herbivore” beaker as follows:
A. Use the graduated cylinder to measure 300 ml of water into the beaker.
B. Use the triple beam balance to measure a 3.75 g sample of sugar. Refer to the Triple Beam Balance Use and Operation procedure if necessary for assistance.
C. Place the sugar into the “Dead Herbivore” beaker. Add a stir bar to the beaker.
D. Place the beaker on the stir plate and stir for 5 minutes at level 6 (700 rpm).
2. Place the oxygen meter carefully in the sugar solution and secure it in the clamp of the ring stand.
3. Adjust the height of the clamp so that the tip of the oxygen meter is approximately 2 cm from the bottom of the beaker.
4. Turn the stir control to level 2 (100 rpm). Keep the stir bar moving during the experiment so that you can take oxygen readings repeatedly.
5. Allow the oxygen meter to adjust to the temperature of the water for 1 minute.
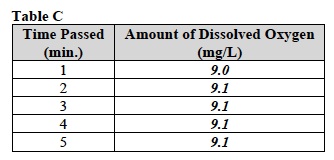
6. Determine how much energy is in the plant biomass before the “Dead Herbivore” is added to the beaker. Do this by measuring the amount of oxygen in the solution in the beaker:
A. Set the timer for 5 minutes.
B. Every minute, press the “Record” button and record for 15 seconds.
C. Press the “Call” button three times to obtain the average amount of dissolved oxygen.
D. Press the “Record” button once to exit recording.
E. Record the average level of dissolved oxygen in Table C.
- While the oxygen level is being determined in the solution, use the empty centrifuge tube to obtain a 3.75 ml sample of “Dead Herbivore” suspension from the distribution center. Stir the suspension thoroughly before filling the centrifuge tube.
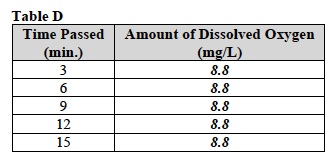
- Determine the amount of energy from the plant biomass that is used by the “Dead Herbivore” to live. Do this by measuring the amount of oxygen in the beaker after the “Dead Herbivore” is added.
A. Set the timer for 15 minutes.
B. Add the “Dead Herbivore” sample to the beaker on the stir plate.
C. Start the timer.
D. Every 3 minutes, press the “Record” button on the oxygen meter and record for 30 seconds.
E. Press the “Call” button three times to obtain the average amount of dissolved oxygen.
F. Press the “Record” button once to exit recording.
G. Record the average level of dissolved oxygen in Table D.
- Turn off the stir plate and remove the oxygen meter from the yeast solution. Remove the oxygen meter from the solution and rinse thoroughly in the “Rinse” beaker.
CLEAN UP
Let students know your expectations for clean up. Ask them to clean up.