Teacher Portal:
Ecosystems
Investigation 1 – Lab
ZERO-IN
Italicized font represents information to be shared orally or physically completed with the students at this time.
The non-italicized font represents additional information included to support the teacher’s understanding of the content being introduced within the CELL.
MINDSET
This Investigation is designed to:
- illustrate to students that energy flow through an ecosystem is unidirectional and inefficient,
- illustrate to students that the energy content of an ecosystem is directly related to the amount of biomass in the ecosystem, and
- guide students to conclude that the amount of energy that initially enters the ecosystem through photosynthesis determines the amount of energy available for biomass accumulation.
BE PREPARED
Teacher Preparation for the Investigation includes the following. This preparation should be done prior to students arriving in the lab.
- Label five (5) 400 ml beakers “Sun Stock Solution”, “Plants Stock Solution”, “Herbivores Stock Solution”, “Carnivores Stock Solution”, and “Detritivores Stock Solution”.
- Create stock solutions according to the following directions:
- Fill the “Sun Stock Solution” beaker with 200 ml of water using a 100 ml graduated cylinder. Use the plastic dropper to add 6 drops of green food coloring. If your bottle of food coloring has its own dropper please remove it so the plastic dropper will fit inside. Stir thoroughly with a glass stirring rod.
- Fill the “Plants Stock Solution” beaker with 285 ml of water using the 100 ml graduated cylinder. Use the 100 ml graduated cylinder to add 15 ml of “Sun Stock Solution” and stir thoroughly with a glass stirring rod.
- Fill the “Herbivores Stock Solution”, “Carnivores Stock Solution”, and “Detritivores Stock Solution” beakers with 150 ml of water using the 100 ml graduated cylinder.
- Use the 100 ml graduated cylinder to transfer 150 ml of “Plants Stock Solution” to the “Herbivores Stock Solution” beaker and stir thoroughly with a glass rod.
- Use the 100 ml graduated cylinder to transfer 150 ml of “Herbivores Stock Solution” to the “Carnivores Stock Solution” beaker and stir thoroughly with a glass rod.
- Use the 100 ml graduated cylinder to transfer 150 ml of “Carnivores Stock Solution” to the “Detritivores Stock Solution” beaker and stir thoroughly with a glass rod.
Note: Occasionally the “Sun Stock Solution” may be too concentrated. Test the absorbance of the “Sun Stock Solution” using the spectrophotometer to make sure it is below 2.0. If its absorbance is 2.0 or out of range of the spectrophotometer, dilute the solution with water until its absorbance is between 1.9 and 1.4.
In order to test a dilution, do NOT use the entire 200 ml. Rather measure a smaller amount such as 10 ml and dilute with 10 ml of water. Test the absorbance of the newly diluted “Sun Stock Solution.” If it is between 1.9 and 1.4, use this dilution to prepare a larger amount of “Sun Stock Solution.”
For example, take 100 ml of the original “Sun Stock Solution” and dilute with 100 ml of water. Use this newly diluted solution to prepare the remaining solutions described below.
If the absorbance is above 1.9, dilute by adding an additional amount of water, such as 5 ml. Test its absorbance. Once this small sample of “Sun Stock Solution” has the correct absorbance, determine the dilution and prepare a larger volume for use below.
For example, if 5 additional 5 ml of water were added, the dilution would be 10 ml original stock/15 ml water. To prepare the 200 ml or more needed below, take 100 ml of the original “Sun Stock Solution” and add 150 ml water.
- Place stock solutions at the distribution center.
- Label one (1) 400 ml beaker “Cloudy Sky Solution” and fill with 200 ml of water using the 100 ml graduated cylinder.
- Add 5 drops of green food coloring to the “Cloudy Sky Solution” beaker and stir thoroughly with a glass stir rod.
- Label five (5) test tubes “Cloudy Sky” and place 1 test tube in each of five test tube racks. Fill each test tube with 20 ml of “Cloudy Sky” solution.
- Place six (6) empty test tubes in each test tube rack and place racks at the distribution center.
- Fill five (5) 100 ml beakers to the 20 ml mark (13 g) with sand.
- Fill five (5) liter pitchers to the 550 ml mark (500 g) with split peas.
- Cut off the top half of each of five (5) paper lunch bags and discard, keeping the bottom half for students to use as a container to determine the mass of the split peas.
- Place all materials at a distribution center except spectrophotometers, cuvettes, Kim-wipes, and water bottles.
- Provide each work station with one (1) spectrophotometer, one (1) cuvette, one (1) box of Kim-wipes, and one (1) water bottle filled with water.
- Turn on spectrophotometers at least 15 minutes before the start of lab to allow adequate warm-up time.
- Divide the class into five cooperative groups.
Note: Each student lab group will need the materials listed below.
Student Preparation for the Investigation includes having students gather the following materials. This preparation takes place on lab day after student lab groups have settled at their assigned lab tables.
Note: The materials are listed in students’ SDRs. They are also listed below for your reference.
- (1) test tube rack
- (7) plastic droppers
- (1) empty 400 ml beaker
- (1) 100 ml beaker of sand
- (1) liter pitcher of split peas
- (1) paper lunch bag
- (27) small bears
- (7) medium bears
- (3) large bears
- (1) weigh dish
- (1) triple beam balance
Direct one student from each lab group to collect the materials listed in their SDRs.
INVESTIGATE
- Inform students that they will first use a model to demonstrate how energy flows through an ecosystem.
- Encourage students to reflect on the PreLab video as they move through the procedural steps.
- Explain to students that during the Experiment, every procedural step is important. If one step is skipped, data can become invalid. To help students keep on track, direct them to read each step thoroughly, complete the step, then check it off (Read it – Do it – Check it off).
- Direct students to complete the procedural steps in their SDRs.
Note: The procedural steps are listed below for your reference. Teacher “Notes” are inserted, as needed, to help facilitate the lab.
The Experiment includes the following:
- Label the six test tubes “Blank”, “Sun”, “Plants”, “Herbivores”, “Carnivores”, and “Detritivores”.
- Label the empty 400 ml beaker “Waste”.
- Use the graduated cylinder to fill the labeled test tubes as follows:
A. Fill the “Blank” test tube with 20 ml of water.
B. Fill the “Sun” test tube with 20 ml of “Sun Stock Solution”.
C. Fill the “Plants” test tube with 20 ml of “Plants Stock Solution”.
D. Fill the “Herbivores” test tube with 20 ml of “Herbivores Stock Solution”.
E. Fill the “Carnivores” test tube with 20 ml of “Carnivores Stock Solution”.
F. Fill the “Detritivores” test tube with 20 ml of “Detritivores Stock Solution”.
Trial 1:
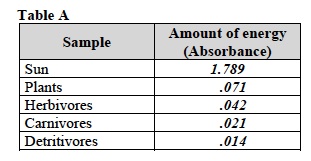
- Find the energy in the levels of the ecosystem by measuring the absorbance for the samples below.
A. Set the wavelength to 630 nm.
B. Fill the cuvette with the sample using a plastic dropper. Use a new plastic dropper for each sample. (Remember to zero the spectrophotometer using a “blank” before you begin collecting data.)
C. Place the cuvette in the sample compartment and close the lid.
D. Record the absorbance for each sample in Table A. Remember the absorbance represents the amount of energy at each level of the ecosystem.
E. Pour the sample back into the test tube.
F. Rinse the cuvette with water from the water bottle. Pour the rinse water into the “Waste” beaker.
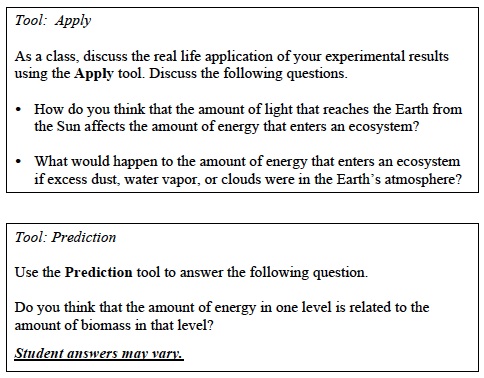
- Determine the effect of the presence of extra dust or clouds in the atmosphere on the amount of energy that reaches the Earth.
A. Transfer the amount of energy from the “Sun” solution in Table A to Table B.
B. Use the spectrophotometer to find the amount of energy in the “Cloudy Sky” solution. Refer to the Procedure Spectrophotometer Use and Operation if you need help.
C. Record your results in Table B.

Trial 2:
- Before beginning Trial 2, if you need help, refer to the Procedures, Triple Beam Balance Equilibration, Triple Beam Balance Use and Operation, and Measuring Mass Using a Weigh Dish or Beaker.
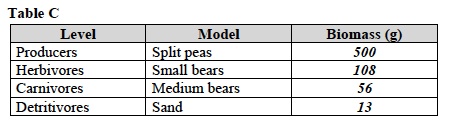
- Determine the mass of the biomass in each level of the land ecosystem. Do this by using a model of the ecosystem.
A. Locate the containers of split peas, small bears, medium bears, and large bears. These items will represent the levels in an ecosystem.
B. Label the containers as follows: • split pea container —-“Producers” • the container small bears—–“Herbivores” • the container of medium bears —-“Carnivores” • the sand —–“Detritivores”
C. Use the triple beam balance to determine the mass of the biomass at each level of the ecosystem. Use the paper bag as a container when massing the “Producers”.
D. Record the mass of the biomass in each level of the ecosystem in Table C.
OPTIONAL EXTENSION
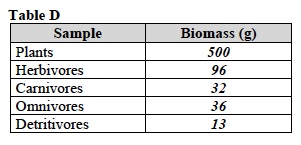
- Determine how adding omnivores affects the biomass of the ecosystem.
A. Transfer the masses of the biomass of the “Plants” and “Detritivores” from the first model to table D.
B. Label the container of large bears “Omnivores.”
C. Remove 3 bears from the “Herbivores” container.
D. Remove 3 bears from the “Carnivores” container.
E. Determine the masses of the biomass of the “Herbivores,” “Carnivores,” and “Omnivores.” Record masses of the biomass in each level in table D.
CLEAN UP
Let students know your expectations for clean up. Ask them to clean up.