Teacher Portal:
Chemical Reactions
Investigation 3 – Lab

ZERO-IN
Italicized font represents information to be shared orally or physically completed with the students at this time.
The non-italicized font represents additional information included to support the teacher’s understanding of the content being introduced within the CELL.
MINDSET
This Investigation is designed to allow students to investigate:
- how the concentration of a reactant affects the amount of a product,
- how the consumption of reactant results in the production of a product,
- the relationship between the amount of reactants and reaction time, and
- the relationship between the amount of products and reaction time.
BE PREPARED
Teacher Preparation for the Investigation includes the following. This preparation should be done prior to students arriving in the lab.
- Prepare the diluted acetone solution according to the following table.

- For each student group, pour 40 ml of the diluted acetone solution into a 50 ml centrifuge tube.
- Prepare the diluted hydrochloric acid (HCl) solution according to the following table.

- For each student group, pour 15 ml of the diluted HCl solution into a 50 ml centrifuge tube.
- Prepare the diluted iodine (I2) solution according to the following table.

Note: The undiluted and the diluted iodine solutions will temporarily stain skin and permanently stain clothing. Care must be taken to avoid spills. If spills occur, immediately rinse with water.
- For each student group, pour 15 ml of the diluted iodine solution into a 50 ml centrifuge tube.
- Place one spectrophotometer and one cuvette at each group’s table.
- Place all materials at a central location.
- Divide students into five cooperative groups.
Note: Each student lab group will need the materials listed below.
Student Preparation for the Investigation includes having students gather the following materials. This preparation takes place on lab day after student lab groups have settled at their assigned lab tables.
Note: The materials are listed in students’ SDRs. They are also listed below for your reference.
- (6) 15 ml centrifuge tubes
- (1) 50 ml centrifuge tube filled with 40 ml of acetone solution
- (1) 100 ml beaker filled with 50 ml of water
- (1) centrifuge tube filled with 15 ml of hydrochloric acid (HCl)
- (1) centrifuge tube filled with 15 ml of iodine (I2) solution
- (1) 400 ml waste beaker
- (4) dropper pipettes
- (1) test tube rack
- (1) stopwatch
- (1) spectrophotometer
- (1) cuvette
- (1) box Kim wipes
- (1) calculator
- (1) pair goggles per student
- (1) pair gloves per student
- masking tape
- marker pen
Direct one student from each lab group to collect the materials listed in their SDRs.
INVESTIGATE
- Inform students that they will perform six Trials in this Investigation.
- Explain to students that each Trial consists of a separate reaction and each reaction differs in the amount of acetone that is added. The different volume of acetone in the Trials is accounted for by adding different volumes of water. The volumes of iodine and HCl are the same for each Trial.
- Encourage students to reflect on the PreLab video as they move through the procedural steps.
- Explain to students that during the Experiment, every procedural step is important. If one step is skipped, data can become invalid. To help students keep on track, direct them to read each step thoroughly, complete the step, then check it off (Read it – Do it – Check it off).
- Remind students to wear gloves, safety eyewear, and lab coats when handling chemicals.
- Direct students to complete the procedural steps in their SDRs.
Note: The procedural steps are listed below for your reference. Teacher “Notes” are inserted, as needed, to help facilitate the lab.
- Use the marker and masking tape to label six centrifuge tubes with numbers 1 through 6. Place them in order left to right in the test tube rack.
- Refer to Table A for the volumes of the chemicals needed for each tube.
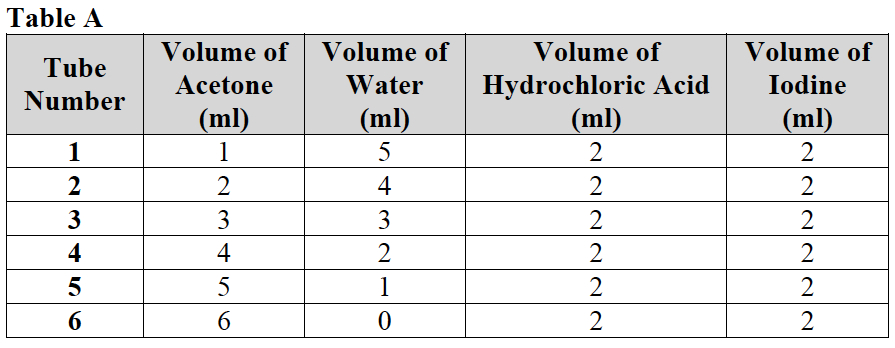
- Use a dropper pipette to add acetone to each tube. Add 1ml of acetone to tube 1, 2 ml of acetone (CH3COCH3) to tube 2, 3 ml of acetone (CH3COCH3) to tube 3, etc. Use the markings on the tubes as a guide.
- Use a second dropper pipette to add water to each tube. Add water so that it reaches the 6 ml mark on the centrifuge tube after the proper amount of acetone has already been added. Use the markings on the sides of the tubes as a guide.
- Use a third dropper pipette to add 2 ml of hydrochloric acid (HCl) to all tubes 1 through 6. Each centrifuge tube should now reach the 8 ml mark. Use the markings on the sides of the tubes.
- DO NOT add iodine (I2) to any tubes.
- Replace the caps on all the tubes.
- Preparation of the Spectrophotometer: If you need help, read the procedure Spectrophotometer Use and Operation.
- Set the wavelength at 460 nanometers using the wavelength control knob.
- Blank the spectrophotometer with water. After you have prepared the spectrophotometer, make certain that the mode selection button is set to Absorbance.
- Decide which members of the lab group will be responsible for the following tasks.
- One group member will add the iodine (I2) solution to each centrifuge tube.
- One group member will use the stopwatch to time the reaction.
- One group member will record the time in their Student Data Record.
- All other group members will observe the spectrophotometer display.
- Group members may exchange roles between Trials.
Note: Caution students that the iodine solution will temporarily stain skin and permanently stain clothing. Students must exercise care to avoid spills. Students should especially be careful to screw the caps of the centrifuge tubes tightly before inverting and mixing the reactions.
Trial 1
- In this Trial, the reaction in tube 1 will be started by adding the iodine (I2) solution. The procedure must be performed as quickly as possible without spilling the solution.
- Using a clean dropper pipette, add 2 ml of the iodine (I2) solution to tube 1. Using the markings on the side of the tube, add iodine (I2) until the volume in the tube is 10 ml.
- Quickly screw the cap back on the tube and turn it upside down then upright again. As soon as the centrifuge tube is upside down, start the stopwatch. Turn the tube upside down then upright again 2 more times.
- Uncap the tube and pour the solution into the cuvette until it is three quarters (3/4) full. Wipe any liquid and fingerprints on the outside of the cuvette with a kim wipe.
- Place the cuvette in the sample compartment. Push it into the compartment until you hear a click and then close the lid.
- Continue to time the reaction and observe the display.
- When the display on the spectrophotometer reads .000 or remains unchanged at a reading close to .000, stop the stopwatch.
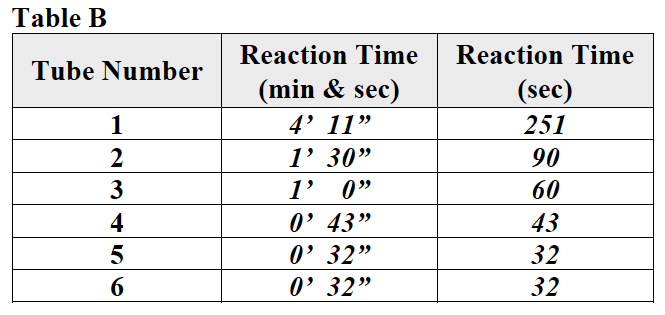
- Record: Write the reaction time in minutes and seconds as it appears on the stopwatch in the row for tube 1 in Table B.
- Reset the stopwatch to zero and pour the contents of the cuvette into the 400 ml waste beaker.
Trial 2
- In this Trial, the reaction in tube 2 will be started by adding the iodine solution. The procedure must be performed as quickly as possible without spilling the solution.
- Using a clean dropper pipette, add 2 ml of the iodine (I2) solution to tube 2. Using the markings on the side of the tube, add iodine (I2) until the volume in the tube is 10 ml.
- Quickly screw the cap back on the tube and turn it upside down, then upright again. As soon as the centrifuge tube is upside down, start the stopwatch. Turn the tube upside down then upright again 2 more times.
- Uncap the tube and pour the solution into the cuvette until it is three quarters (3/4) full. Wipe any liquid and fingerprints on the outside of the cuvette with a paper towel or wiper.
- Place the cuvette in the sample compartment. Push it into the compartment until you hear a click and then close the lid.
- Continue to time the reaction and observe the display.
- When the display reads .000 or remains unchanged at a reading close to .000, stop the stopwatch.
- Record: Write the reaction time in minutes and seconds as it appears on the stopwatch in the row for tube 2 in Table B.
- Reset the stopwatch to zero and pour the contents of the cuvette into the 400 ml waste beaker.
Trial 3
- In this Trial, the reaction in tube 3 will be started by adding the iodine (I2) solution. Follow the same steps for this reaction as you used for Trials 1 and 2. Use steps 1 through 3 of Trial 2 as a guide.
- Record: Write the reaction time in minutes and seconds for tube 3 in Table B.
Trial 4
- In this Trial, the reaction in tube 4 will be started by adding the iodine (I2) solution. Follow the same steps for this reaction as in Trials 1, 2, and 3. Use steps 1 through 3 of Trial 2 as a guide.
- Record: Write the reaction time in minutes and seconds for tube 4 in Table B.
Trial 5
- In this Trial, the reaction in tube 5 will be started by adding the iodine (I2) solution. Follow the same steps for this reaction as in Trials 1 through 4. Use steps 1 through 3 of Trial 2 as a guide.
- Record: Write the reaction time in minutes and seconds for tube 5 in Table B.
Trial 6
- In this Trial, the reaction in tube 6 will be started by adding the iodine (I2) solution. Follow the same steps for this reaction as in Trials 1 through 5. Use steps 1 through 3 of Trial 2 as a guide.
- Record: Write the reaction time in minutes and seconds for tube 6 in Table B.
CLEAN UP
Let students know your expectations for clean up. Ask them to clean up.