Teacher Portal:
Cellular Organization
Investigation 2 – Lab
ZERO-IN
Italicized font represents information to be shared orally or physically completed with the students at this time.
The non-italicized font represents additional information included to support the teacher’s understanding of the content being introduced within the CELL.
MINDSET
This Investigation is designed to:
- help students understand that staining and sectioning of a specimen can change the appearance of cells and tissues,
- promote the idea that knowledge of staining and sectioning is important in helping to identify structures and functions of cells, and
- familiarize students with identifying the nucleus, cytoplasm, and cell membrane in stained and unstained animal cell specimens.
BE PREPARED
Teacher Preparation for the Investigation includes the following. This preparation should be done prior to students arriving in the lab.
- Cut the celery into five 20 cm stalks.
- Create more sleeves to cover the labels of the corn stem slides. To do this, cut one strip of paper per group, each strip approximately 10 cm by 2.5 cm. Fold the paper around the labeled end of each corn stem slide and tape in place.
- Place the materials at the distribution center.
- Divide the class into five cooperative groups.
Note: Each student lab group will need the materials listed below.
Student Preparation for the Investigation includes having students gather the following materials. This preparation takes place on lab day after student lab groups have settled at their assigned lab tables.
Note: The materials are listed in students’ SDRs. They are also listed below for your reference.
Each student group needs the following:
- (1) slide with the label covered (corn stem slide)
- (1) scalpel
- (1) human cheek slide
- (1) 100 ml beaker filled with 50 ml of water
Each student needs the following:
- (1) toothpick
- (1) glass slide
- (1) plastic dropper
- (1) paper towel
- (1) coverslip
Note: The plastic dropper, glass slide, and coverslip should be placed on each of the paper towels. The celery may be placed on one of the paper towels.
Direct one student from each lab group to collect the materials listed in their SDRs.
INVESTIGATE
- Briefly review with students the experiment they performed in Investigation One.
Note: Students observed six slides under a microscope and compared the characteristics of the cells in each slide. Students may have compared color, size, shape, and arrangement of cells.
- Tell students that the characteristics of the cells they observed in Investigation One were specific to those cells because of the nature of the cell or due to the preparation of the slides. When the slides were prepared, two factors, staining and sectioning, may have influenced the characteristics of the cells when viewed under the microscope.
- Tell students that in Investigation Two, they will investigate two procedures, sectioning and staining, used in creating slides. In doing so, students should answer the following questions:
- How does sectioning affect the appearance of a specimen?
- How does staining affect the appearance of a specimen?
- Encourage students to reflect on the PreLab video as they move through the procedural steps.
- Explain to students that during the Experiment, every procedural step is important. If one step is skipped, data can become invalid. To help students keep on track, direct them to read each step thoroughly, complete the step, then check it off (Read it – Do it – Check it off).
- Direct students to complete the procedural steps in their SDRs.
Note: The procedural steps are listed below for your reference. Teacher “Notes” are inserted, as needed, to help facilitate the lab.
Explain that scientists often stain the specimens on a slide so that the specific parts of the specimen can be more easily observed. In Trial 1, students will create a wet mount slide of their own cheek cells in order to investigate the effect of staining on a slide.
Trial 1:
- Prepare a wet mount slide of your cheek cells.

- Use a plastic dropper to place a drop of water on the glass slide.
- Gently scrape the inside of your cheek with the flat side of a toothpick.
- Place the toothpick in the water drop on your slide and gently move the toothpick in the water.
- Place one edge of the coverslip on the slide. Tilt the opposite edge down until it is resting on the water.
- If the slides contain air bubbles, gently tap on the coverslip. This may remove air bubbles.
- Place one of the wet mount slides of cheek cells prepared by students in your group on the microscope.
- Use the 10X objective to locate the cells. Refer to the procedure, Microscope Use and Operation, if you need help.
- Observe the cells under the 40X objective. Do not use the 100X objective on a wet mount slide, because the oil may move under the coverslip and ruin the specimen.
- Record: Draw what the cheek cells look like.
- Look at other cheek cell slides that students in your group made. What similarities and differences do you see?
- Suggested Response: Student answers will vary. Cheek cell slides should look similar.
- View the prepared slide of the human cheek cells. Use the 10X and the 40X objectives.
- Record: Draw what the prepared cheek cells look like under the 40X objective.
- Compare and contrast the prepared slide with the slides you created. How are the slides similar or different?
- Suggested Response: Student answers will vary. The cells in their own slide were clear and did not contain much color. However, the cells observed on the prepared slide were pink in color. The cells in the prepared slide may have been easier to locate and observe.
Tell students that during Trial 2 they will investigate slide preparation by learning about sectioning. Instruct students to observe their piece of celery. Tell students that when scientists prepare slides, they may cut, or section, the specimen in a variety of ways. Depending on how the specimen is cut, it may appear different when viewed under the microscope.
Trial 2:
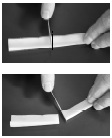 Prepare a cross-section of the piece of celery.
- Cut the stalk in half by cutting across the width of the stalk.
- Cut off as thin a slice as possible from one of the halves. You should be able to almost see through the slice.
- Observe the cross-section without the microscope.
- Record: Draw the cross-section and describe your observations below.
![]()
- Suggested Response: When a cross-section of the celery was made, the celery was crescent-shaped. Small circles are scattered across the specimen where the string-like fibers were cut.
- Place the piece of celery on a slide, and prepare a wet mount. If you need help, refer to the procedure, Wet Mount Slide Preparation.
- View the slide under the microscope using the 4X, 10X, and 40X objectives.
- Record: Draw what the cross-section looked like under the microscope. Be sure to label drawings with the magnification (objective) used.
- Student drawings will vary. The drawing should be labeled with the appropriate magnification.
- Prepare a longitudinal section of the piece of celery.
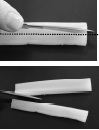
- Cut one of the remaining pieces in half by cutting through the length of the stalk.
- Cut as thin a slice as possible from the length of one of the halves. You should be able to almost see through the slice.
- Observe the longitudinal section without the microscope.
- Record: Draw the longitudinal section and describe your observations below.
![]()
- Suggested Response: When a longitudinal section of the celery was made, it was long and rectangular. No small circles were visible. Rather, long stripes stretched across the specimen.
- Shorten the length of the specimen so that it fits on slide.
- Place the specimen on a slide, and prepare a wet mount. If you need help, refer to the procedure, Wet Mount Slide Preparation.
- View the slide under the microscope using the 4X, 10X, and 40X objectives.
- Record: Draw what the longitudinal section looked like under the microscope. Be sure to label drawings with the magnification (objective) used.
- Student drawings will vary. The drawings should all be labeled with the appropriate magnification.
- Compare and contrast the cross-section and the longitudinal section of the celery. How are the slides similar or different?
- Suggested Response: Student answers will vary. The two sections will look very different under the microscope. The cross-section will contain small circles (cross-section of the celery fibers) and the longitudinal section will contain long fibers.
- Record: Observe the slide with the covered label using the microscope. Draw or write your observations below.
- Suggested Response: Students should observe two specimens on the slide. One contains many large, somewhat circular cells that appear empty. In various areas of the specimen, students observed clusters of smaller cells and ducts. The other specimen of the corn stem contains many long, narrow, rectangular cells which appear empty. In various areas of the specimen, students observed stripes of cells and ducts which are stained purple or red.
- The slide you observed contains specimens of a corn stem. Based on your observations with the celery, make a prediction of what you are seeing in the prepared slide.
- Suggested Response: Student answers may vary. Based on their work with celery, students should predict that they are seeing both a cross-section and a longitudinal section of the corn stem.
Tell students that the two specimens were two different sections of a corn stem slide. The circular specimen is the cross-section, and the long and thin specimen is the longitudinal section. Tell students that if needed, they may view the slide under the microscope again.
CLEAN UP
Let students know your expectations for cleanup. Ask them to clean up.
Instruct students to place the glass slide containing their own cheek cells and the toothpick in a paper towel and dispose of them.
Note: If you choose not to dispose of the slides, handle them according to your school’s safety regulations. Students may return the remaining materials to the distribution center.