Teacher Portal:
Cellular Organization
Investigation 2 – Concept Day
ZERO-IN

Italicized font represents information to be shared orally or physically completed with the students at this time.
The non-italicized font represents additional information included to support the teacher’s understanding of the content being introduced within the CELL.
ASK WHY
Remind students that all known living things are made of cells. Studying cells helps us understand how living things function.
BRANCH OUT
Explain to students that cytotechnologists are responsible for the preliminary interpretation of specimens from body sites, such as the lung, bladder, central nervous system, and liver, etc. Cytotechnologists often work in collaboration with pathologists to diagnose benign and infectious processes, precancerous lesions, and malignant disease.
PRINT IT
Use your browser to download a printable PDF as a help during the slide presentation and to make additional notes. In your browser, go to File > Print and then choose to save as PDF.
NAVIGATE IT
Once the slide presentation is launched
- use your left and right arrows to advance or go back in the slide presentation, and
- hover your mouse over the left edge of the presentation to get a view of the thumbnails for all the slides so that you can quickly move anywhere in the presentation.
- Click HERE to launch the slide presentation for the CELL.
SHARE IT

SLIDE CELLULAR-2-1
Note: In this Investigation we will discuss light microscopy and electron microscopy. Cells and microscopes present an interesting problem for science educators:
- The very small size of cells and their subcellular components are simply beyond our imagination, much like contemplating the distance between stars at the other extreme of the size scale.
- Because we cannot see most subcellular structures using even very expensive light microscopes, most students are forced to memorize structures such as mitochondria, nucleolus, endoplasmic reticulum, Golgi apparatus and so on, from drawings, photographs and models. This is not a very hands-on or inquiry-based practice.
- Subcellular structures are visible with electron microscopy. In fact, it was the advent of electron microscopy in the mid-twentieth century that lead to the discovery of most of the cellular organelles and other cell sub-structure and revolutionized Cell Biology.
- Consequently, we can only practically introduce subcellular structure to students by presenting electron microscope micrographs to them. The best we can do is to familiarize students with the electron microscope through analogy to the light microscope that they actually use. We attempt to do this in this presentation.
________________________________________

SLIDE CELLULAR-2-2
Note: This slide gives a quick overview of the light microscope. It will lead into a discussion of the two types of electron microscopes. Students will be familiar with this instrument from the previous investigation. At this time, the are several points we should make:
- The light microscope has an upper limit of useful magnification of not much more than about X1,000. We will contrast this with the much higher magnifications of both types of electron microscopes.
- In a light microscope, the specimen is placed between the light source and the lenses. Therefore, the light passes through the specimen. This is somewhat like the Transmission Electron Microscope and different from the Scanning Electron Microscope as well be discussed below.
- Because light must travel through the specimen, specimens that are too thick for light to pass through must be cut into “thin sections” prior to mounting on the microscope slide.
- The light microscope gives us images in color if the specimen has intrinsic color, or sometimes stains are used to make certain parts of cells easier to see. In either case, we see color. In any type of electron microscope, micrographs (photographs taken through a microscope) are in black and white. When one comes across a colorized micrograph (and there are many) we can be sure that there is artificial color added to the black and white original image.
- Finally, even though light microscopes have significantly less magnification than electron microscopes, they have one huge advantage… they can be used to view living cells. Electron microscopes fire a beam of electrons at specially preserved and stained specimens. To operate, anywhere from 50,000 to over 100,000 volts are used. Living tissue simply can’t survive such hostile conditions.
________________________________________

SLIDE CELLULAR-2-3
- This slide gives a quick overview of the Transmission Electron Microscope (TEM). this instrument uses tremendous voltages. It is cooled by liquid nitrogen.
- An electron microscope uses a beam of energized electrons shot down into the “column” from the top instead of a beam of light, as is the case with light microscopes. Therefore, to magnify and focus the beam of electrons, electromagnetic “lenses” replace glass lenses (see center insert).
- Also notice in the insert, that the specimen to be examined is placed in the column near the middle so that the electron beam passes through it. The image appears on a screen at the bottom of the column where it can be examined even closer by binocular glass lenses that focus onto the viewing screen.
- Powerful Transmission Electron Microscopes can achieve magnifications of x1,000,000! Not only can microscopists view incredibly detailed cellular structures with these valuable and very expensive instruments, they can actually see molecules and approach seeing at the atomic level.
- On the right of the slide are two images produced by TEM. Notice that they are both black and white. The top specimen, the plant root tip, could be magnified many, many times more than shown here. The lower image is of the Aids HIV-1 virus.
________________________________________

SLIDE CELLULAR-2-4
- This slide shows a Scanning Electron Microscope (SEM). It is much smaller than a TEM and produces an entirely different kind of image. Unlike the TEM, where the electron beam is transmitted through the specimen, in the SEM the specimen is placed at the very bottom of the column that directs the electron beam. Therefore, the electrons do not pass through the specimen, but bounce of its surface and are detected and digitized into an image. Consequently, the SEM only can look at the surface of a specimen, but it does so in a breathtaking way. SEM produces high-resolution images with a distinctive 3D appearance. SEM images are often colorized and represent some of the most stunning images in science.
- The sample at the top right is of mixed pollen particles. The image below is the head of a worm that lives deep in the oceans near hydrothermal vents.
________________________________________

SLIDE CELLULAR-2-5
- As mentioned above, both light microscopy and Transmission Electron Microscopy require either visible light or an electron beam to be transmitted through the specimen. In order to produce good images, the specimen, therefore, needs to be cut into thin slices. An instrument called a microtome is used to do this.
- In the case of light microscopy, the sections can be thicker than for TEM. The instrument shown on this slide is called an ultramicrotome and is used to cut prepared specimens into incredibly thin slices. As mentioned in the slide, a single human hair could be cut into at least 500 slices.
- The specimen is first “fixed”, stained and embedded in an epoxy resin, and then cut with a fine glass or diamond knife. The very delicate thin sections are collected and placed on small grids that are introduced into the TEM for viewing.
________________________________________

SLIDE CELLULAR-2-6
- In preparation for Investigation 2 Lab, this slide shows the technique of preparing a wet mount slide for the light microscope.
Note: In the lab, students will prepare wet mount slides of their cheek cells.
- Once the wet mount slides are prepared, any excess solution should be removed from around the coverslip with a tissue. It is not a good idea to dip the objective lens into the sample solution on a slide, particularly if it contains salt or other caustic agents.
________________________________________

SLIDE CELLULAR-2-7
Note: In the Lab for Investigation 2, students will also prepare a wet mount slide of both a cross-section and longitudinal section of fresh celery. The point is to get as thin a section as possible using a scalpel. Fresh, single-edged utility razor blades work even better, but they are very sharp and caution must be used. If the scalpel is new and sharp, this technique can be done fairly easily. The duller the scalpel becomes, the more difficult it is to get a nice thin section.
- One way to assure that a part of the specimen will be cut thin enough for good imaging is to cut into the stalk at a bit of an angle. Even though one side of the section may be too thin to be useful, the other edge should be thin enough for our purpose. The section is then placed on a drop of water on a fresh microscope slide and a coverslip is lowered onto the slide as with the cheek cell preparation.
________________________________________
SLIDE CELLULAR-2-8
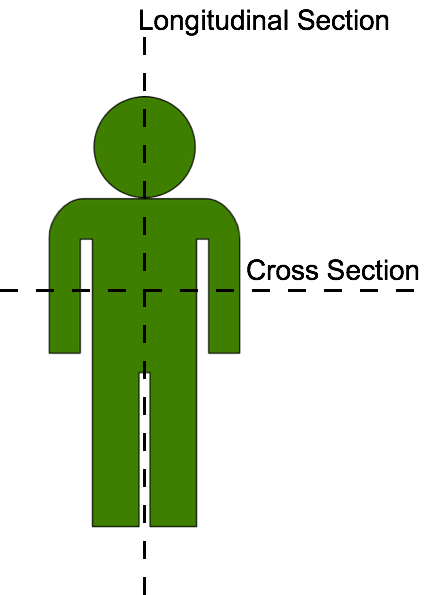
- This final slide shows how to cut a longitudinal section of the celery stalk. Remember that a longitudinal section is sectioned the “long” way.
Note: Below is a longitudinal and cross-section of a human form. This image does NOT show up when the slide presentation is in play mode and is simply included here for teacher reference.