Teacher Portal:
Cellular Organization
Investigation 1 – Lab
ZERO-IN
Italicized font represents information to be shared orally or physically completed with the students at this time.
The non-italicized font represents additional information included to support the teacher’s understanding of the content being introduced within the CELL.
MINDSET
This Investigation is designed to:
- direct students’ attention to the variables that should be considered when viewing microscopic specimens such as presence and type of staining and section preparation, and
- illustrate that often cells from different organisms appear similar under microscope observation
BE PREPARED
Teacher Preparation for the Investigation includes the following. This preparation should be done prior to students arriving in the lab.
- From the piece of colored paper, cut five strips of paper per group. The strips should be approximately 10 cm by 2.5 cm. These strips will be used to cover the labels of the slides students will be viewing. Fold the paper strip around the labeled end of each student group’s slides and place a piece of tape on the strip, creating a sleeve for the slide. This sleeve should cover the label and should allow students to slide the cover so that they can view the label at the end of the activity.
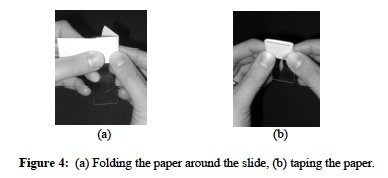
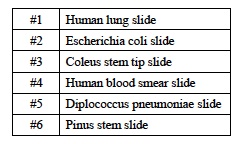
- Label the sleeve of each slide with its corresponding number according to the table below.
- Place the bottles of immersion oil next to the microscopes.
- Place the remaining materials at the distribution center.
- Divide the class into five cooperative groups.
Note: Each student lab group will need the materials listed below.
Student Preparation for the Investigation includes having students gather the following materials. This preparation takes place on lab day after student lab groups have settled at their assigned lab tables.
Note: The materials are listed in students’ SDRs. They are also listed below for your reference.
- (1) microscope
- (1) sheet of lens tissue
- (1) set of slides (#1 – #6)
Direct one student from each lab group to collect the materials listed in their SDRs.
INVESTIGATE
- Explain to students that throughout this investigation they will attempt to determine how cells from organisms are similar or different to cells from other organisms.
- Instruct students to familiarize themselves with the microscope.
Note: Students can refer to the procedure Microscope Use and Operation, if they need help.
- Tell students to work in groups to observe the characteristics of the cells on each of the six slides.
- Ask students to record the similarities and differences between the cells in each slide.
Note: Students should record their observations through written descriptions and through drawings in Table A of their Investigation One Data Record. Student observations may include but are not limited to shape, size, color and arrangement of cells.
- Encourage students to reflect on the PreLab video as they move through the procedural steps.
- Explain to students that during the Experiment, every procedural step is important. If one step is skipped, data can become invalid. To help students keep on track, direct them to read each step thoroughly, complete the step, then check it off (Read it – Do it – Check it off).
- Direct students to complete the procedural steps in their SDRs.
Note: The procedural steps are listed below for your reference. Teacher “Notes” are inserted, as needed, to help facilitate the lab.
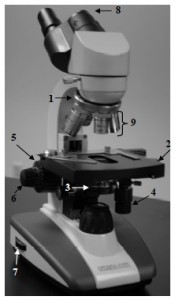
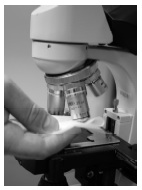
- Prepare the microscopes for use. If necessary review the procedure Microscope Use and Operation, if you need help. Use the image of the microscope to locate the different parts of the microscope.

- Look at Slide #1. After the microscope is turned on and you are ready to view the slide review the following steps.
- Turn the large coarse adjustment knob (5) away from you and focus the slide.
- Rotate the light intensity control knob (7) until the image can be seen clearly.
- Use the smaller fine focus knob (6) to focus more sharply.
Note: After this point, use only the fine focus knob to make adjustments. Do not rotate the coarse adjustment knob.
- Rotate the nosepiece so that you view the slide through the 10X objective, then the 40X objective. Focus using the fine focus knob.
- From the 40X objective, rotate the nosepiece slightly toward the 100X objective. Neither the 40X nor the 100X objectives should be in place.
- Place one small drop of immersion oil on the slide. Rotate the nosepiece so that the 100X objective is in place.
- Focus on the slide, using only the fine focus knob.
Note: After the 100X objective is in place and oil is on the slide, you may not view the slide with other objectives. You must first clean the slide and the 100X objective.
- Record: What do you see? Draw a picture and write a description in Table A. Be sure to label your drawing with the total magnification used to view the slide.
- Remove the slide and wipe it clean using a paper towel or tissue.
- Clean the 100X objective.
- Once you view a slide with the 100X objective, you must rotate the nosepiece clockwise until the 4X objective is in place.
- Clean the bottom of the 100X objective using lens paper. Do not use a tissue, paper towel, or any other type of paper, as this may damage the objective.
- Keep wiping the objective until no more oil residue is removed.
- Follow the same procedure to view slides 2-6.
- Record: Select the magnification that best shows each cell type. Draw a picture and write a description in Table A. Be sure to label your drawing with the objective used to view the slide.
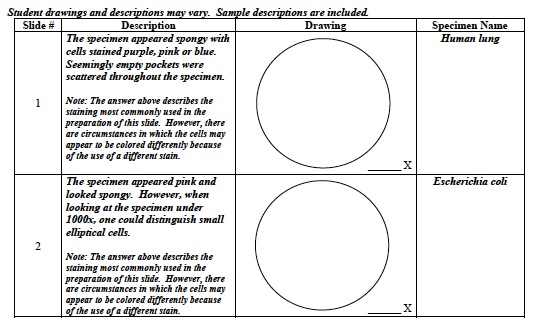
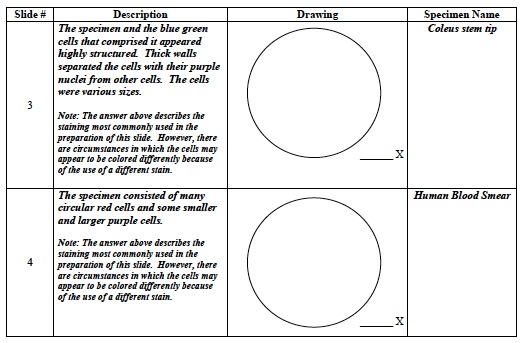
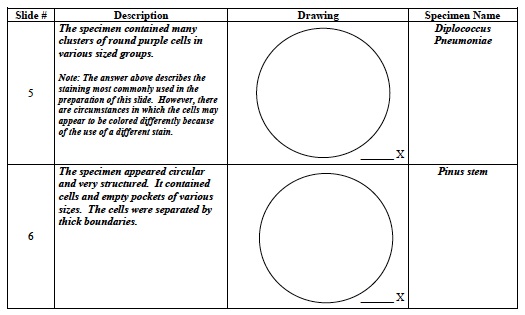
Table A
CLEAN UP
Let students know your expectations for clean up. Ask them to clean up.