Teacher Portal:
Cell Cycle and Cancer
Investigation 1 – Lab

ZERO-IN
Italicized font represents information to be shared orally or physically completed with the students at this time.
The non-italicized font represents additional information included to support the teacher’s understanding of the content being introduced within the CELL.
MINDSET
This Investigation is designed to:
- introduce students to the different types of cells within a given tissue,
- direct students to see a relationship between the organization of these different cell types and the function of the tissue,
- expose students to information on the function of three sample organs; lung, skin, and breast, and
- allow students to explore the relationship between the organization of the cells within these organs and the function of these organs.
BE PREPARED
Teacher Preparation for the Investigation includes the following. This preparation should be done prior to students arriving in the lab.
- Place one microscope at each group station.
- Place one slide each of normal skin, normal lung, breast active, and inactive tissue at each station.
- Divide students into five cooperative groups.
Note: There is no Student Preparation for Investigation 1 Lab.
INVESTIGATE
- Encourage students to reflect on the PreLab video as they move through the procedural steps.
- Explain to students that during the Experiment, every procedural step is important. If one step is skipped, data can become invalid. To help students keep on track, direct them to read each step thoroughly, complete the step, then check it off (Read it – Do it – Check it off).
- Direct students to complete the procedural steps in their SDRs.
Note: The procedural steps are listed below for your reference. Teacher “Notes” are inserted, as needed, to help facilitate the lab.
Trial 1:
- Set up the microscope according to the procedure, Microscope Use, and Operation.
- Place the skin slide on the microscope stage. Remember to focus first using the lowest power.
- Look at the different cell types and the organization of the cells by moving the microscope stage as needed. Look at the skin section under both the 4X and 10 X objectives.
Note: Remind students that they should examine the skin tissue at 4X, 10X, and 40X, but be sure they know to draw the picture of the 10X magnification. Students should not use the 100X objective to view the slide.
- Record: In the space below, draw a picture showing the different cell shapes and organization you can see with the 4X objective. You may need to move the stage to draw a full picture of the tissue section.

- Do all of the cells look the same? Does skin appear to be made of one tissue type? Explain. No, there are multiple cell types and tissues within the skin section. There are several layers of cells in the skin section and several types of cells within each layer. The top layer is composed of epidermal cells which are closely packed. The second layer composed of primarily connective tissue cells which are less densely packed in. The bottom layer, the subcutaneous layer, contains primarily large open fat cells.
- Record: The epidermis is the very thin top layer of the skin stained slightly purple. It contains primarily epidermal and connective tissue cells tightly packed to protect the body from external injury. Label the portion of the sample you think is the epidermis on your drawing.
- Record: The dermis layer is directly under the epidermis. It is stained pink/red. This layer contains connective tissue and is less densely packed. Look for blood vessels and nerve tissue in this portion of the tissue. Label the dermis on your drawing.
- Record: The subcutaneous tissue lies under the dermis and is primarily composed of large adipose (fat) cells. These cells look large and empty (the lipids are removed when the tissue is stained). You should also see the papilla indicating the growth point of the hair shaft in this portion of the tissue. There may be rings of cells making up sweat glands in this layer too. Label the subcutaneous layer on your drawing.
- How does the organization of the cells shown and described above help the skin function to protect the body? Explain. Student answers may vary. The top epidermal layer has compact cells to keep harmful things out of the body. The dermis has nerves so we can feel our surroundings and blood vessels to supply nutrients to the surrounding tissues. The subcutaneous layer contains a lot of fat cells to help keep us warm.
Trial 2:
- Place the lung slide on the microscope stage. Focus first on the lowest power, and then focus with each of the higher power objectives up to the 40X objective. Do not use the 100X objective.
- Look at the different cell types and the organization of the cells with each objective moving the microscope stage as needed. You should be able to see blood vessels which will have purple stained cells in a circle with red blood cells in the middle. You should also see open spaces that are lined with a single layer of alveoli cells. The large open spaces are alveolar ducts.
- Record: While examining the lung slide with the 40X objective, draw a picture of what you see in one field that contains alveoli below.
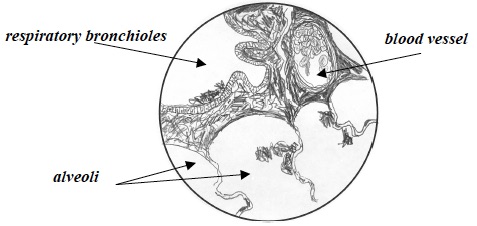
- Record: Examine the slide with the 40X objective and attempt to find the following structures: alveoli, respiratory bronchioles, and a blood vessel. The blood vessel can be identified because they will contain a lot of red blood cells. Label these structures on your drawing.
- How does the organization of the cells in the lung help with the function of this tissue? The single layer of alveolar cells surrounding the large open spaces will allow room for the inhaled air to travel into the lung. The small blood vessels in the alveolar walls make it easy for the oxygen in the inhaled air to diffuse into the blood and the carbon dioxide to go from the blood to the air to be exhaled.
Trial 3:
- Place one of the breast slides on the microscope stage. Focus first on the lowest power and the 10X and 40X power.
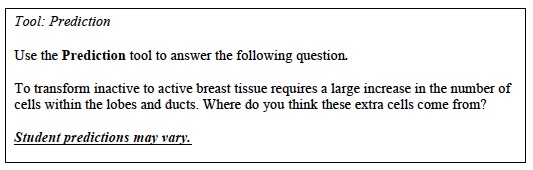
- Look at the different cell types and the organization of the cells by moving the microscope stage as needed. On both the active (lactating) breast tissue and inactive (resting) breast tissue, the connective tissue is stained red and the duct and lobe cells are stained purple. The active breast tissue will contain more duct and lobe cells. The inactive tissue may also have yellow fat cells.
- Record: Draw a picture of what you see when focused on a lobe and some connective tissue using the 10 X objective. Be sure to draw separate pictures for the active and inactive breast tissue.
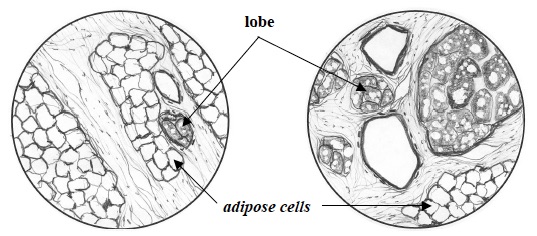
- Record: Find and identify the lobes that store milk, the ducts and the adipose (fat) cells. Label these structures on your drawing.
- Compare the inactive and active breast slides. What are the major differences in these tissues? The lobes and ducts in the active tissue are much larger leaving space for the milk to be stored and transported.
CLEAN UP
Let students know your expectations for clean up. Ask them to clean up.