Teacher Portal:
Atomic Structure
Investigation 3 – Lab

ZERO-IN
The italicized font represents information to be shared orally or physically completed with the students at this time.
The non-italicized font represents additional information included supporting the teacher’s understanding of the content being introduced within the CELL.
MINDSET
This Investigation is designed to
- allow students to further explore the Periodic Table of the Elements and its organization,
- continue students’ exploration of metals and nonmetals, and
- give students the opportunity to explore the electrical conductivity of elements.
BE PREPARED
Teacher Preparation for the Investigation includes the following. This preparation should be done prior to students arriving in the lab.
- Label a weigh dish “carbon” using masking tape and a lab marker. Prepare five pieces of carbon using a lab scoop. The pieces should be about 2 cm3.
- Label a weigh dish “sulfur” using masking tape and a lab marker. Prepare five sulfur lumps using a lab scoop. The pieces should be about 2 cm3.
- Label a weigh dish “magnesium” using masking tape and a lab marker. Use a metric ruler to measure five 3 cm strips of magnesium metal ribbon.
- Label five of each metal strip (zinc, iron, copper, and aluminum) with masking tape and a lab marker. The metal strips do not need to be stored in a weigh dish.
- Put all materials at the distribution center.
- Divide the students into five cooperative groups.
Note: Each student lab group will need the materials listed below.
Student Preparation for the Investigation includes having students gather the following materials. This preparation takes place on lab day after student groups have settled at their assigned lab tables.
Note: The materials are listed in students’ SDRs. They are also listed below for your reference.
- (1) sulfur lump
- (1) piece of carbon
- (1) 3 cm strip magnesium metal ribbon
- (1) iron strip
- (1) aluminum strip
- (1) zinc strip
- (1) copper strip
- (1) multimeter
- (1) red probe
- (1) black probe
- (1) wire with alligator clips
- (1) D cell battery
- (1) battery holder
- (1) pair of vinyl gloves per student
- (1) pair of goggles per student
- (1) Periodic Table per student.
Direct one student from each lab group to collect the materials listed in their SDRs.
INVESTIGATE
- Explain to students that they will measure the milliamps of electric currents that flow through different elements.
- Explain to students that they will be using a multimeter during their next two investigations.
- Explain to students that multimeters are instruments that can be used to measure both voltage and current, but they will only be measuring current.
- Encourage students to reflect on the PreLab video as they move through the procedural steps.
- Explain to students that during the Experiment, every procedural step is important. If one step is skipped, data can become invalid. To help students keep on track, direct them to read each step thoroughly, complete the step, then check it off (Read it – Do it – Check it off).
- Remind students to wear gloves, safety eyewear, and lab coats when handling chemicals.
- Direct students to complete procedural steps in their SDRs.
Note: The procedural steps are listed below for your reference. Teacher “Notes” are inserted, as needed, to help facilitate the lab.
- Use the masking tape and lab marker to label three weigh dishes with the following element names: Carbon, Sulfur, and Magnesium.
- Prepare the multimeter. If you need additional help you can refer to the Multimeter Use and Operation in the Procedure Toolbox.
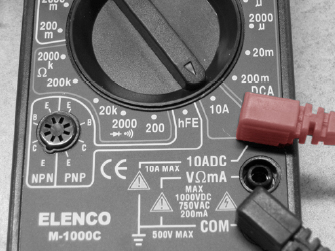
- Place the connector of a red probe into the outlet marked “10ADC” on the front of the multimeter.
- Place the connector of the black probe into the outlet marked “COM” on the front of the multimeter.
- Turn the selection dial on the multimeter to the 10A mark. This sets the multimeter to measure amps.
- Insert the tip of the red probe on the positive side of the battery holder between the copper strip and the plastic casing.
Note: To reduce the chance of blowing a fuse do NOT touch the red or black probes to the side of the batteries or battery holders when the selector dial is turned to 20m or 200m in the DCA range or when the red probe is in the 10A outlet.
- Attach one end of an alligator clip wire to the
 tab at the negative terminal of the battery holder.
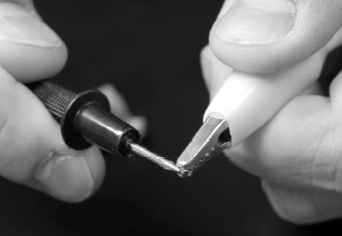
 - Test the amps of the current by placing the
tip of the black probe against the tip of the free end of the alligator clip. - How many amps strong is the current? 2.68 A
Note: If the current is less than 0.2 A, adjust the multimeter to the 200 mA (milliamp) range. Remove the black probe from the alligator clip and the red probe from the battery holder.
- Turn the selection dial to the “Off” position.
- Remove the connector of the red probe from the 10ADC outlet and into the VΩmA outlet.
- Turn the selection dial to the 200 mA mark in the DCA range and repeat steps 4 through 6. Record the current in units of mAmps (mA).
- Test electrical current as it flows through copper.
- Place the tip of the black probe and the free end of the alligator clip against the copper strip.
- Observe the current flowing through the circuit by reading the display on the multimeter.
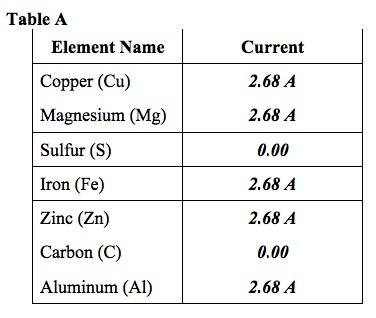
- Record the current for the element in Table A.Make sure to use the correct unit for current. If the selection dial is set at 10ADC, use units of amps (A). If the selection dial is set at 200 mA, use units of milliamps (mA).
- Repeat the previous steps using the remaining elements.
CLEAN UP
Let students know your expectations for clean up. Ask them to clean up.