Teacher Portal:
Atmosphere
Investigation 3 – Lab
ZERO-IN
Italicized font represents information to be shared orally or physically completed with the students at this time.
Non-italicized font represents additional information included to support the teacher’s understanding of the content being introduced within the CELL.
MINDSET
This Investigation is designed to:
- help students understand how the rising of a warmer air mass into cooler levels of the troposphere can result in condensation, cloud formation and precipitation along a front,
- promote student understanding that condensation and precipitation result from changes in the rate of evaporation and condensation of water and water vapor in the atmosphere,
- reinforce that differences in the density of air result in warmer air masses rising over cooler air masses,
- correlate the changes in pressure that accompany the passing of cold and warm fronts, and
- introduce students to the symbols used to designate cold and warm fronts on weather maps
BE PREPARED
Teacher Preparation for the Investigation includes the following. This preparation should be done prior to students arriving in the lab.
- For Trial 1, obtain 8 ice cubes for each student group. Keep ice cubes frozen until needed in the experiment.
- Trials 2 and 3 are designed for students to model the changes in pressure that accompany the passing of cold and warm fronts. These trials are optional. If time will not permit for Trials 2 and 3 to be completed, prepare stacks of paper for each student group and one copy of the Cold and Warm Front Pressure Changes Background record for each student.
- Place all materials at a central location.
- Divide students into cooperative groups of five students.
Note: Each student lab group will need the materials listed below.
Student Preparation for the Investigation includes gathering the following materials.
Note: The materials are listed in your SDR. They are also listed below for your reference.
- (1) hotplate/stirrer
- (1) ring stand
- (1) support ring
- (1) 2 prong clamp
- (1) piece of wire mesh
- (1) 100 ml graduated cylinder
- (2) L tubing connector
- (1) stopwatch/timer
- (1) 500 ml flask
- (1) 1 L pitcher
- (2) pieces of tubing 60 cm long
- (2) 400 ml beakers
- (1) 500 ml Erlenmeyer flask
- (1) #7 one-hole rubber stopper
- (1) test tube
- (1) lab marker
- (1) metric ruler
- (1) liter pitcher
- (1) pinch clamp
- (1) 50 ml syringe (graduations up to 60 ml)
- (1) 15ml centrifuge tube
- (1) medium binder clip
- (1) 1000 ml graduated cylinder
- (8) ice cubes
- (1) 60 ml syringe
- ( 1) plastic bag with zipper
- one pair (1) of hot hands protectors
- (1) small rubber band
- (1) pair of goggles for each student
Direct one student from each lab group to collect the materials listed in their SDRs.
INVESTIGATE
- Explain to students that they will investigate the movement of two different air masses and what occurs when they meet.
- Encourage students to reflect on the PreLab video as they move through the procedural steps.
- Explain to students that during the Experiment, every procedural step is important. If one step is skipped, data can become invalid. To help students keep on track, direct them to read each step thoroughly, complete the step, then check it off (Read it – Do it – Check it off).
- Direct students to complete the procedural steps in their SDRs.
Note: The procedural steps are listed below for your reference. Teacher “Notes” are inserted, as needed, to help facilitate the lab.
Trial 1:
- In this Trial, you will make a model to investigate what happens when air masses of two different temperatures meet and a front is formed. You will investigate what happens when a front is formed between a cold air mass and a warm moist air mass.
- Set up the model.
A. Put the ring stand on one side of the hot/stir plate. Adjust the ring so that it is 12 cm above the top of the hot/stir plate.
B. Attach the 2 prong clamp to the ring stand. The clamp should be 10 cm above the ring.
C. Place the wire mesh onto the ring.
D. Place the T connector into the hole of the rubber stopper.
E. Attach a piece of tubing to both ends of the T connector.
F. Attach the pinch clamp to one piece of tubing. The pinch clamp should be 4 cm from the end of the T connector.
G. Fill the plastic bag with a zipper with 8 ice cubes and 300 ml of cold water. Carefully squeeze excess air out of the bag. Close the plastic bag using the zipper.
H. Place the plastic bag with the ice water on the wire mesh.
I. Fold the plastic bag in half and place both top ends into the 2 prong clamp holder.
J. Close the 2 prong clamp holder so that it holds the top of the plastic bag in place.
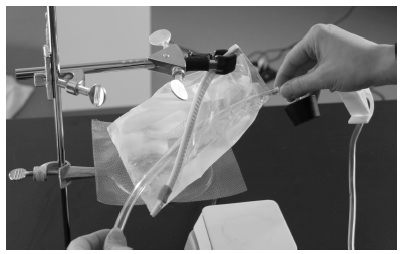
K. Look at the picture below. Then using the following steps to add to the model.
L. Take the piece of tubing WITHOUT the pinch clamp and move it between the two sides of the plastic bag. Start at the side of the plastic bag just below the clamp.
M. Move the tubing through the sides of the plastic bag until there is approximately 2 cm between the end of the plastic bag and the T connector.
N. Adjust the tubing so that it sits a low as possible between the two sides of the plastic bag.
O. Take the free ends of the plastic bag near the ring stand and fold them around the tubing. Hold the ends together with a binder clip. The model should now look like the picture below.
P. The cooled tubing represents the colder temperature of air at higher levels of the atmosphere (troposphere).
Q. Fill the 500 ml flask with 100 ml of water. Place the flask on top of the hot/stir plate.
R. Place the rubber stopper with the T connector and attached tubing into the top of the 500 ml flask. The water in the flask will be heat to create a MOIST warm air mass that rises.
S. Place the centrifuge tube into an empty 400 ml beaker.
T. Place the end of the tubing that goes through the ice water into the centrifuge tube. The centrifuge tube represents the surface of the Earth.
U. Check the model using the picture.
- The picture below shows the model. Label the parts of the model using the following terms: colder upper atmosphere, warm moist rising air mass, the surface of the Earth.
Note: After you have constructed your model, review what each part of the model represents. The tubing between the sides of the plastic bag with ice water represents the upper levels of the atmosphere that are significantly cooler than the lower levels. The air inside the flask containing water represents a warm MOIST air mass. The centrifuge tube represents the surface of the Earth.

- Think about the experiments conducted in Investigation One in which air was heated and cooled. Think about the experiments in Investigation One in which the temperature was measured above and below the metal cube and the ice cube.
- If air masses of two different temperatures meet and a front is formed, why does the colder mass of air sink below the warmer air mass? Why does the warmer air mass rise above the colder air mass? Explain your answer in terms of density. Colder air is denser than warmer air. Therefore the colder air sinks below the warmer air and the warmer air rises above the colder air.
 6. Begin testing the predictions by turning on the hot/stir plate to a setting of 10 (500 ºC). Careful, very hot!
7. Observe the water in the flask. It should begin to boil in approximately 8 to 10 minutes.
8. Once the water boils, create a rising MOIST warm air mass by continuing to heat the water for 2 minutes.
9. After 2 minutes turn off the hotplate.
10. Set the stopwatch/timer for 2 minutes.
11. Observe the flask and the tubing that goes into the “cold upper atmosphere.” Does any substance form in the flask or tubing? Students should indicate that water vapor forms in the flask and in the tubing that goes into the “cold upper atmosphere.” Water condenses or forms in the tubing that goes through the “cold upper atmosphere.”
12. After 2 minutes, carefully remove the tubing from the centrifuge tube. Lift the centrifuge tube out of the beaker and observe its contents.
13. What substance appeared in the centrifuge tube (“surface of the Earth)”? Students should indicate that water appeared in the centrifuge tube (“surface of the Earth”).
14. Use the hot hands protectors to lift the flask and pour the water into an empty 400 ml beaker to cool. Place the 500 ml flask on the lab table or heat resistant surface to cool for approximately 10 minutes.
Note: Questions 15-18 are included on the PostLab Analysis page. They appear here for the teacher’s reference as students progress through the lab.
- Why did water form in the tube that was placed between the sides of the ice water bag? Why did water appear in the centrifuge tube? Explain your answer in terms of the temperatures of the air in the flask and in the tube. The air that rose from the heated flask was moist and very warm. The molecules of water in this air possessed a great amount of kinetic energy. As the heated air rose, it encountered air in the tube that was surrounded by the ice water. The air in this tube was cooler than the air from the flask. As the temperature decreased the kinetic energy of the water molecules decreased. As a result there was condensation of some of the molecules of water vapor.
- In the model, the moist air mass was represented by the water vapor that rose up into the flask and the tubing. The cold upper atmosphere was represented by the tubing inside the bag with ice water. How does your experiment help explain why precipitation occurs at a front? The experiment showed that if warm moist air rises into the upper layers of the atmosphere where the temperature is colder than the temperature of the air in the warm moist air mass, the water vapor contained in the warm moist air mass will condense and precipitation can occur, falling to Earth.
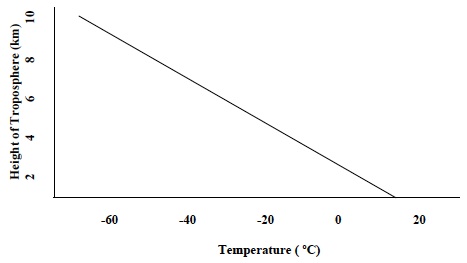
- The diagram below shows the relationship between altitude and temperature in the troposphere. Which part of the model does the diagram resemble? In the model, this is represented by the tubing that is between the sides of the bag containing ice water.
- Many of the fronts that form in the United States form over land. Why do these front produce precipitation? Explain your answer in terms of where the air masses that form the fronts may have formed. Even though fronts form over land, the air masses that meet to form a front may have developed over land OR water. If the warm air mass that forms the front formed over water or formed over land but moved and then remained over an area of water for a period of time, it would likely contain a significant amount of water vapor to produce precipitation when it rose into the upper levels of the atmosphere.
______________________________
Note: Trials 2 and 3 are optional depending upon the time constraints. If Trials 2 and 3 are to be completed in the lab, you will investigate how pressure changes with the passing of a cold front and warm front. In order to do this, you will combine two procedures you used in Investigation Two: simulation of rising and sinking air and the use of a model barometer. Record your data in Table E in your SDR and answer the question that follows Trials 2 and 3. If time does not permit Trials 2 and 3 to be completed, you should receive copies of the Cold and Warm Front Pressure Changes Background sheet. Use the information to answer the question that follows Trials 2 and 3 in your SDR.
Trial 2:
- In this Trial, you will model the changes in pressure that occur as a cold front is created and passes over an area.
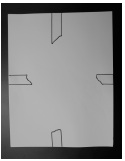
- Obtain a stack of white paper. Use masking tape to hold the stack together. Place a piece of masking tape on the paper at the top of the stack at four different locations: the center of each side and the center of the top and bottom of the stack.
- Pull the masking tape from the top paper to the paper on the bottom of the stack and secure.
- The stack of paper will be used to simulate the sinking of a cold air mass and the rising of a warm air mass.
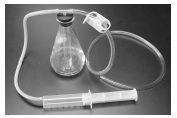
- Create a model of a barometer.
A. Use paper towels to remove any water from the inside of the 500 ml flask.
B. Use a graduated cylinder to pour 100 ml of water into a 500 ml flask. Add one drop of green food coloring to the water.
C. Obtain a test tube and turn it upside down. Using a metric ruler, make marks at 0.5, 1, 2, 3, 4, 5, 6, 7 and 8 cm from the open end of the tube.
D. Place the test tube into the flask with the open end down. Some water will move into the test tube.
E. Insert the T connector into the stopper hole.
F. Put the 60 ml syringe into one end of the tubing and use a rubber band to secure the syringe onto the tubing.
G. Remove the syringe plunger from the syringe. h. Obtain a second piece of tubing and place the pinch clamp onto it.
H. Completely close the tube so that air is unable to move through the tubing.
I. Place stopper with the T connector into the top of the flask. Gently push down on the rubber stopper to make sure that the stopper is sealed into the opening.
J. Attach the two pieces of tubing to the T connector in the stopper.
K. Re-insert the plunger into the syringe so that it passes the “stop line.” This is just above the 60 ml mark. As this occurs, there should be some resistance in the syringe.
L. Check the model using the picture below. Observe the level of water in the test tube. It should be just above or equal to the water level in the flask. If the water level is too high or too low, disconnect and then reconnect the tubing on the syringe and the tubing that runs from the syringe to the T connector.
- Record: Before a cold front forms a warm air mass is over an area. Model the initial pressure by pushing the plunger to the 30 ml mark of the syringe. Take an initial pressure reading by determining the level of water in the test tube. Write the “pressure” in Table E under “Pressure before cold front forms.” Record the pressure in cm of water.
- The front forms as the cold air mass sinks. It pushes under the warm air mass and the warm air mass begins to rise. Model the upward movement of the warm air mass from the lower to the upper levels of the atmosphere and the movement of the cold front into an area.
A. Place the stack of paper on the lab table. Grasp it with two hands and move it upward as quickly as possible.
B. Model the change in the barometer that occurs with the rising of the warm air. Pull air out of the flask by slowing pulling the plunger back to the stop line.
C. Record: Write the “pressure” in Table E under “Pressure as warm air mass rises and front is overhead.”
- As the front passes the cold air mass has sunk and is over the area. Model the downward movement of the cold air mass from the upper to lower levels of the atmosphere and the passing of the cold front out of the area.
A. Place the stack of paper on the lab table. Lift it as high as you can above the table. Grasp it with two hands and move it down as quickly as possible.
B. Model the change in the barometer that occurs with the sinking of the cold air. Push air into the flask slowly by pushing the syringe plunger into the syringe as far as it can go. Be careful not to push too quickly or the stopper will pop out.
C. Record: Write the “pressure” in Table E under “Pressure as cold air mass sinks and the front has passed.”
Trial 3:
- In this Trial, you will model the changes in pressure that occur as a warm front is created and passes over an area.
- Record: Before a warm front forms a cold air mass is over an area. Model the initial pressure by pushing the plunger to the 0 ml mark of the syringe. Take an initial pressure reading by determining the level of water in the test tube. Write the “pressure” in Table E under “Pressure before warm front forms.” Record the pressure in cm of water.
- The front forms as the warm air mass behind the cold air mass rises over the cold air mass. Model the upward movement of the warm air mass from the lower to the upper levels of the atmosphere and the movement of the warm front into an area.
A. Place the stack of paper on the lab table. Grasp it with two hands and move it upward as quickly as possible.
B. Model the change in the barometer that occurs with the rising of the warm air. Pull air out of the flask by slowing pulling the plunger back to the 30 ml line.
C. Record: Write the “pressure” in Table E under “Pressure as warm air mass rises and warm front is overhead.”
4. As the front passes the warm air mass continues to rise over the cold air mass and moves into the area. Model the continued upward movement of the warm air mass from the lower to upper levels of the atmosphere and the passing of the warm front out of the area.
A. Place the stack of paper on the lab table. Grasp it with two hands and move it upward as quickly as possible.
B. Model the change in the barometer that occurs with the movement of the warm air mass into the area. Pull air into the flask slowly by pulling the syringe plunger back to the 60 ml line.
C. Record: Write the “pressure” in Table E under “Pressure as warm air mass is overhead and the warm front has passed.”

CLEAN UP
Let students know your expectations for clean up. Ask them to clean up.