Teacher Portal:
Atmosphere
Investigation 1 – Lab
ZERO-IN
Italicized font represents information to be shared orally or physically completed with the students at this time.
Non-italicized font represents additional information included to support the teacher’s understanding of the content being introduced within the CELL.
MINDSET
This Investigation is designed to
- help students understand how the unequal heating of the Earth’s atmosphere causes the movement of air within the atmosphere,
- allow students to model the effect that increases in temperature have on the volume of a “parcel” of air,
- encourage students to recognize that as the temperature of a gas increases, its volume increases (Charles’ Law),
- provide students with an opportunity to investigate how changes in the temperature and volume of a gas affect its density,
- help students understand how changes in the density of air result in the movement of air in the atmosphere, and
- expand students’ view of weather and the atmosphere to include the idea that weather is a phenomenon that occurs as a result of changes in the physical properties of a gas.
BE PREPARED
Teacher Preparation for the Investigation includes the following. This preparation should be done prior to students arriving in the lab.
- Prepare ice packs for use by placing in a freezer the night before the experiments in Investigation One will occur.
- Keep the ice packs frozen until students are ready to use in Trial 2. If possible, transport and store the ice packs in a cooler once they are removed from the freezer.
- If ice packs are unavailable, obtain or make twelve (12) ice cubes for Trial 2. Keep the ice cubes frozen until students are ready to use in Trial 2. Prior to Trial 2, put the ice cubes in a 100 ml beaker. Place the beaker at a central location for easy student access. Students should use 2 ice cubes in place of 1 ice pack.
- Trial 2 requires students to use two thermometers.
- If thermometers have not been calibrated recently, they may indicate slightly different temperatures. If desired, calibrate the thermometers prior to student use. To calibrate the thermometers, move the glass tube either up or down the metal backing so that the red liquid is at the same numerical graduation mark on all thermometers.
- However, students CAN perform Trial 2 without the calibration of thermometers. In this case, students should note that some thermometers may indicate different initial temperatures. Therefore, as the experiment progresses they should focus on the changes in temperature that occur as a result of the experiment rather than on differences in the starting temperature between different thermometers.
- Place all materials at a central location.
- Divide students into cooperative groups of five students.
Note: Each student lab group will need the materials listed below.
Student Preparation for the Investigation includes gathering the following materials.
Note: The materials are listed in your SDR. They are also listed below for your reference.
- (1) 500 ml Erlenmeyer flask
- (1) balloon
- (1) medium size rubber band
- (1) hot plate/stirrer
- (1) pair of hot hands protectors
- (2) binder clips
- (1) stopwatch/timer
- (1) calculator
- (1) metric ruler
- (1) triple beam balance
- (1) liter graduated cylinder
- (1) piece of wire mesh
- (1) support ring
- (2) metal thermometers
- (2) thermometers (-20ºC – 150ºC)
- (1) pair of metal tongs
- (1) small container
- (1) 1L Erlenmeyer flask
- (1) liter pitcher
- (1) 2 prong clamp
- (1) metal cube
- (1) ring stand
- (1) ice pack
- (1) pair of goggles per student
- (2) paper towels
Direct one student from each lab group to collect the materials listed in their SDRs.
INVESTIGATE
- You will perform two Trials during this Investigation.
- In Trial 1 you will investigate whether changes in the temperature of air affect its mass, volume, or density.
Note: In Trial 1 students will need to determine the diameter of a balloon attached to a flask. If students are unfamiliar with the term diameter, explain the diameter as a measurement taken from one end of a sphere to the other. Emphasize that the diameter is measured at the center of the sphere.
- In Trial 2 students will investigate how changes in the temperature of air affect its movement in the atmosphere.
- Encourage students to reflect on the PreLab video as they move through the procedural steps.
- Explain to students that during the Experiment, every procedural step is important. If one step is skipped, data can become invalid. To help students keep on track, direct them to read each step thoroughly, complete the step, then check it off (Read it – Do it – Check it off).
- Direct students to complete the procedural steps in their SDRs.
Note: The procedural steps are listed below for your reference. Teacher “Notes” are inserted, as needed, to help facilitate the lab.
Trial 1:
- In this experiment, you will determine how changes in temperature affect the density and movement of air.
- Begin heating water needed for the experiment.
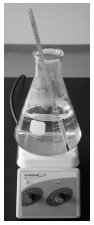
A. Measure 800 ml of water using a 1 liter graduated cylinder.
B. Pour the water into a 1 liter Erlenmeyer flask and place the flask on top of a hot plate/stir plate.
C. Turn the heating control to 10 (500 °C).
D. Place one glass thermometer inside the flask.
E. Heat the water to 75 °C.
F. While waiting for the water to heat, continue to set up the experiment by following the procedures below.

- Place the balloon over the neck of the 500 ml flask. Secure the balloon to the flask using a rubber band.
- Measure the mass of the flask, balloon, and air inside the flask. Refer to Triple Beam Balance Use and Operation if necessary. Record the mass in the first row of Table A.
Note: Understand that, in this experiment, we do not have a method for determining only the mass of the air inside the balloon and flask. Therefore, the mass of the flask, balloon and rubber band under different heating conditions are used.

- Observe that the balloon is deflated and the diameter is zero. Record your observation of the diameter in the first row of Table A.
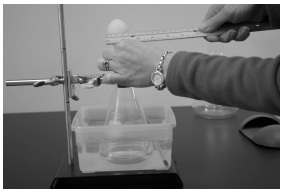
- Set up the apparatus that will be used to heat the air inside the flask. Use the picture to help you.
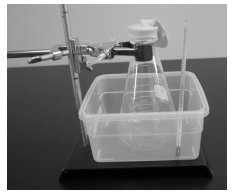
A. Place the small container on the plate of the ring stand.
B. Attach the clamp onto the support rod.
C. Place the flask with the balloon in the center of the small container.
D. Adjust the clamp so that it holds the neck of the flask. Tighten the clamp so that the flask cannot move inside the container. Make sure the balloon is NOT caught in the clamp.
E. Place one glass thermometer inside the container. Measure the temperature of the air that surrounds the flask. This is used to estimate the temperature of the air inside the flask.
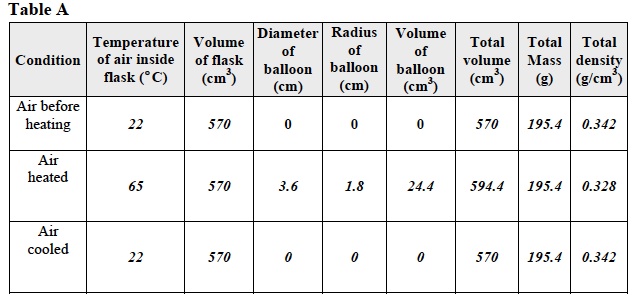
F. Record the temperature of the air inside the flask in the first row of Table A.
G. Remove the thermometer from the container.
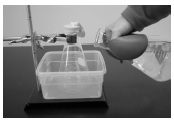
- Observe the temperature of the water in the flask on the hot plate. Once the temperature reaches 75 °C, remove the glass thermometer and use the hot hands protectors to carefully remove the flask from the hot plate/stir plate. Turn the hot plate/stir plate off.
- Using the hot hands protectors, carefully pour the water from the flask into the container. The water should surround the flask.
- Place a glass thermometer in the water that is in the container. Observe the flask and balloon for 5 minutes.
- What is happening to the balloon? The balloon is beginning to inflate.
- After 5 minutes measure the diameter of the balloon.
A. Do not remove the balloon from the flask.
B. Hold the neck of the balloon with one hand to make the shape of the balloon into a sphere.
C. Measure the diameter of the balloon using the metric ruler. The ruler should be held so that it crosses the center of the balloon.
Note: If students are unfamiliar with the term diameter, explain the diameter as a measurement taken from one end of a sphere to the other. Emphasize that the diameter is measured at the center of the sphere.
- Record: Write the diameter of the balloon in the second row of Table A.
- Record: Write the temperature of the water inside the container in the second row of Table A. This is also the temperature of the air inside the flask.
- Determine whether the mass of the air inside the flask and balloon changed as air was heated.
A. Loosen the clamp and carefully remove the flask from the small container.
B. Using a paper towel, completely dry the outside of the flask.
C. Measure the mass of the flask, balloon, and heated air inside the flask. Record the mass in the second row in Table A. Refer to Triple Beam Balance Use and Operation if necessary.
15. Keep the flask with the balloon on the triple beam balance for 5 minutes. Observe the flask and the balloon. Observe the beam of the triple beam balance.
16. What is happening to the balloon? The balloon is starting to deflate.
17. Does the mass of the flask, balloon, and air inside the flask change as the air inside the flask cools? No. The mass of the flask, balloon, and air inside the flask does not change as the air cools.
18. After 5 minutes determine the mass of the flask, balloon, and cooled air inside the flask, the temperature of the air inside the flask, and the diameter of the balloon.
A. Is the balloon still inflated? No
B. Record: Write the diameter of the balloon in the third row of Table A. Remember if the balloon is deflated, its diameter is 0.
C. Use the glass thermometer to measure the temperature of air OUTSIDE the flask. This is an estimate of the temperature of the air inside the flask.
D. Record: Write the temperature of the air inside the flask in the third row of Table A.
E. Determine the mass of the flask, balloon, and cooled air inside the flask. Record the mass in the third row in Table A.
19. Determine the volume of air that was inside the flask. Remove the balloon from the flask. Using a 1liter pitcher, completely fill the flask with water.
20. Measure the volume of the flask by pouring the water into the 1 liter graduated cylinder. Record the volume of the flask in Table A for each of the three conditions.
21. Predict. What happened to the volume of air inside the flask and balloon as the air was heated? Student answers will vary. However, students may predict that the volume of air increased because of their observations of the inflation of the balloon as the air was heated.
22. Calculate the volume of air inside the balloon when the air was heated and cooled using the formula for the volume of a sphere. Use the space below for calculations. Record the volumes in Table A.
- Look at the data in Table A. Look at the mass and the volume of the flask, balloon, rubber band, and air when the temperature of the air changed.
 24. What was the relationship between the temperature of air and its mass? There was no relationship between the temperature of air and its mass. The mass of the air did not change when the temperature of the air changed.
25. What was the relationship between the temperature of air and its volume? As the temperature of the air increased, the volume of air increased. As the temperature of the air decreased, its volume decreased.
26. Do the results from Trial One follow Charles’ Law? Use data from Trial 1 to answer the question. Yes. Charles’ Law indicates that as the temperature of a gas increases, the volume of a gas increases and as its temperature decreases so does its volume. As the air inside the flask was heated, its volume increased from 570cm3 to 594.4 cm3. As the air cooled, its volume decreased to 570 cm3.
27. Calculate the density of the flask, balloon, and air inside the flask after the air was heated and cooled? Record the densities in Table A. Use the Calculation of Density procedure for help if necessary. Use the space below for calculations. Density= mass/volume Density of air before heating= 195.4 g/ 570 cm3=0.342g/ cm3 Density of air when heated= 195.4 g/ 594.4 cm3=0.328g/ cm3 Density of air when cooled=195.4 g/ 570 cm3 = 0.342g/ cm3
28. How do changes in the temperature of the air effect is density? As the temperature of air increased, its density decreased. This occurred because the mass of the air remained constant as it was heated but its volume expanded. As the temperature of the air decreased, it density increased. The result was more molecules in a given area as compared to before it was heated. This occurred because the mass of the air remained constant as the air was cooled but its volume decreased. The result was more molecules in a given area as compared to when it was heated.
Trial 2:
- Begin by setting up an apparatus to test the temperature and movement of air.
A. Attach one support ring 15 cm from the base of the ring stand.
B. Set the wire mesh on top of the ring.
C. Obtain the ice pack. The ice pack will eventually sit on top of the wire mesh.
D. Record: Measure the thickness of the ice pack.
Note: The thickness of the ice pack may vary. The sample ice pack used was 4 cm thick.
E. Put the ice pack back into a cooler or freezer.
F. Use one binder clip to secure a thermometer to the ring stand. The tip of the thermometer should be 4 cm above the top of the ice pack. For example. If the ice pack is 4 cm thick, the thermometer would be 8 cm above the wire mesh. The numbers of the thermometer should be easily visible for data collection.
G. Attach the second thermometer to the ring stand with another binder clip. The tip of the second thermometer should be directly below the first thermometer, and 4 cm below the wire mesh.

2. Take a reading for each thermometer.
3. Record: Write the temperatures shown on both thermometers in Table B under “Initial Temperature.”
4. In the next part of the experiment, an ice pack will be added to the wire mesh.
5. Place the ice pack in the center of the wire mesh directly above and below the two thermometers. Set the stopwatch/timer for 5 minutes. In order to obtain accurate results, keep movements around the ring stand to a minimum. Movements around the ring stand will cause large movements of air which can interfere with the results.
6. Record: After 5 minutes, record the temperatures of both thermometers in Table B under “End temperature.”
7. After recording the temperatures, place a hand directly above the ice pack.
8. What does the air feel like directly above the ice pack? Students should indicate that the air above the ice pack is the same as in the rest of the classroom.
9. Place a hand directly below the ice pack.
10. What does the air feel like directly below the ice pack? Students should indicate that the air feels cooler below the ice pack.
11. Remove the ice pack from the wire mesh.
12. Prepare to test the temperature of air above and below a metal cube that is heated.
13. Make sure the thermometers have stabilized at room temperature and that the temperatures above and below the wire mesh are the same.
14. Record: Write the temperatures shown on both thermometers in Table B under “Initial Temperature.”
15. Place a metal cube on the hotplate/stir plate. Refer to the Procedure Hot Plate/Stirrer Use and Operation if necessary.
16. Turn the hotplate to a setting of 10 (500°C ) and set the timer/stopwatch for 4 minutes.
17. After 4 minutes, turn off the hotplate/stir plate. Use the tongs to move the metal cube onto the wire mesh. Do not touch the cube with unprotected hands as it is very hot. Make sure the cube is centered between the two thermometers and begin timing. In order to obtain accurate results, keep movements around the ring stand to a minimum. Movements around the ring stand will cause large movements of air which can interfere with the results.
18. Record: After 5 minutes, record the temperatures of both thermometers in Table B under “End temperature.”
19. After recording the temperatures, place a hand directly above the metal cube. Be careful not to touch the metal cube as it is very hot.
20. What does the air feel like directly above the metal cube? Students should indicate that the air above the metal feels warm.
21. Place a hand below the metal cube.
22. What does the air feel like directly below the metal cube? Students should indicate that the air below the metal cube feels the same as the air in the classroom.
23. Allow the metal cube to cool on the wire mesh.
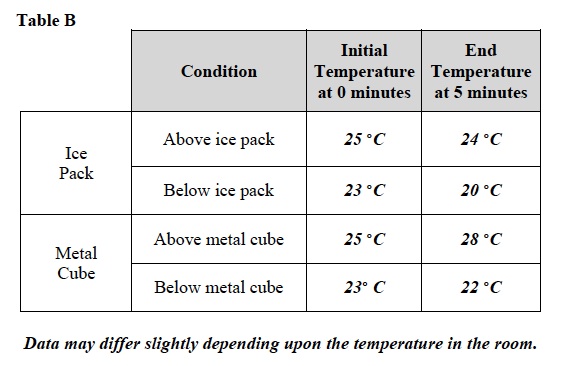
24. Look at the data in Table. B. Did the temperature of the air above the ice pack change? It is likely that the temperature above the ice pack will remain the same or increase slightly.
25. Did the temperature of the air below the ice pack change? Yes. The temperature of the air decreased.
26. Where did the temperature of air change around the metal cube? The air above the metal cube changed in temperature. The air above the metal cube became warmer. The air below the metal cube either did not changed or changed by a smaller degree than the air above the metal cube.
27. Look at the data in Table B. At the end of the experiment, where was the colder air found in each case? The colder air was found below the ice pack and metal cube.
28. At the end of the experiment, where was the warmer air found in each case? The warmer air was found above the ice pack and metal cube.
CLEAN UP
Let students know your expectations for clean up. Ask them to clean up.