Teacher Portal:
Acids and Bases
Investigation 2 – Lab

ZERO-IN
Italicized font represents information to be shared orally or physically completed with the students at this time.
The non-italicized font represents additional information included to support the teacher’s understanding of the content being introduced within the CELL.
MINDSET
This Investigation is designed to:
- allow students to view and demonstrate the concept of concentration,
- introduce students to the concept of decreasing the concentration of a solution by dilution,
- give students the opportunity to perform a serial dilution of an acid,
- allow students to measure the pH of various concentrations of an acid, and
- allow students to correlate pH with the concentration of hydrogen ions.
BE PREPARED
Teacher Preparation for the Investigation includes the following. This preparation should be done prior to students arriving in the lab.
- Prepare 100 ml of 1N HCl solution using the following procedure.

Note: The hydrochloric acid solution may be stored indefinitely in closed bottles. The solution of HCl does not pose any significant hazard. If spills occur, simply rinse the skin, piece of clothing, or table with water. Care, however, should be exercised to prevent splashing any solution into the eyes.
- Next, measure 100 ml of 1N HCl and pouring it into the 400 ml beaker. Add 5 drops of red food coloring and stir until dispersed using a glass stir rod. Adding red food coloring will allow students to more easily observe the effects of diluting the acid.
Note: The color of the red food coloring is not affected by the low pH of the 1N HCl.
- For each student group, pour 10 ml of the red-colored 1N HCl into a 50 ml beaker.
- Place all materials at a central location.
- Divide students into cooperative groups of five students.
Note: Each student lab group will need the materials listed below.
Student Preparation for the Investigation includes having students gather the following materials. This preparation takes place on lab day after student lab groups have settled at their assigned lab tables.
Note: The materials are listed in students’ SDRs. They are also listed below for your reference.
- (1) pair of goggles per student
- (1) pair of gloves per student
- (1) test tube rack
- (6) 15 ml centrifuge tubes
- (6) dropper pipettes
- (1) box of pH paper strips
- (1) pair of forceps
- (1) lab marker
- (1) piece of plastic wrap 30 cm long, masking tape
- (1) 400 ml beaker filled with distilled water
- (1) 50 ml beaker containing 10ml of 1N HCl colored with red food coloring
Direct one student from each lab group to collect the materials listed in their SDRs.
INVESTIGATE
- Explain that dilution is accomplished when additional solvent but no additional solute is added to a solution. The result is a less concentrated solution than the original solution.
Note: The following is a Teacher Demonstration.
- To demonstrate the concept of dilution, pour 100ml of the more concentrated red solution from the previous demonstration into a 100ml graduated cylinder. Pour the remaining 900ml of solution out and into the sink.
- Add 900 ml of water, the solvent, to the graduated cylinder. Cover with a piece of plastic wrap and invert to mix.
- Discuss the color of the two solutions. The color of each solution should be the same shade of pink or light red.
- Inform students that you have diluted the more concentrated solution with water so it is now the same shade of red and should have the same concentration as the first solution. The concentration of each of the two solutions is now 1 drop of food coloring in 1 liter of water.
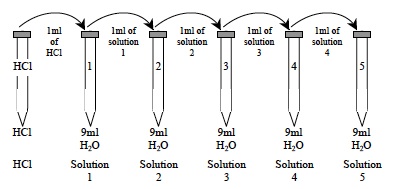
- Explain to students that in this Investigation, they will dilute a solution of hydrochloric acid using a technique called serial dilution and then determine the pH of the different dilutions. Discuss the technique using the following explanation and the diagram below. This diagram is also present in the Student Data Record.
- Using this technique, students will add 1ml of a concentrated solution containing hydrochloric acid as the solute to 9 ml of the solvent, water. The resulting dilution has a total volume that is 10 times greater than the original 1 ml and 1/10th the concentration of the original concentrated solution.
- A series of such dilutions can be made that are each 1/10th the concentration of the previous solution.
- Use the diagram (below) from the Student Data Record to help explain the procedure.
- Encourage students to reflect on the PreLab video as they move through the procedural steps.
- Explain to students that during the Experiment, every procedural step is important. If one step is skipped, data can become invalid. To help students keep on track, direct them to read each step thoroughly, complete the step, then check it off (Read it – Do it – Check it off).
- Direct students to complete the procedural steps in their SDRs.
Note: The procedural steps are listed below for your reference. Teacher “Notes” are inserted, as needed, to help facilitate the lab.
- In this Investigation, you will use a technique called serial dilution to dilute an acid 5 times. You will determine the H+ ion concentration each time by measuring the pH of each of the solutions.
- Label the 50 ml beaker “HCl” and the 400 ml beaker “H2O.”
- Place the centrifuge tubes in a row in the test tube rack. Using the lab marker and the masking tape, label the left most centrifuge tube “HCl.” Label the next centrifuge tube “1,” the next “2,” and continue until you have labeled the last centrifuge tube “5.”
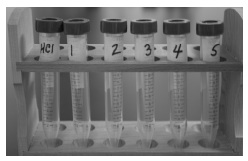
- Use one of the dropper pipettes and fill the “HCl” centrifuge tube with 7 ml of hydrochloric acid (HCl) from the 50 ml “HCl” beaker. Screw the cap back on the centrifuge tube and return the dropper pipette to the beaker.
- Use a second dropper pipette to add 9ml of distilled water from the 400 ml “H2O” beaker to centrifuge tubes 1, 2, 3, 4, and 5. Add water until the volume reaches the 9ml mark on the side of each centrifuge tube. Screw the caps back on the centrifuge tubes and return the dropper pipette to the beaker.
- Use the following diagram to help you with your serial dilutions.
Note: Hydrochloric acid (HCl) is not normally red. Red food coloring has been added to help you see the differences among your dilutions.
A. Completely empty the dropper pipette from the 50 ml “HCl” beaker into the beaker. Use the dropper pipette to transfer 1ml of the HCl from the centrifuge tube labeled “HCl” to tube 1. The volume should reach the 10 ml mark on the side of the tube.
B. Return all excess hydrochloric acid (HCl) in the dropper pipette to the centrifuge tube labeled “HCl” and screw the cap on. Return the dropper pipette to the 50 ml “HCl” beaker.
C. Screw the cap back onto tube 1 and turn it upside down then upright again three times to mix the contents.
D. Use a clean dropper pipette to transfer 1ml of the solution from tube 1 to tube 2. The volume should reach the 10 ml mark on the side of the tube. Return any excess solution to tube 1 and screw the cap on.
E. Screw the cap back onto tube 2 and turn it upside down then upright again three times to mix the contents.
F. Repeat this procedure as shown in the diagram until the dilutions have been prepared for tubes 3, 4, and 5.
- Spread the plastic wrap on the table next to the test tube rack.
- Label the top of a pH paper strip with “HCl.” Label 5 additional strips with numbers 1, 2, 3, 4, and 5.
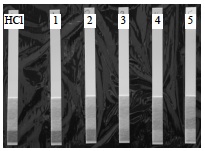
- Using forceps grasp the top of the pH paper strip labeled “HCl.” Dip ¼ of the strip into the liquid in the tube labeled “HCl.”
- Place the pH paper strip just inside the lower-left corner of the plastic wrap.
- Dip ¼ of strip 1 into the liquid in tube 1.
- Remove the pH paper strip and place it to the right of the strip labeled “HCl.”
- Dip ¼ of strip 2 into the liquid in tube 2. Remove the pH paper strip and place it to the right of strip 1.
- Repeat this procedure until you have lined up all 6 pH paper strips on the plastic wrap as shown in the picture. Fold the excess plastic wrap down over the strips.
- Starting with the pH paper strip numbered 0, match the color on the strip with the pictures of the squares on the pH chart. Estimate the pH of the HCl that most closely corresponds to the color of the colored squares in the pictures. Find the pH to the nearest half of a pH unit, for example, 3.0, 3.5, or 4.0.
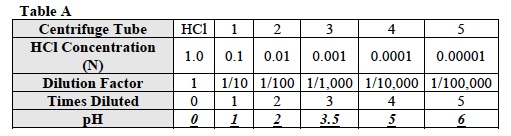
- Record the pH value in Table A.
- Find the pH of the solutions in tubes 1, 2, 3, 4, and 5 and record the pH values in Table A
CLEAN UP
Let students know your expectations for clean up. Ask them to clean up.