Teacher Portal:
Watersheds
Investigation 1 – Lab

ZERO-IN
The italicized font represents information to be shared orally or physically completed with the students at this time.
The non-italicized font represents additional information included supporting the teacher’s understanding of the content being introduced within the CELL.
MINDSET
This Investigation is designed to:
- build an understanding of the importance of dissolved oxygen in a watershed,
- allow student discovery of the ways that salinity, temperature, and water velocity can affect the dissolved oxygen content of water,
- introduce students to the use and operation of oxygen meters.
BE PREPARED
Teacher Preparation for the Investigation includes the following. This preparation should be done prior to students arriving in the lab.
1. At least 24 hours before the Investigation, prepare the salt solutions (see directions below). Salt solutions must be prepared in advance to be sure that any degassing caused by the addition of salt to the water does not interfere with the dissolved oxygen readings. Salt solutions can be stored in plastic bottles until needed. The teacher may wish to prepare enough salt solutions for this Investigation and the Performance Assessment at one time. Note: Salt solutions must be prepared with distilled water and pickling salt or reagent grade sodium chloride (NaCl) for this Investigation. Pickling salt and reagent grade sodium chloride do not contain additives found in table salt that can interfere with obtaining accurate dissolved oxygen readings.
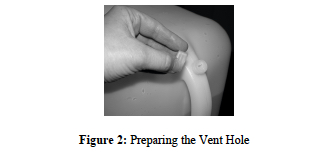
A. Remove the vent cap and use a sharp knife to cut a small vent hole. Replace the vent cap. See Figure 2 below:
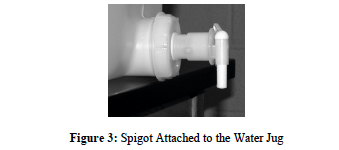
B. Using a sharp knife, cut the center out of the large cap.
C. Screw the spigot into the large cap and place the cap on the jug, as shown in Figure 3 below:
2. Use a permanent marker to label the spigots with the numbers 1, 2, and 3 as follows:
A. Hold the spigot horizontally and look through the opening that attaches to the cap. Make sure that the spigot is in the off position.
B. Turn the spigot valve so that it is almost in the off position. All but a small sliver of the opening should be covered by the valve’s plastic guard. Mark the position of the spigot with the number “1” using a lab marker. In this position, a minimum amount of water should be able to flow from the spigot.
C. Turn the spigot until the valve is completely open. The valve is completely open when no plastic covers the opening. Mark the position of the spigot with the number “3” using a lab marker. In this position, a maximum amount of water should be able to flow from the spigot.
D. Place a third mark evenly between Position 1 and Position 3. Label this position with the number “2” (Figure 4c). Ensure that the three positions are marked an equal distance from one another.
E. Turn the spigot into the off position and attach it to the large plastic jug.

3. Place a water jug with a spigot attached at each lab table. Make sure the spigot is in the “off” position. To facilitate classroom management, you may want to fill the water jugs prior to the class. Jugs should be filled above the 4-gallon mark.
4. Place the remaining materials at the distribution center.
5. Divide students into five cooperative groups.
Note: Each student lab group will need the materials listed below.
Student Preparation for the Investigation includes having students gather the following materials. This preparation takes place on lab day after student lab groups have settled at their assigned lab tables.
Note: The materials are listed in students’ SDRs. They are also listed below for your reference:
- 1 large plastic jug with a spigot
- 1 piece of vinyl tubing, 75cm
- large pinch clamp
- 1 pitcher, 1L
- 1 stopwatch
- 1 small bucket
- 1 graduated cylinder, 1L
- 1 metric ruler
- water, approximately 16L
- masking tape
- calculator
INVESTIGATE
- Instruct each group to obtain the following materials from the distribution center: one (1) triple beam balance, one (1) stir bar, one (1) hotplate/stirrer, thirty (30) ml 50% glycerin, 1.0g flour, one (1) stopwatch, one (1) lab scoop, one (1) wooden test tube rack, two (2) weigh dishes, one (1) 400 ml beaker, six (6) plastic droppers, five (5) 15 ml centrifuge tubes, masking tape, one (1) clear metric ruler, one (1) glass stir rod, one (1) box Kimwipes, one (1) water bottle with water, one (1) cuvette, one (1) spectrophotometer, one (1) triple beam balance, 300 ml distilled water and one (1) lab marker.
- If students have not had experience using a weigh dish to measure substances on the triple beam balance, demonstrate the procedure to the class. Show students how to account for the mass of the weighing dish by doing a sample calculation on the blackboard. Refer students to the procedures: Triple Beam Balance Use and Operation and Measuring Mass Using a Weigh Dish or Beaker, if necessary.
- When groups are preparing the watershed models, remind students that they will need to place the stir bar in the water before adding the flour.
- Students should begin the experiment by making qualitative observations of the water velocities at each of the three spigot positions and recording their results in Table A:

- Be sure students place pinch clamps on the tubing approximately 6 cm below the bottom of the spigot. Students should open the pinch clamps completely and start water flowing into the bucket. While the water is still flowing, the clamps should be shut as tightly as possible. The tubing above the pinch clamp should be completely filled with water before shutting off the spigot. This will ensure consistent water flow throughout the experiment. Students may need to tap the tubing slightly to allow the tubing above the clamp to fill.
- Before beginning the trials, direct students to read the steps prior to and included in Trial 1. Lead a class discussion to be sure all groups understand the procedure.
- If necessary, assist students in calculating discharge and velocity using the equations listed in Trial 1. Students should record the data for all three trials in Table B. Table B is located in the Student Data Record:

- As a class, read the Background following Trial 3 in the Student Data Record or ask for a student volunteer to read the Background aloud. Lead a class discussion explaining that water velocity is the independent variable of the experiment even though it could not be measured directly.
- If necessary, assist students in graphing water velocity versus discharge. If students have not used best-fit lines before, review the procedure Drawing of a Best Fit Line. Make a graph on the board using one group’s data, and demonstrate drawing a best fit line to the class. Note: This step may be left for PostLab.
CLEAN UP
Let students know your expectations for clean up. Ask them to clean up.