Teacher Portal:
Simple Machines
Investigation 3 – Lab

ZERO-IN
Italicized font represents information to be shared orally or physically completed with the students at this time.
The non-italicized font represents additional information included to support the teacher’s understanding of the content being introduced within the CELL.
MINDSET
This Investigation is designed to:
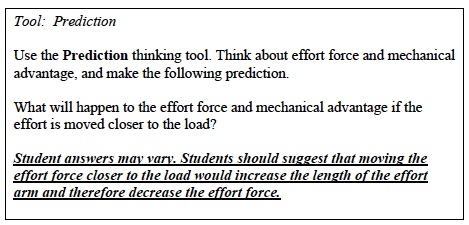
- demonstrate to students that moving the effort closer to the load in a third-class lever decreases the mechanical advantage due to force and distance,
- demonstrate to students that moving the effort closer to the fulcrum in a third-class lever increases the mechanical advantage due to force and distance,
- demonstrate to students that the mechanical advantage offered by a third-class lever can never be greater than 1,
- demonstrate through modeling that the human arm is a third-class lever, with the bicep as the effort, the hand as the position of the load, and the elbow as the fulcrum,
- demonstrate to students that because the positions of the effort (bicep) and load (hand) in the human arm is fixed, mechanical advantage can not change, and
- demonstrate to students that when effort and load arm lengths are fixed, varying load force by varying mass has no effect on mechanical advantage.
BE PREPARED
Teacher Preparation for the Investigation includes the following. This preparation should be done prior to students arriving in the lab.
- Place all materials at the distribution center.
- Divide students into five cooperative groups.
Note: Each student lab group will need the materials listed below.
Student Preparation for the Investigation includes having students gather the following materials. This preparation takes place on lab day after student lab groups have settled at their assigned lab tables.
Note: The materials are listed in students’ SDRs. They are also listed below for your reference.
- (3) metric rulers
- (1) 100-gram mass
- (1) 20-gram mass or (1) 25-gram mass (either may be used)
- (1) 50-gram mass
- (1) roll of masking tape
- (1) calculator
- (1) spring scale (5N)
Direct one student from each lab group to collect the materials listed in their SDRs.
INVESTIGATE
- Encourage students to reflect on the PreLab video as they move through the procedural steps.
- Explain to students that during the Experiment, every procedural step is important. If one step is skipped, data can become invalid. To help students keep on track, direct them to read each step thoroughly, complete the step, then check it off (Read it – Do it – Check it off).
- Direct students to complete the procedural steps in their SDRs.
Note: The procedural steps are listed below for your reference. Teacher “Notes” are inserted, as needed, to help facilitate the lab.
Trials 1-4:
- Calculate: Determine the force of gravity on the load that will be used in the experiment. This is the load force.
A. One 100 gram mass will be used as the load for the experiment. The mass is calibrated. Therefore, it does not need to be placed on a triple beam balance.
B. Calculate: Convert the mass of the load in grams to kilograms.
100 g= 0.1 kg
C. Calculate: Use the following formula to determine the force of gravity on the load. Round the answer to the nearest whole number.
Force of gravity (N) = mass (kg) x g g = 9.8 m/s2
Force = 0.1 kg x 9.8 m/s2
Force= 0.98 N
Force= 1 N
D. Record: Write the load force in each row of the column labeled “Load force” in Table A at the end of the Investigation Three Student Data Record.
Trial 1:
- Construct a third-class lever using the following steps.
A. Calibrate the spring scale in its normal upright position. Refer to the Spring Scale (5N) Use and Operation procedure for assistance if necessary.
B. Attach one 100 gram mass to the 0 cm end of the ruler with a piece of masking tape. This is the load.
C. Tape the hook of the spring scale in the groove of the ruler at the 15 cm mark. This is the effort.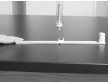
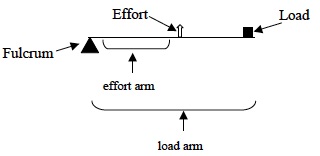
D. Place the lever flat on the table. One person should put their finger on the edge of the ruler on the 30 cm side. This will be the fulcrum.
2. Find the length of the load and effort arms.
A. Length of load arm = Distance from fulcrum to center of load.
B. Length of effort arm = Distance from the fulcrum to the center of the effort.
- Record: Measure the length of the load arm and record the length in Table A.
- Record: Measure the length of the effort arm and record the length in Table A.
- Record: Find the effort force required to lift the load 5 cm off the table.
A. Place a ruler upright beside the load end of the lever with the “0” mark down.
B. Pull up on the spring scale until the load is at the 5 cm mark.
C. Use the spring scale to measure the effort force needed to lift the load off the table and record it in Table A.
Trial 2:
- Move the point at which the effort will be applied to the 10 cm mark.
- Repeat the procedures used in Trial 1 to measure the length of the effort arm, length of the load arm, and the effort force.
- Compare the effort required to lift the load in this trial to Trial 1. Did it feel easier or harder to lift the load in this trial? It felt easier to lift the load in this trial as compared to Trial 1.
Trial 3:
- Move the point at which effort will be applied to the 4 cm mark.
- Repeat the procedures used Trial 1 to measure the length of the effort arm, length of the load arm and the effort force.
- Compare the effort required to lift the load is this trial to Trials 1 and 2. Did it feel easier or harder to lift the load in this trial? It felt easier to lift the load in this trial as compared to Trials 1 and 2.
Note: The Analysis Questions for Trials 1-3 are located on the PostLab page for Investigation 3.
Trial 4:
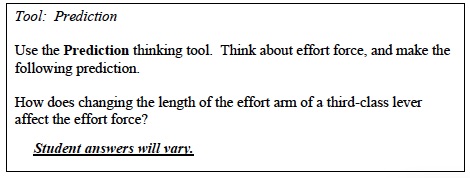
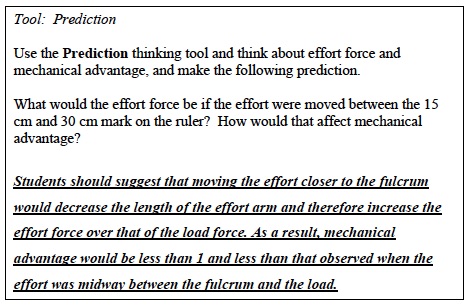
- Test the prediction. Move the effort anywhere between the 15 cm and 22 cm mark on the ruler.
- Where will the load be positioned? Student answers will vary.
- Record: Measure the length of the load arm and record the length in Table A.
- Record: Measure the length of the effort arm and record the length in Table A.
- Pull up on the spring scale until the ruler is at the 5 cm mark.
- Measure the effort force applied to the ruler and record it in Table A.
Note: The Analysis Questions for Trial 4 are located on the PostLab page for Investigation 3.

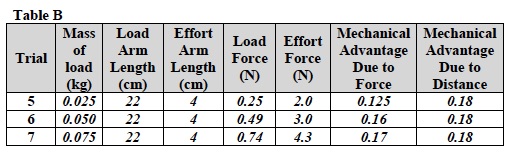
Trials 5-7:
- In these Trials, you will investigate an example of a third-class lever, the bicep.
- Find the loads that will be lifted during this experiment. This is the load force.
A. Trial 5 will use the 20-gram mass or a 25-gram mass. Choose one of these masses to use for Trial 5.
B. Trial 6 will use the 50-gram mass.
C. Trial 7 will use a mass of 70g (20g mass and 50g mass combined) or a mass of 75g (25g and 50g mass combined) depending on whether you have a 20g or 25g mass. If you used the 25 gram mass in Trial 5 then use a combined mass of 75 grams. If you used the 20 gram mass in Trial 5 then use a combined mass of 70 grams.
D. Convert the mass of the load in grams to kilograms and record below. Sample data shown below.
25 grams = 0.025 kg
50 grams = 0.05 kg
75 grams = 0.075 kg
E. Calculate: Use the following formula to determine the force of gravity on the load. Round the answer to the nearest tenth of a Newton and record the values in Table B.
Force of gravity (N) = mass (kg) x g g = 9.8 m/s2
Sample data shown below.
25 gram mass: 0.025 kg x 9.8 m/s2 = 0.245 N = 0.25 N
50 gram mass: 0.05 kg x 9.8 m/s2 = 0.49 N = 0.5 N
75 gram mass: 0.075 kg x 9.8 m/s2 =0.735 N = 0.74 N
- Construct a model arm using two rulers.
A. Place one ruler so that it is standing up on the  30 cm end of the other ruler.
B. Tape these two rulers together using a piece of masking tape. Only place the tape on the outside edge of the ruler, the side without numbers.
C. The connection of the rulers represents the elbow and it is the fulcrum of the lever.
D. The ruler that is now vertical is the upper arm. The ruler that is horizontal is the forearm.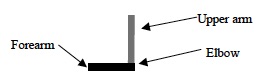
E. Pick up the rulers and allow the “forearm” to hang from the upper arm.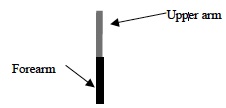
F. Tape the upper arm (ruler that is vertical) to the 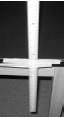 lab bench. Use two 30 cm pieces of tape and tape the ruler close to and over the “elbow.” Both rulers should now be in a vertical position.
4. Attach the biceps muscle to the forearm.
A. Place the hook of the spring scale into the hole of the horizontal (forearm) ruler at the 26 cm mark. This will simulate the attachment of the biceps muscle to the forearm.
B. The distance between the spring scale hook and the fulcrum is the effort arm.
C. Record: Measure the length of the effort arm and record the data in each row of the column labeled “Effort Arm Length” in Table B.
5. Calibrate the spring scale in its normal upright position. Refer to the Spring Scale (5N) Use and Operation procedure for assistance if necessary.
6. Place the load onto the forearm as follows:
A. Place the 20 gram or 25g mass onto the ruler 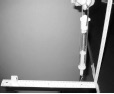 at the 8 cm mark. Hold the ruler horizontally while taping.
B. Attach the 20 gram or 25-gram mass to the ruler with a piece of masking tape.
C. The distance between the fulcrum and the load is the load arm.
D. Record: Measure the length of the load arm and record the data in each row of the column labeled “Load Arm Length” in Table B.
Trial 5:
- Find the effort force required to bring the ruler to a horizontal position with the 20 g mass or 25 gram mass.
- Pull up on the spring scale until the ruler is completely horizontal.
- Use the spring scale to measure the force applied on the ruler when the ruler is completely horizontal. This is the effort force. Record in Table B.
Trial 6:
- Place a new load onto the load arm.
- Remove the 20 g mass or 25 g mass.
- Hold the ruler horizontally and place a 50 g mass onto the ruler at the 8 cm mark.
- Attach the 50 g mass to the ruler with a piece of masking tape.
- Pull up on the spring scale until the ruler is completely horizontal.
- Use the spring scale to measure the force applied on the ruler when the ruler is completely horizontal. This is the effort force. Record in Table B.
Trial 7:
- Place a new load onto the load arm.
- Remove the 50g mass.
- Tape the 50g and 20g masses or 50g and 25g masses together using masking tape. Place the combined 70g mass or combined 75g mass onto the ruler at the 8 cm mark.
- Attach the 70g or 75g masses to the ruler with a piece of masking tape.
- Pull up on the spring scale until the ruler is completely horizontal.
- Use the spring scale to measure the force applied on the ruler when the ruler is completely horizontal. This is the effort force. Record in Table B.
Note: The Analysis Questions for Trial 5-7 are located on the PostLab page for Investigation 3.
CLEAN UP
Let students know your expectations for clean up. Ask them to clean up.