Teacher Portal:
Photosynthesis
Investigation 3 – Lab

ZERO-IN
Italicized font represents information to be shared orally or physically completed with the students at this time.
The non-italicized font represents additional information included to support the teacher’s understanding of the content being introduced within the CELL.
MINDSET
This Investigation is designed to:
- illustrate to students that light is essential in photosynthesis, and
- help students conclude that plants undergo cellular respiration.
BE PREPARED
Teacher Preparation for the Investigation includes the following. This preparation should be done prior to students arriving in the lab.
- Fill two-liter pitchers with one liter of water. Label these pitchers “Elodea water.”
Note: For best results, the Elodea should be as fresh as possible. It is recommended that it be obtained from the store less than 24 hours before use in this experiment.
Note: Depending on the time of year that this Core Experience is implemented, the Elodea supplied by some pet stores may be less green and healthy than the Elodea purchased at other times. Thus, while photosynthesis still occurs in these plans, the plants may yield less dramatic results than healthier plants. To resolve this issue, add 2.5 g of baking soda to one liter of water. This solution provides Elodea with additional carbon dioxide, aiding in photosynthesis. This water should then be used as the “Elodea water” as students perform the experiment.
- Fill a third liter pitcher with one liter of water.
- Prepare one piece of aluminum foil for each student group. The foil should be 30 cm in length and should be the width of the roll of foil, approximately 30 cm.
- Place all materials at a central location.
Note: Each student lab group will need the materials listed below.
- Divide students into cooperative groups of five students.
Student Preparation for the Investigation includes having students gather the following materials. This preparation takes place on lab day after student lab groups have settled at their assigned lab tables.
Note: The materials are listed in students’ SDRs. They are also listed below for your reference.
- (1) 100 ml graduated cylinder
- (1) 100 ml beaker
- (1) triple beam balance
- (1) ring stand with clamp
- (1) oxygen meter
- (1) metric ruler
- (1) bulb and socket
- (1) stopwatch
- (2) glass slides
- (2) coverslips
- (1) plastic dropper
- (1) scalpel
- (1) microscope
- Ask one student from each group to fill one (1) 400 ml beaker with 100 ml of “Elodea water” and place two (2) stems of Elodea in the beaker.
- Instruct another student from each group to fill one (1) 400 ml beaker with 100 ml of water.
- Ask half of the student groups to obtain one piece of aluminum foil.
Note: Because these amounts are approximations and do not need to be exact, students do not need to use graduated cylinders to measure volume. They may simply pour the liquids into their beakers and use the graduations on the beakers.
- Direct one student from each lab group to collect the materials listed in their SDRs.
INVESTIGATE
- Tell students that due to the nature of their experiments for the day, they will be conducting two trials at the same time.
- The first trial is similar to the experiments performed in Investigation 2 while measuring the oxygen level in the beaker of water. This time, however, some students will measure the oxygen level in a beaker of water with Elodea that receives light, and some students will measure the oxygen level in a beaker of water with Elodea that does NOT receive light.
- As students will recall from Investigation 2, they will have time between their measurements of oxygen to perform another activity. During these short times, students will perform the second trial.
- Tell students that at the end of the investigation, students in each group will compare the data that each group collected.
- Encourage students to reflect on the PreLab video as they move through the procedural steps.
- Explain to students that during the Experiment, every procedural step is important. If one step is skipped, data can become invalid. To help students keep on track, direct them to read each step thoroughly, complete the step, then check it off (Read it – Do it – Check it off).
- Direct students to complete the procedural steps in their SDRs.
Note: The procedural steps are listed below for your reference. Teacher “Notes” are inserted, as needed, to help facilitate the lab.
Trial 1: The Effect of Light on Photosynthesis
- In this Trial, you will test and record the amount of dissolved oxygen in your beaker several times. Some of the class will measure the amount of dissolved oxygen in a beaker containing Elodea and water that is exposed to light. Other students will measure the amount of dissolved oxygen in a beaker of Elodea and water that is kept in the dark. Your teacher will give you your assignment. Circle your experiment below.
Elodea, water, light Elodea, water, no light
- Place the stems of Elodea within the beaker of 100 ml of “Elodea water.”
- To begin, equilibrate the oxygen meter by using the procedure Oxygen Meter Calibration.
- Measure 80 ml of water using a 100 ml graduated cylinder.
- Pour the 80 ml of water into the 100 ml beaker.
- Use the triple beam balance to obtain a sample of Elodea approximately 5 g in mass ( approximately 25 cm in length). Cut up the Elodea and place it in the beaker.
- Adjust the clamp on the ring stand so that it is approximately 3-4 cm from the top of the beaker.
- Place the oxygen probe in the water in the beaker. To avoid air bubbles, tilt the beaker and the probe so that the probe enters the water at an angle.
- Lower the probe into the water until it is approximately 1 cm from the bottom of the beaker. Tighten the clamp on the probe until later use.
- If you are investigating the “Light” condition, go to step 12.
- If you are investigating the “No Light” condition, obtain a piece of aluminum foil. Cover the beaker with aluminum foil. Follow these steps:
- Slide the piece of aluminum foil under the beaker.
- Gently fold the foil upward so that it surrounds the beaker and the tip of the oxygen probe. This keeps light from reaching the Elodea.
- Slide the piece of aluminum foil under the beaker.
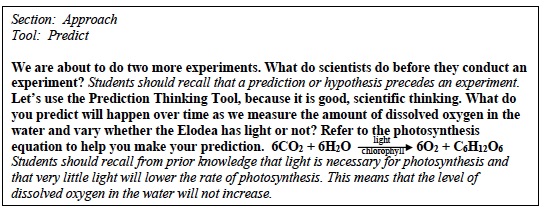
- Place the bulb and socket 8 cm from the beaker.
- Turn on the light.
- Keep the probe underwater for the entire investigation.
- Each time you take a reading from the oxygen meter, you will follow these steps. Read all of these steps. Do not begin the procedure until you have read the steps.
A. Make sure the switch on the oxygen meter is on the dissolved oxygen (DO) setting.
B. Gently stir the water in the beaker.
C. Stir for 30 seconds.
D. Still stirring, press the record button.
E. Record the oxygen measurements for 30 seconds.
F. Press the recall (CALL) button on the meter 3 times to obtain the average measurement.
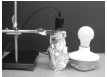
G. Record: Write the average dissolved oxygen concentration in Table A.
H. Press the record button again to set up the oxygen meter for the next reading. The letters “rec” will disappear from the meter’s display.
16. Record: Measure and record the average amount of dissolved oxygen in the water in the times listed in Table A.
Trial 2: Observing the Parts of a Plant
- You will compare two parts of the Elodea plant, the stem and the leaf.
- What major cellular structure contributes to photosynthesis? Chloroplasts are cellular structures that contribute to photosynthesis.
- Create a wet mount slide of an Elodea leaf using the procedure Wet Mount Slide Preparation. Use a whole leaf to create your slide.
- Create a wet mount slide of the longitudinal section of the Elodea stem. To do this, follow these steps.
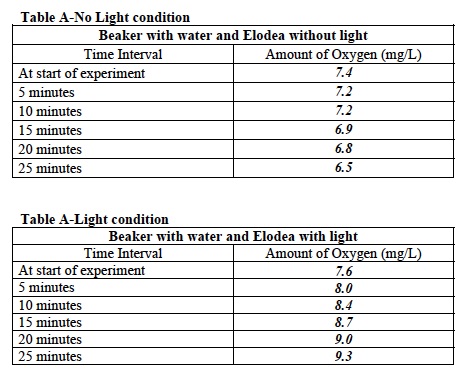
A. Take a piece of Elodea plant and remove its  leaves using the scalpel.
B. Holding one end of the stem, carefully use the blade of the scalpel to scrape a thin layer of the stem. Always push the scalpel away from your body and toward the table.
C. After you slice a small piece of stem, use the forceps to gently remove the piece and place in on a slide to create a wet mount.
5. Create a wet mount slide of the cross section of the  Elodea stem. To do this, follow these steps.
A. Cut the leafless Elodea stem in half.
B. Carefully cut a thin slice from one freshly cut end.
C. Use this specimen to create a wet mount slide.
6. Record: Observe the three slides using the Microscope. If you need help you may refer to the Microscope Use and Operation procedure. Draw and label your observations.
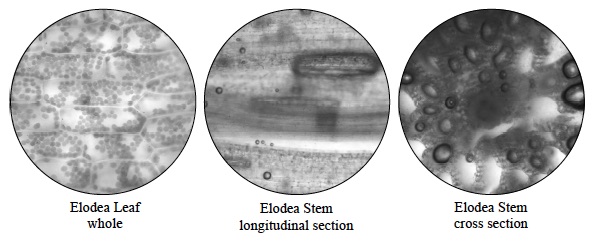
Note: Students’ drawings may differ slightly, but all should contain nuclei, chloroplasts, and cell walls. Students may note a difference in the abundance of chloroplasts in the leaf, periphery of the stem, and inner portion of the stem. The cells of both the leaf and periphery of the stem generally contain more chloroplasts than the inner portion of the stem.
CLEAN UP
Let students know your expectations for clean up. Ask them to clean up.