Teacher Portal:
Atomic Structure
Investigation 2 – Lab

ZERO-IN
Italicized font represents information to be shared orally or physically completed with the students at this time.
The non-italicized font represents additional information included to support the teacher’s understanding of the content being introduced within the CELL.
MINDSET
This Investigation is designed to:
- allow students to examine the reactivity of metals and nonmetals,
- introduce students to the concept of atoms and the different components that make up an atom, and
- allow students to further explore the Periodic Table and the information contained within it.
BE PREPARED
Teacher Preparation for the Investigation includes the following. This preparation should be done prior to students arriving in the lab.
- Fill five 100 ml beakers, one for each group, with 30 ml of 3 N hydrochloric acid (HCl).
- Label a weigh dish “carbon” using masking tape and a lab marker. Prepare five pieces of carbon using a lab scoop. The pieces should be small enough to fit into a test tube.
- Label a weigh dish “sulfur” using masking tape and a lab marker. Prepare five sulfur lumps using a lab scoop. The pieces should be small enough to fit into a test tube.
- Label a weigh dish “iron” using masking tape and a lab marker. Using a triple beam balance, weigh 20 g of iron filings and place them in the weight dish.
- Label a weigh dish “magnesium” using masking tape and a lab marker. Use a metric ruler to measure five 3 cm strips of magnesium metal ribbon. Place the strips in the weigh dish.
- Put all materials at the distribution area.
- Divide the students into five cooperative groups.
Note: Each student lab group will need the materials listed below.
Student Preparation for the Investigation includes having students gather the following materials. This preparation takes place on lab day after student groups have settled at their assigned lab tables.
Note: The materials are listed in students’ SDRs. They are also listed below for your reference.
- (1) sulfur lump
- (1) piece of carbon
- (1) 3 cm strip magnesium metal ribbon
- 1 g iron filings
- (1) 100 ml beaker filled with 30 ml hydrochloric acid
- (1) test tube rack
- (4) test tubes
- (3) lab scoops
- (1) plastic dropper
- (1) lab marker
- (1) metric ruler
- (1) roll of masking tape
- (1) stopwatch
- (4) weigh dishes
- (1) pair of vinyl gloves per student
- (1) pair of goggles per student
- (1) Periodic Table per student.
Direct one student from each lab group to collect the materials listed in their SDRs.
INVESTIGATE
- Remind students that during the previous lab they examined the physical properties of elements.
- Explain to students that during this lab they will explore the chemical properties of reactivity by adding four different elements to hydrochloric acid (HCl).
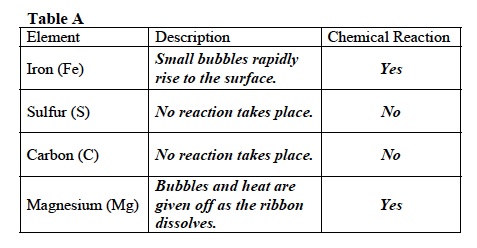
Note: Students will be able to detect if the elements react to the acid by observing a noticeable change that occurs to the element (such as the appearance of bubbles, production of heat, or change in color).
- Encourage students to reflect on the PreLab video as they move through the procedural steps.
- Explain to students that during the Experiment, every procedural step is important. If one step is skipped, data can become invalid. To help students keep on track, direct them to read each step thoroughly, complete the step, then check it off (Read it – Do it – Check it off).
- Remind students to wear gloves, safety eyewear, and lab coats when handling chemicals.
- Direct students to complete procedural steps in their SDRs.
Note: The procedural steps are listed below for your reference. Teacher “Notes” are inserted, as needed, to help facilitate the lab.
- In this experiment, you will study the reactivity of four different elements in acid.
- Use the masking tape and lab marker to label four weigh dishes with the following element names: Carbon, Sulfur, Magnesium, and Iron.
- Using the lab marker and the metric ruler, mark a 1.5 cm graduation from the bottom of each of the four test tubes.
- Place the test tubes in the test tube rack.
- Use the masking tape and the lab marker to label the four test tubes with the following symbols: “Fe”, “S”, “C” and “Mg”. Place the labels on the same side as the graduations you just made.
- Use the plastic dropper to add hydrochloric acid (HCl) to each test tube. Fill each test tube to the 1.5 cm graduation line.
- Use the lab scoop to add about 1 gram of iron filings to the test tube marked “Fe”.
- Observe the contents of the test tube for 60 seconds. Use the stopwatch to keep time.
- Record any reactions that you observe in Table A.
- Repeat the previous steps for carbon (C) and sulfur (S). For magnesium (Mg), place a 3 cm piece of magnesium ribbon into the test tube with HCl. Record any observations you may find in Table A.
Clean Up
Let students know your expectations for clean up. Ask them to clean up.