Teacher Portal:
The Human Body
Investigation 3 – PreLab
ASK WHY

The human body is organized into systems that are made up of many parts and these systems each perform both individual and complementary functions that occur at the same time in the body.
BRANCH OUT
Respiratory therapists help to treat people who have problems with their lungs or breathing. They test how well your lungs work and how deeply you can breathe. Some respiratory therapist work in the neonatal intensive care unit and use special equipment to help babies breathe.
PRINT IT
Use your browser to download a printable PDF as help during the slide presentation and to make additional notes. In your browser, go to File > Print and then choose to save as PDF.
MINDSET
This Investigation is designed to:
- introduce the body as a whole unit made up of systems which are comprised of smaller parts
- promote the understanding of systems as a group of related parts which work together for a common function.
- encourage exploration of the functions, main parts, and pathway of the respiratory system.
- explore the concept of different body systems working together to sustain life.
- discover the effect exercise has on respiratory rate.
- use of models as a way to visualize the lungs during inhalation and exhalation.
- calculate the volume of air the can be exhaled in one breath
- understand that observations can be recorded and presented in different ways.
SCIENTIST’S GLOSSARY
- Bronchi: Moves air from the trachea into the left and right lungs.
- Exhale: The process of forcing the air contained in the lungs into the atmosphere.
- Function: The role or job of an object or a part of an object.
- Inhale: The process of breathing air from the atmosphere into the lungs.
- Lungs: Organs in the body responsible for moving air in and out of the body. The human body contains a right and left lung.
- Organ: One of the parts of the body which makes up a system. The brain, the heart, and the stomach are examples of organs.
- Oxygen: A gas that is found in the air that we breathe.
- Respiratory rate: The measure of how many times a breath, or inhalation followed by an exhalation, is performed in one minute.
- Respiratory system: A system of the body that moves air in and out of the body. The system includes the lungs, bronchi, trachea, and nose and mouth.
- Trachea: Moves air from the nose and the mouth into the left and right bronchi. Also known as the windpipe.
BE PREPARED
Watch the Investigation Three Teacher Video below to prepare for the PreLab.
SET FOR SUCCESS
- Tell students that they are about to learn about the respiratory system.
- Ask students to share the kinds of things they might learn in thisI nvestigation.
- Tell students they will think about the parts of the respiratory system and how it functions.
Begin the PreLab Concept Slides to start students on their learning journey. Then watch the PreLab Student Video as a class.
NAVIGATE IT
Once the slide presentation is launched
- use your left and right arrows to advance or go back in the slide presentation, and
- hover your mouse over the left edge of the presentation to get a view of the thumbnails for all the slides so that you can quickly move anywhere in the presentation.
- Click HERE to launch the slide presentation for the CELL.
SHARE IT
SLIDE BODY-3-1
In this Investigation, we begin our study of the respiratory system.
______________________________________________
SLIDE BODY-3-2
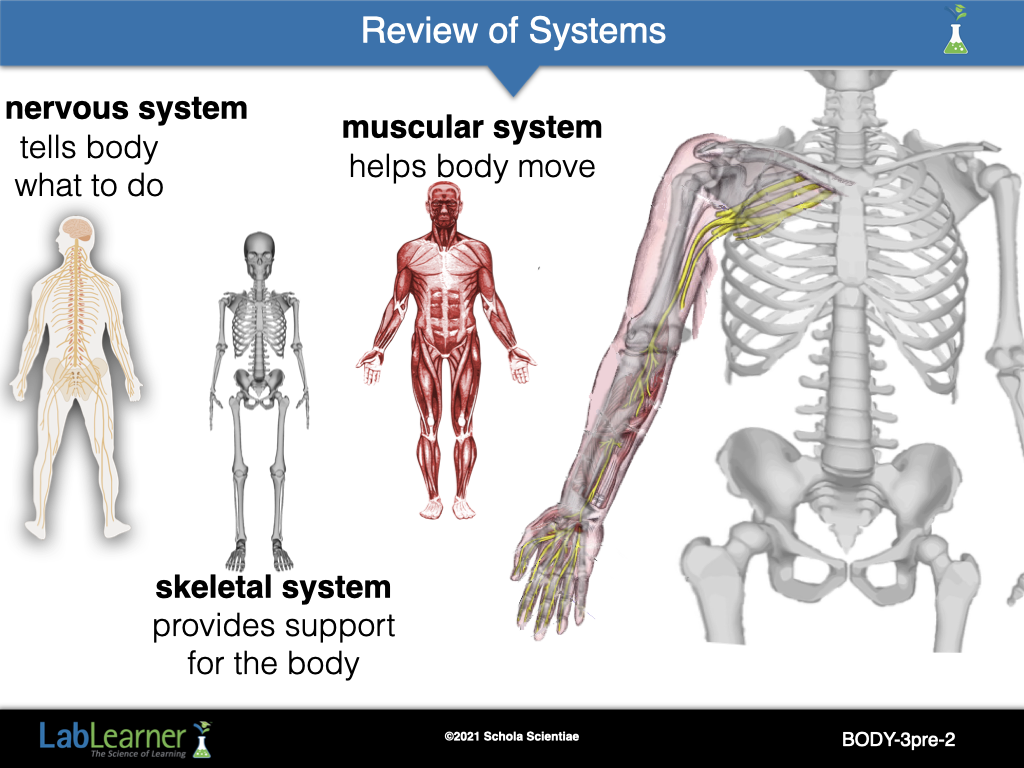
Begin the investigation by reviewing some of the concepts that the students have encountered in the CELL thus far. Diagrams of the three body systems are presented on the slide.
What are the three body systems that you have investigated? Students have investigated the nervous, skeletal, and muscular systems.
What is the function of the nervous system? Skeletal system? Muscular system? Students should indicate that the nervous system controls the actions of the body, helps us to interpret and understand the world around us, and helps us to think about and remember information. The skeletal system provides structure, protection, and support for the body. The muscular system enables the body to move.
An overlay of the arm with nerves and muscles over the skeleton is presented to illustrate how the three systems exist it the body.
Do these three systems work together? How? Students should indicate that the three systems do work together. The nervous system sends signals to the muscular system to tell it how and when to move the skeletal system.
https://commons.wikimedia.org/wiki/File:Hamate_bone_(left_hand)_01_palmar_view.png
______________________________________________
SLIDE BODY-3-3
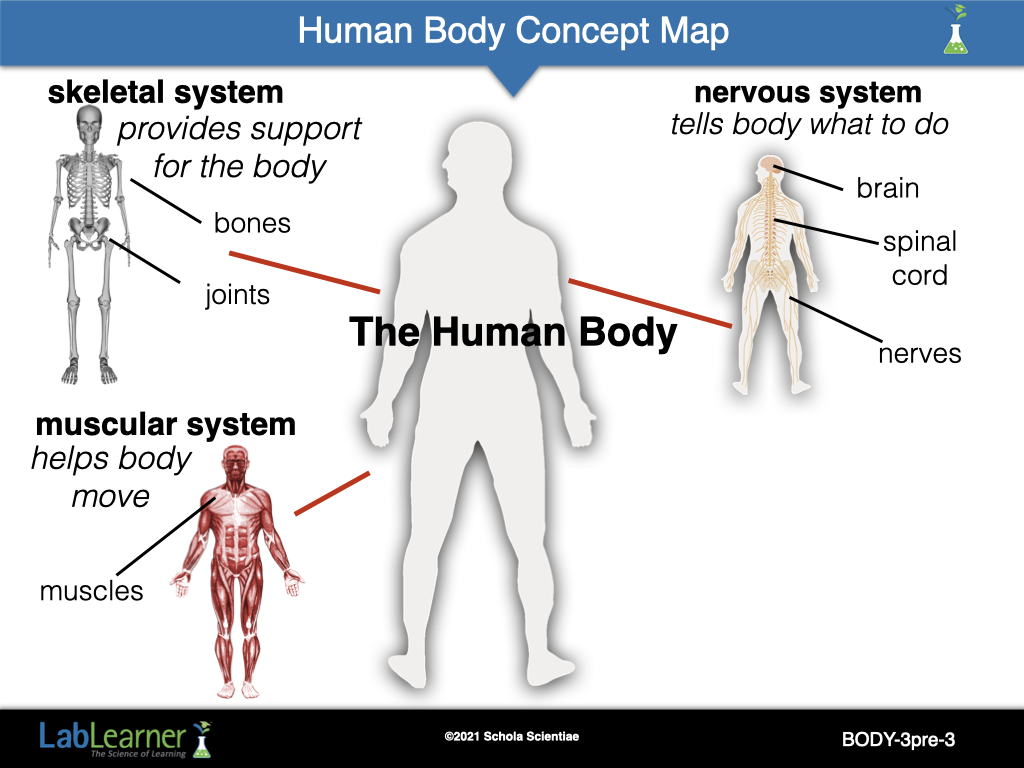
Organize and Present Tool: Remind students that after learning something new, it is a good idea to reflect so that you can organize what you have learned. This means it is more likely that the information will be remembered in the future.
Ask students if they remember the concept map from the previous investigation. Discuss the fact that the information was placed according to a system, with the main idea in the middle and a smaller idea on the outside. Discuss how the ideas were organized so that the concept map could then be understood by another person if they were presented with it. Guide students in continuing the creation of the concept map focused on the human body that they started in Investigation Two.
Ask students: What is the main idea, or concept, of our map? How do you know? Students should indicate that the human body is the main idea of this map. It is located at the center of the map and it branches off into smaller parts.
Ask students: The human body is broken up into smaller groups of parts. What are these smaller groups called? What are examples of these groups?Students should indicate that the smaller groups are called systems. Some examples include the nervous, skeletal, and muscular systems.
Direct students’ attention to the systems of the human body that were explored during the last investigation.
Ask students: Which body systems did you explore in Investigation Two? How do these systems relate to the human body? How can they be represented on this concept map? Students explored the skeletal and muscular systems. Students should indicate that these systems are two of the smaller parts of the human body. They could be represented by placing diagrams of the skeletal system and muscular system on the concept map and connecting them to the central picture with a line.
Ask students: What are the parts of the skeletal system? How can these parts be represented on this concept map? What are the parts of the muscular system? How can these parts be represented on this concept map? The skeletal system consists of the bones and joints. They can be represented by connecting them to the skeletal system silhouette with a straight line. The muscular system consists of the muscles. They can be represented by connecting them to the muscular system silhouette with a straight line.
Divide the class into pairs. Give the student pairs two minutes to think about a word or group of words that describe the function of the skeletal system and a word or group of words that describe the function of the muscular system.
Ask several student pairs to share their answers with the rest of the class. Student answers may vary. Sample answers for the skeletal system may include: provides structure, protects vital organs, or provides support for the body. Sample answers for the muscular system may include allows the body to move or moves bones.
Choose one description of the skeletal system and ask a student volunteer to write it on the concept map under the “Skeletal System” heading. Choose one description of the muscular system and ask a student volunteer to write it on the concept map under the “Muscular System” heading.
______________________________________________
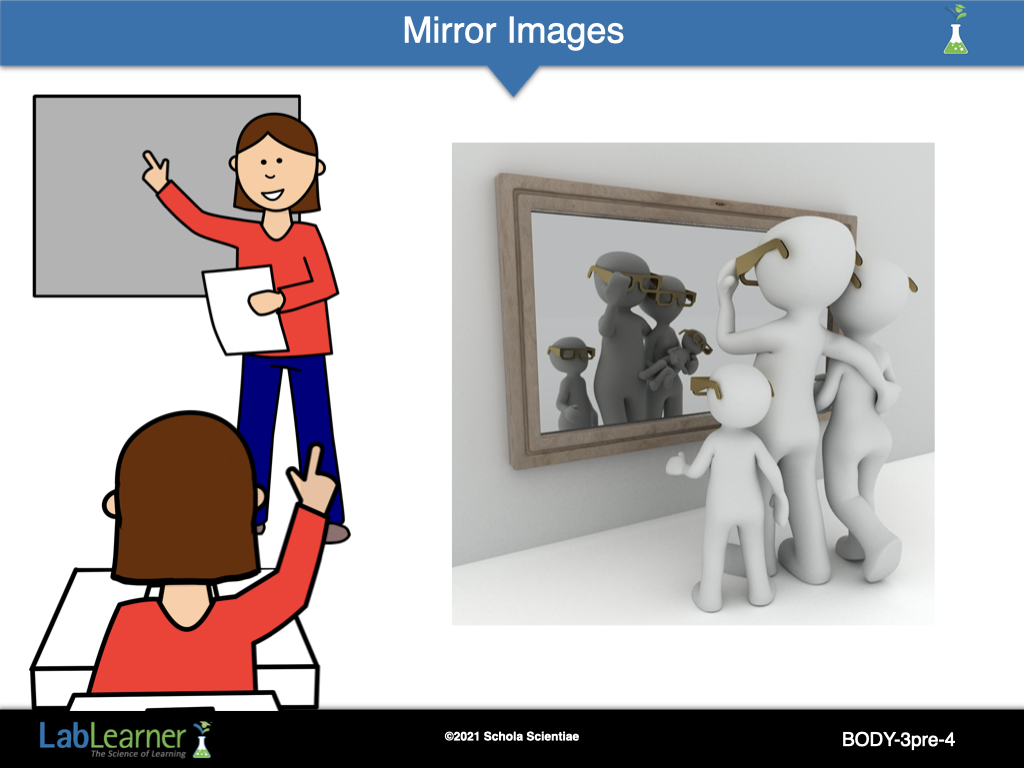
SLIDE BODY-3-4
As a way to prepare students for the lab activity, begin a discussion about the concept of mirror images. Explain to students that some of the parts, or organs, that make up systems are in pairs. That is, one organ of the pair is on the left side of the body and one organ of the pair is on the right side of the body.
Instruct students to stand up behind their desks and face the front of the room. Explain to students that you are going stand in the front of the room and face them. You will then give them a verbal direction that they are to follow.
Raise your right hand straight in the air and then say to students: Raise your right hand. Student responses to the direction may vary. Some students may immediately raise their right hand, some students may begin to raise their right hand and quickly switch and raise their left hand, and some may immediately raise their left hand.
Direct students to stay in that position. Keeping your arm in the air, slowly turn around so that your back is facing the students. Ask students: Did you raise your right hand or did you raise your left hand? Student answers may vary.
Tell students to make sure that they have the correct arm raised and then turn back around to face the students. Ask students to notice that when you are facing them, it appears as if your opposite arm is raised. Explain that this is called a mirror image. You may want to practice a few more examples with students (i.e., point to your left eye, bend your right knee).
______________________________________________
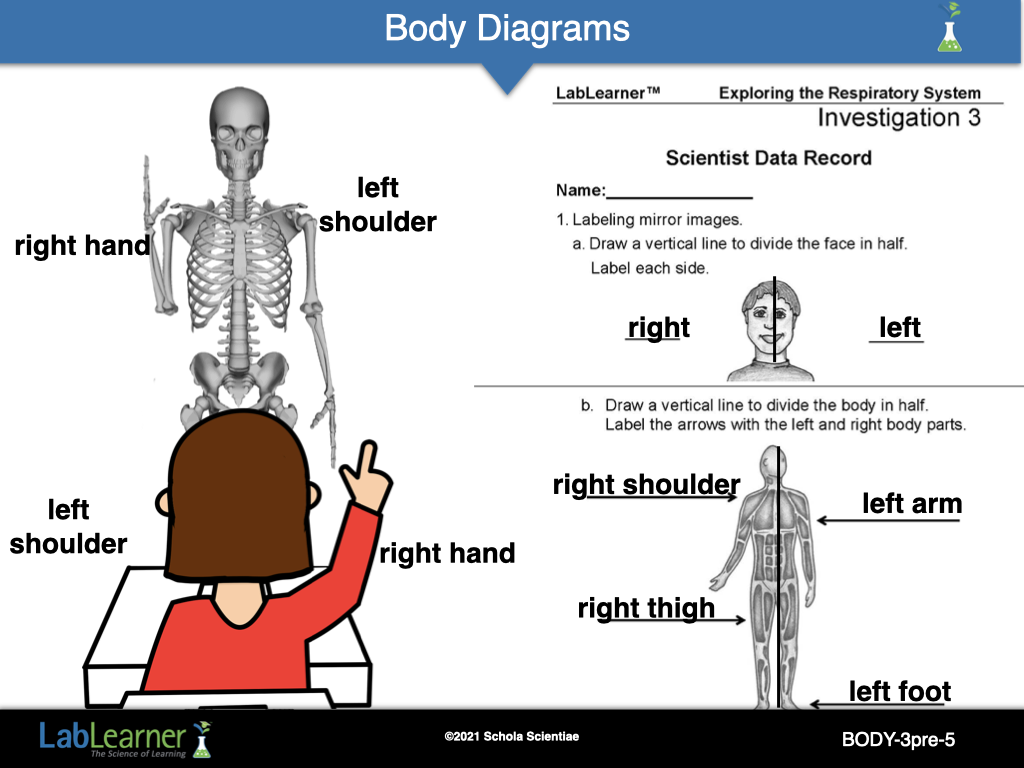
SLIDE BODY-3-5
Note: This slide contains animations. The teacher may want to practice before showing the slides to the students.
Explain to students that when they look at a drawing of a body system in their Student Data Record, the drawing is a mirror image of themselves. Therefore, they must consider that the drawing is a mirror image when labeling pairs of organs with “left” and “right.”
Direct students to locate problem 1 in their Student Data Record. Tell students that they are going to practice labeling two drawings with “left” and “right.”
Direct students to locate the drawing of the face. Encourage students to draw a line down the center of the drawing to divide the left side of the face from the right side of the face.
Ask students: Remembering that the picture of the face is a mirror image of your face, which side is left and which is right? Students should indicate that the right side of the face is to the left of the line and the left side of the face is to the right of the line.
Encourage students to label the face “left” and “right” on the lines provided in problem 1a of their Student Data Record.
Direct students to locate the drawing of the muscular system. Encourage students to draw a line down the center of the drawing to divide the left side of the human body from the right side of the human body.
Explain to students that they are going to label the arrows that are pointing to different parts of the body. Students are to start each label with either “right” or “left.”
Encourage students to label the parts of the body on the lines provided in problem 1b of their Student Data Record.
______________________________________________
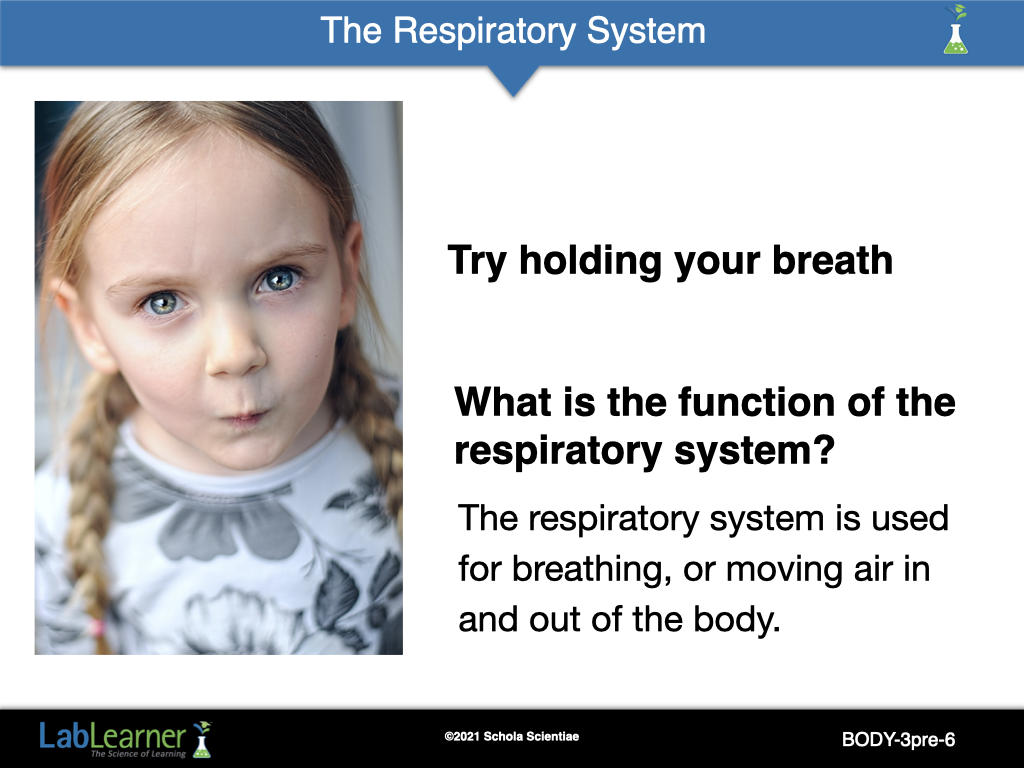
SLIDE BODY-3-6
Note: This slide is animated. The teacher may wish to practice prior to presenting to the class.
Tell students that the next body system they will investigate is the respiratory system.
Direct students to take a deep breath, hold it for 2 seconds, and slowly release it. Tell students that they have just used their respiratory system.
Encourage students to think about the action they just performed. Ask students: What do you think is the main job, or function, of the respiratory system? Students should indicate that the respiratory system is used for breathing, or moving air in and out of the body.
______________________________________________
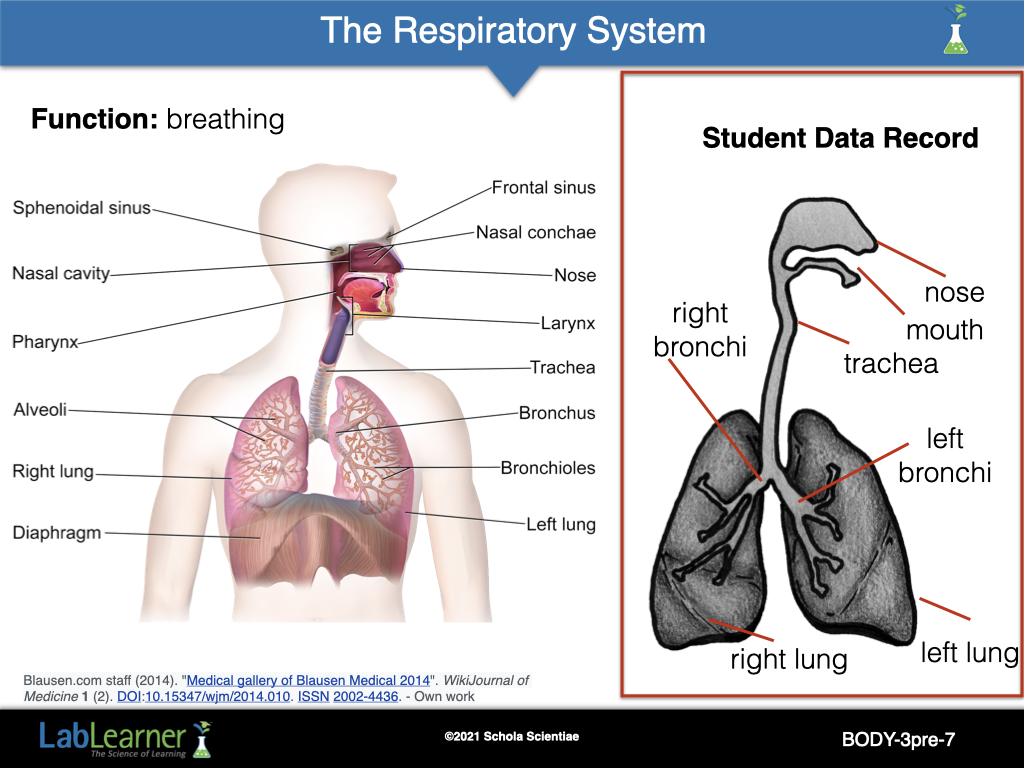
SLIDE BODY-3-7
Note: This slide is animated. The teacher may wish to practice prior to presenting to the class.
Two diagrams are shown. The color diagram includes additional parts of the respiratory system not in the Student Data Record. However, students may enjoy learning about the additional parts.
Introduce students to the parts of the respiratory system. Direct students to locate the diagram of the respiratory system in problem 2 of their Student Data Records.
______________________________________________
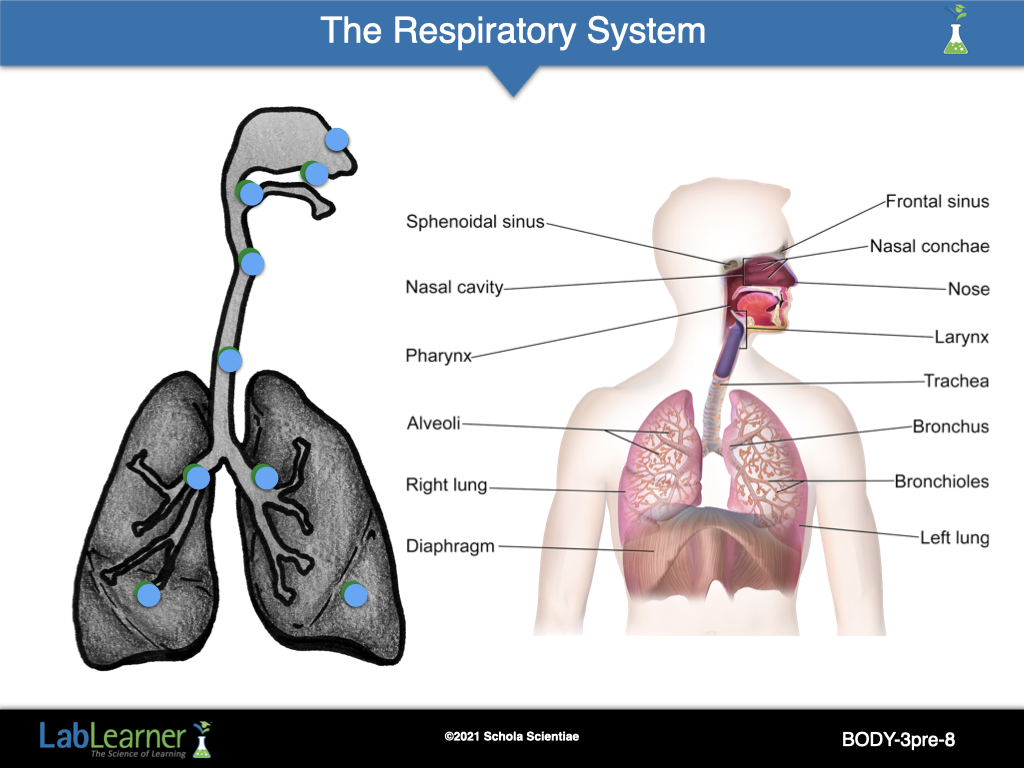
SLIDE BODY-3-8
Note: This slide is animated. The teacher may wish to practice prior to presenting to the class.
As a class, discuss the pathway of air through the respiratory system. Encourage students to trace the pathway of inhalation and exhalation with their finger as it is discussed.
The green dots show the pathway as air enters the respiratory system.
The blue dots show the pathway as air exits the respiratory system
First, the brain signals the respiratory system that the body needs oxygen.
The respiratory system responds by taking a deep breath, or inhaling. The lungs expand and draw the air into your nose or mouth.
As the air passes through your nose, the hairs inside of the nose clean the air by filtering out any dirt.
When the air passes through your nose and your mouth, it is also warmed up.
Next, the air moves from your nose and mouth into the trachea, or windpipe. Encourage students to locate their trachea by touching the front of their throat.
The trachea splits into two tubes: the left and right bronchi.
The air then moves from the bronchi into the left and right lung.
Oxygen is picked up in the lungs and taken to the rest of the body.
Now, you breathe out, or exhale. The lungs relax and become smaller, forcing the air out of the system.
The air passes from the lungs to the bronchi and trachea.
The air finally leaves the body through the mouth and nose.
______________________________________________
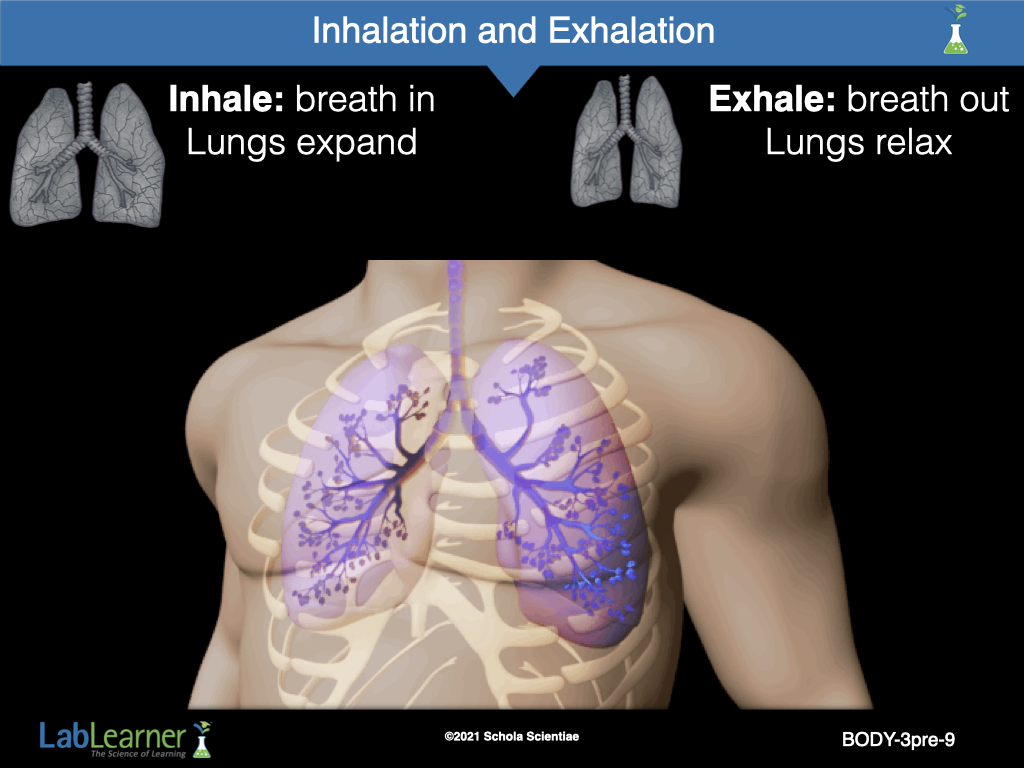
SLIDE BODY-3-9
Note: This slide is animated. The teacher may wish to practice prior to presenting to the class.
Ask students: How does air move in and out of the body? Students should indicate that air moves as you breathe in and out.
Explain to students that when you breathe in you are inhaling and when you breathe out you are exhaling.
When you inhale, your lungs expand causing air to be drawn into the body.
When you exhale, your lungs relax and become smaller which causes air to be forced out of the body.
Direct students to slowly inhale a breath of air and hold it for two seconds. As students breathe in say the word, “Inhale.”
Direct students to slowly breathe the breath of air out of their lungs. As the students breathe out say the word, “Exhale.”
Repeat this with the class several times.
______________________________________________
SLIDE BODY-3-10
Ask students: What do you think your body takes out of the air when you breathe? Student answers may vary. Encourage students to realize that the body needs the oxygen that is in the air.
Tell students that they will be investigating this system further in the lab.
View the PreLab Video before ending the PreLab.
______________________________________________
WATCH IT
Play the following Student Video in preparation for the lab. Discuss as necessary to answer student questions.