MINDSET
This Investigation is designed to:
- promote student understanding of the process by which a baby develops in its mother’s uterus from conception to birth,
- build student proficiency identifying and modeling the individual steps in mitosis,
- begin the CELL-long lab activity (Modeling the miracle) starting with the 7th week of pregnancy.
BE PREPARED
Teacher Preparation for the Investigation includes the following. This preparation should be done prior to students arriving in the lab.
- Place all materials at the distribution center.
- Divide students into five cooperative groups.
Note: Each student lab group will need the materials listed below.
Student Preparation for the Investigation includes having students gather the following materials. This preparation occurs on Lab day after student lab groups have settled at their assigned lab tables.
Note: The materials are listed in the Student Guide. They are also listed below for your reference.
Ongoing Prenatal Development Activity
- Chromebook/Laptop with Student Guide
- metric ruler or meter stick
- Triple-beam balance (or digital scale)
- Modeling clay
Modeling Chromosomes During Mitosis
- Mixed gram cubes:
- 14 of one color
- 10 of a different color
- 8 of a different color
- 2 of a different color
- small balls of clay
- 4 pieces of string about 40 cm in length
- 2 pieces of string about 60 cm in length
Direct one student from each lab group to collect the materials required.
INVESTIGATE
- Have students create a clay model of a 7-week embryo (the developing baby is not called a fetus until week 9) and record its mass and length in their Student Guides.
- Explain that, in the lab, students will model the process of mitosis and learn how chromosomes are replicated and transferred to two new daughter cells.
- Explain to students that every procedural step is important during the experiment. If one step is skipped, data can become invalid. To help students keep on track, direct them to read each step thoroughly, complete the step, then check it off (Read it – Do it – Check it off).
Note: The procedural steps are listed below for your reference. Teacher “Notes” are inserted, as needed, to help facilitate the lab.
EXPERIMENT
In the Investigation 1 lab, you will build two models. The first (Prenatal Development Model) uses the length and mass of a seven-week embryo to create a clay replica. The growing baby is called an embryo until the 9th week after conception, at which point it is referred to as a fetus. You will continue to return to this model embryo as the Human Prenatal Development CELL progresses, modeling the fetus at 14 weeks, 21 weeks, and 28 weeks.
The second model you will construct simulates the important process of mitosis, in which the cell’s genetic information is replicated (doubled), and two new, genetically identical daughter cells are formed.
Prenatal Development Model
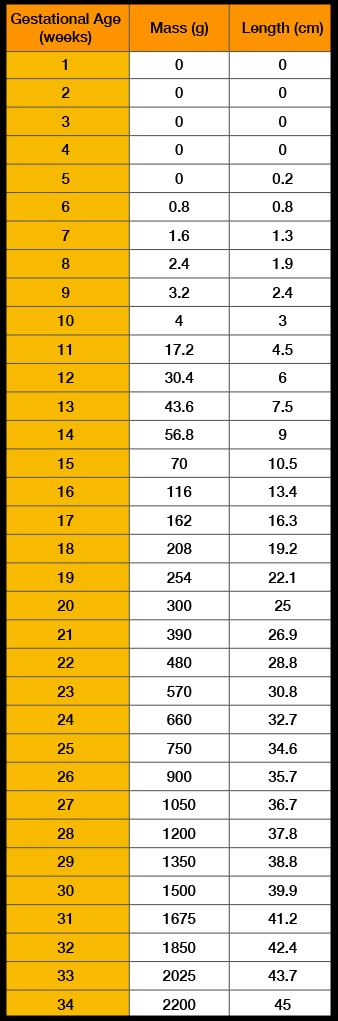
1. Use a triple-beam balance (or digital scale) to weigh out a piece of modeling clay to the mass indicated in week 7 of the Data Table. Record the mass of your 7-week model in the Student Guide.
2. Next, consult the Data Table once again to find the approximate length of the embryo at this gestational age (7 weeks).
3. Using a metric ruler or meter stick, measure your model and form it to be the approximate length listed in the Data Table. Record the length of your 7-week model in the Student Guide.
4. Describe the size and shape of your 7-week embryo model (remember that the baby is referred to as an embryo until the 9th week of gestation; thereafter, it is referred to as a fetus).
5. Depending on your resources, keep the 7-week model embryo to compare from week to week (it will harden unless stored in a sealed plastic baggie) or return it to the modeling clay container.
Mitosis Model
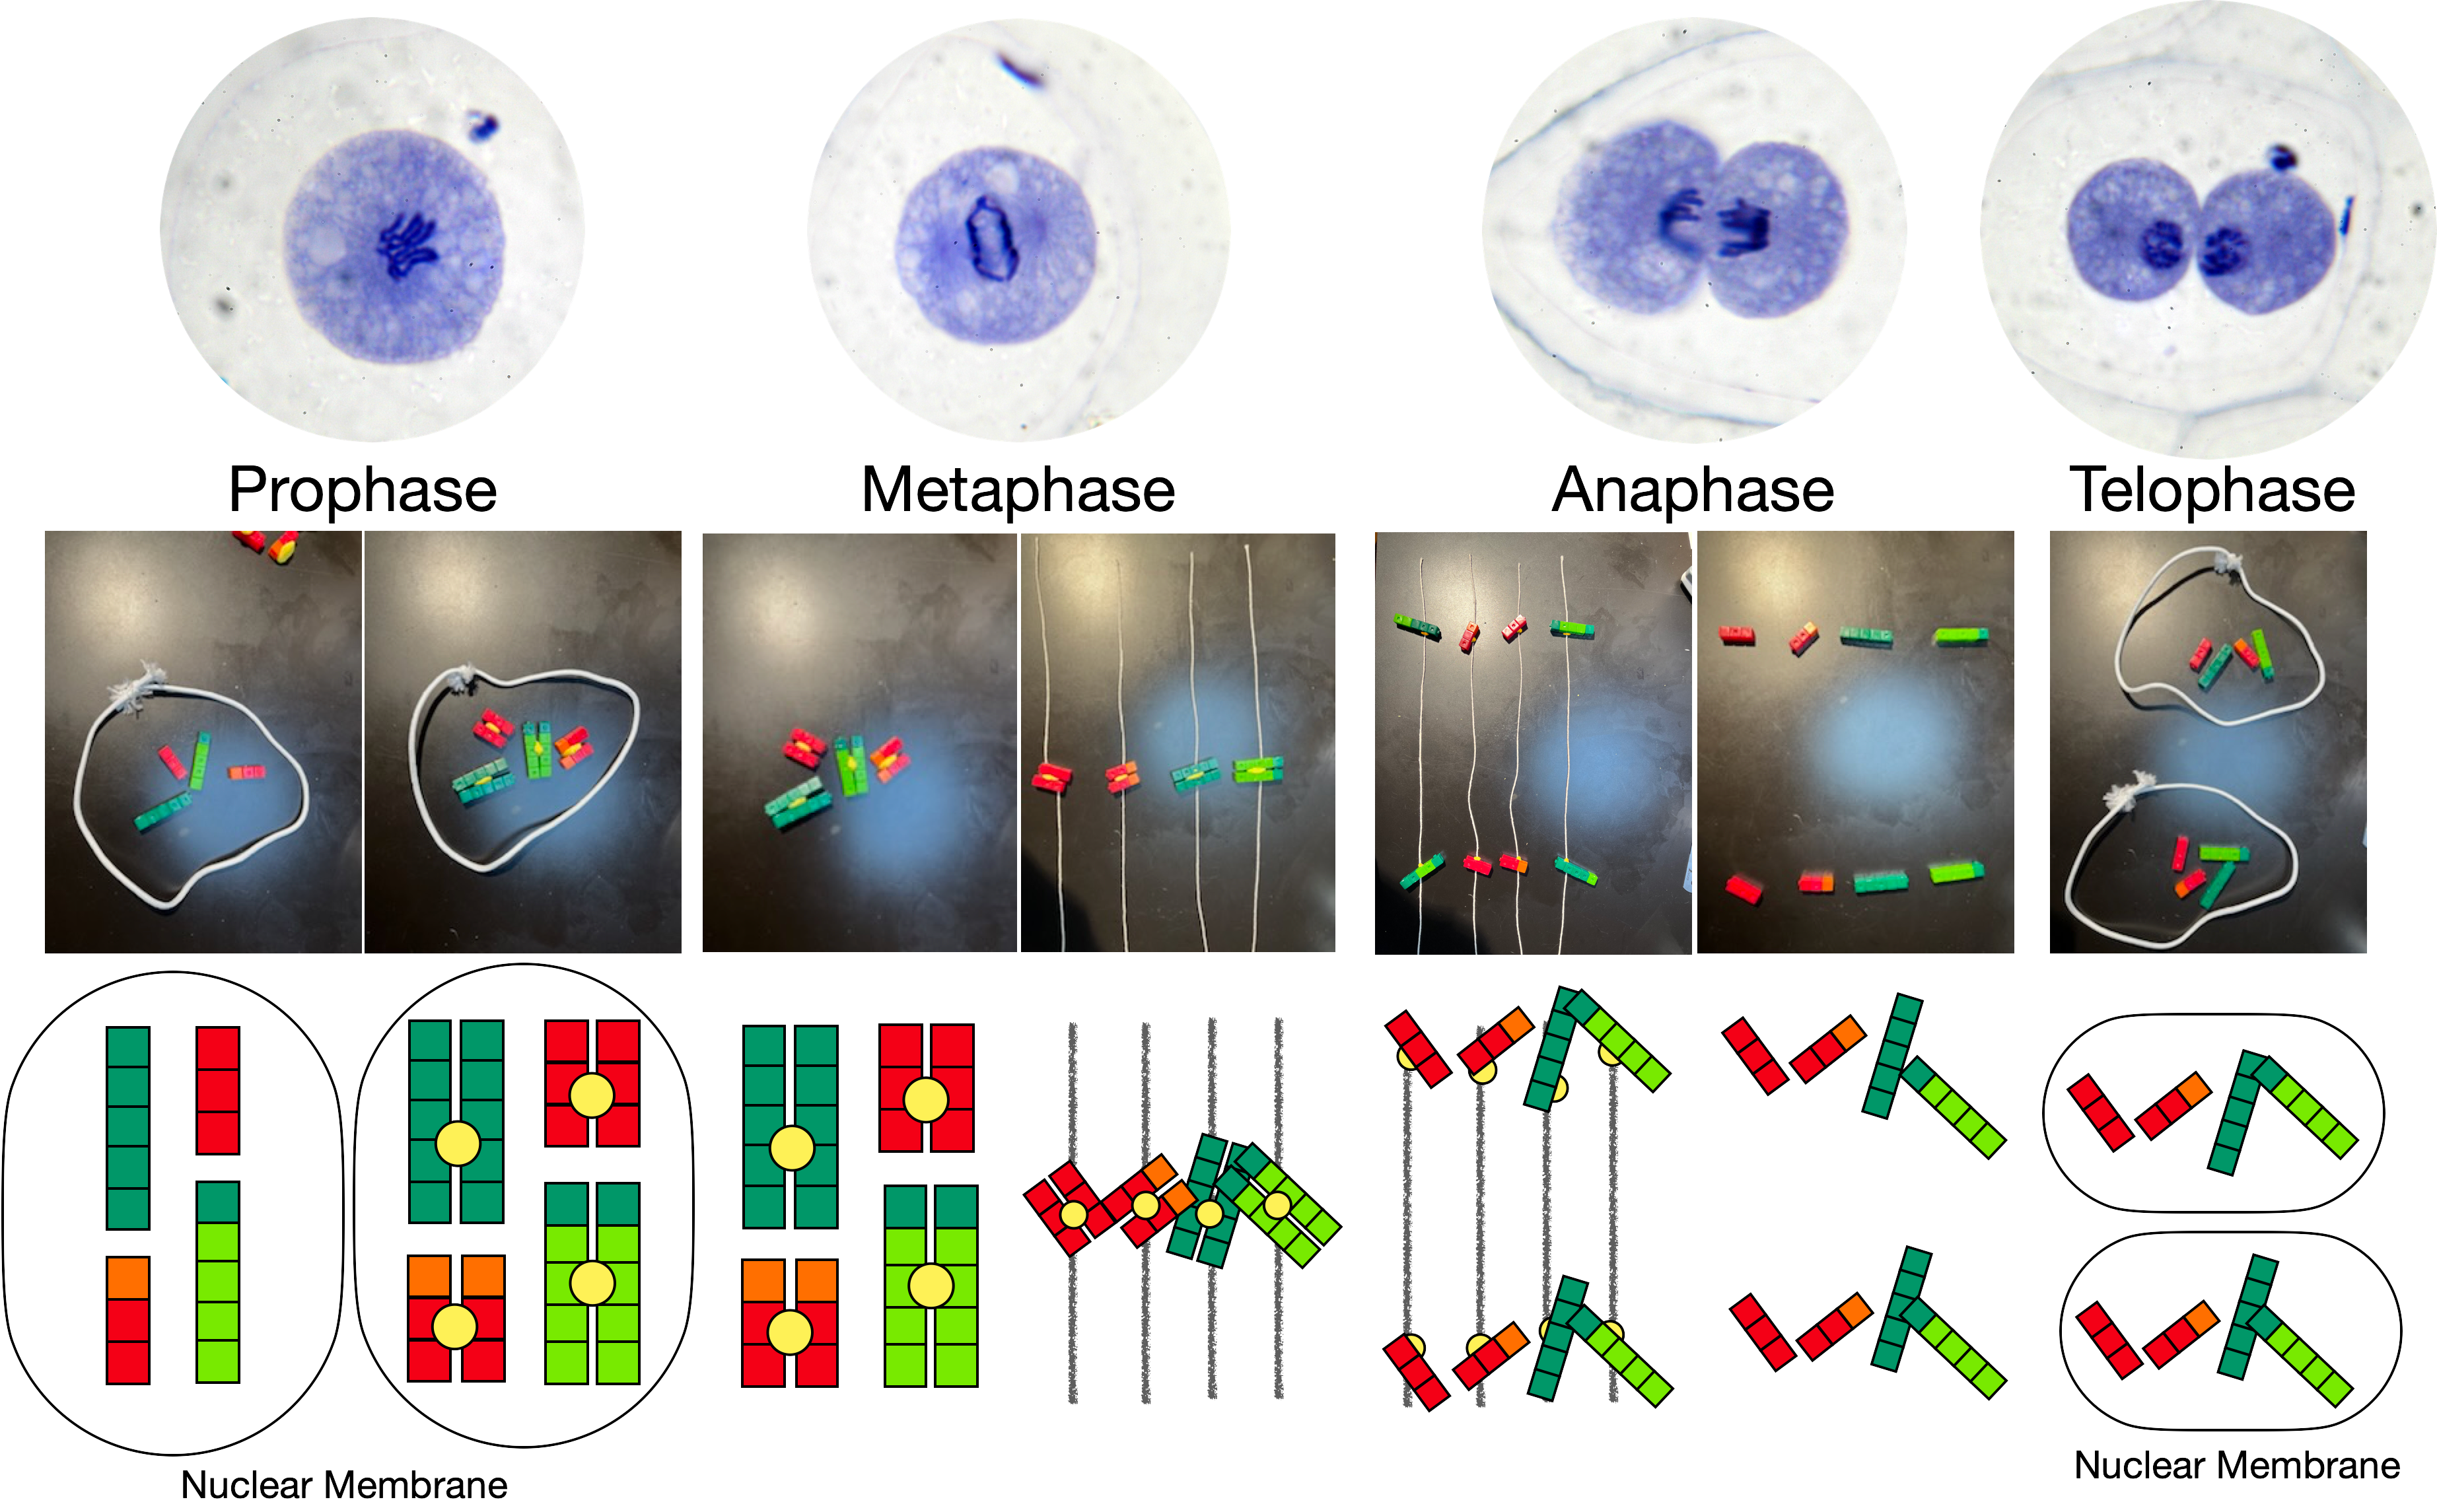
Carefully follow the steps below. By creating this model, step-by-step, you will come to understand the essential cellular process of cell division by mitosis. Later, in PostLab, be prepared to discuss the individual steps in mitosis (prophase, metaphase, anaphase, and telophase) with your classmates.
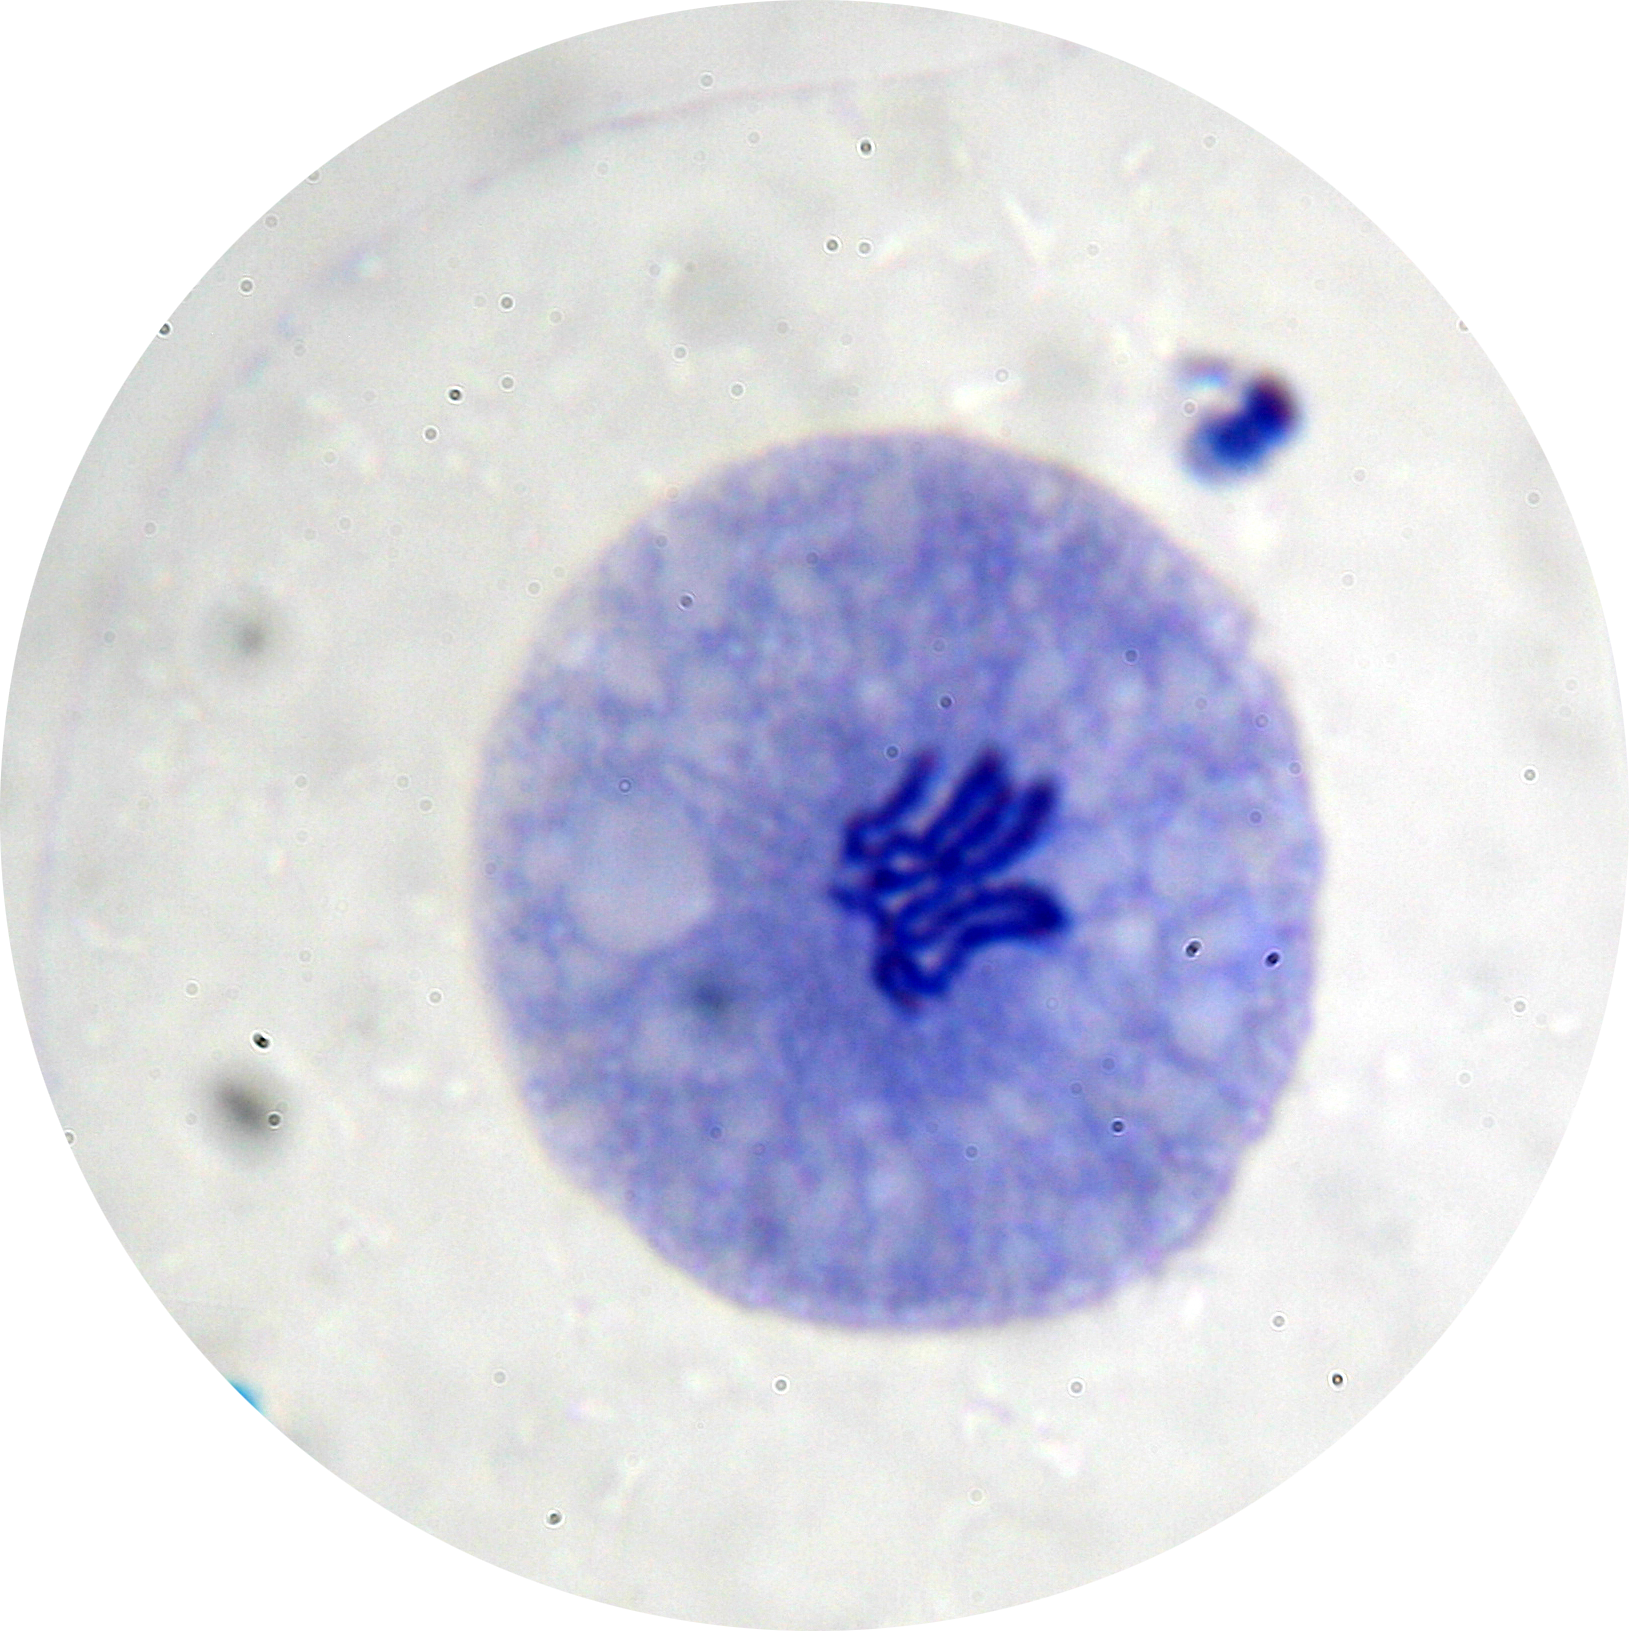
A. Prophase
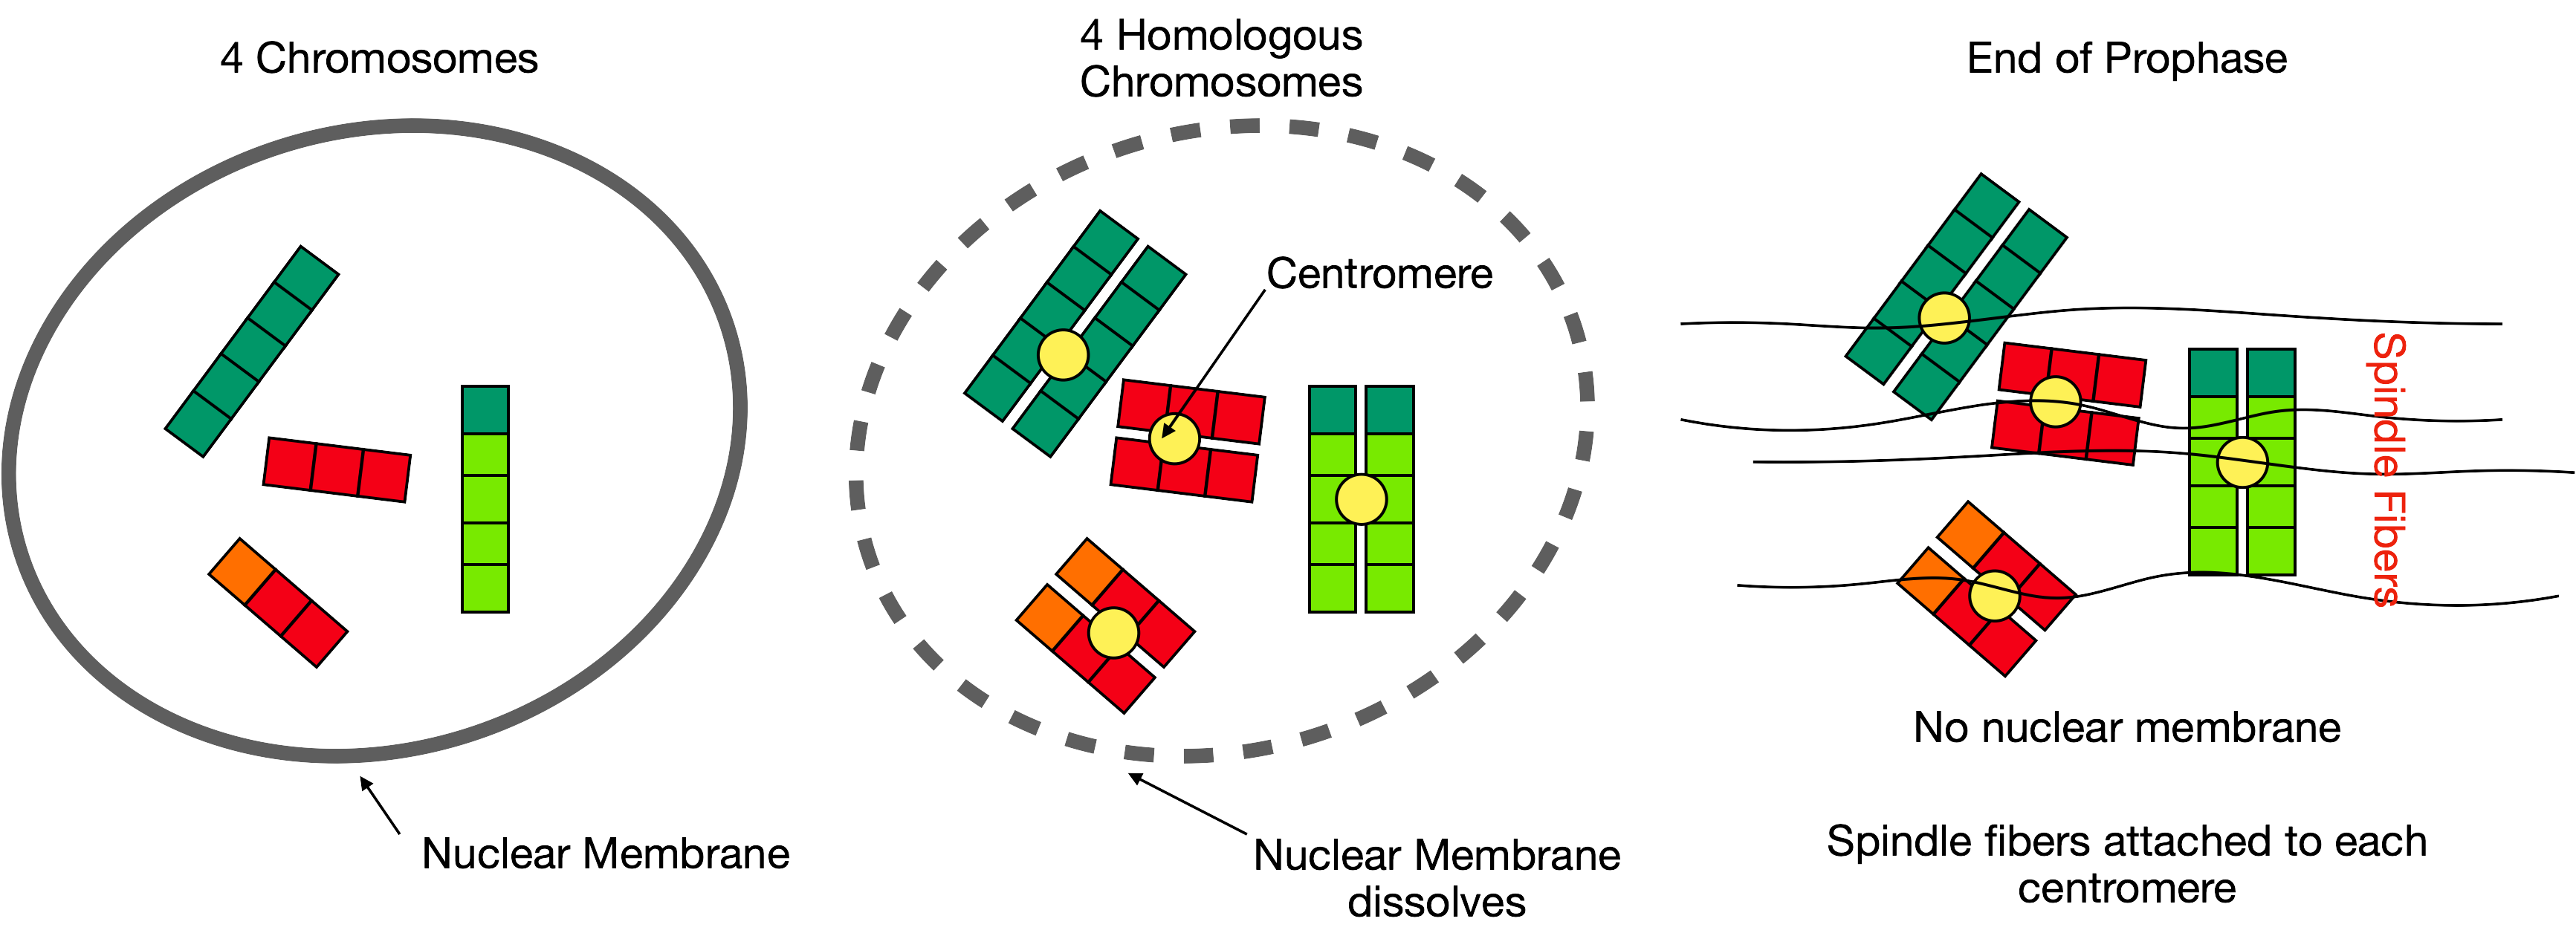
1. Build a model of a body cell with two chromosome pairs in the nucleus. Use the pictures below as a guide. We will use dark green, light green, red, and orange gram cubes in this illustration. You may use different colors but assemble them in the same patterns as shown here.
- Make your chromosomes as follows (you will need two of each) and a prophase model:

2. Begin with one of each chromosome inside the nuclear membrane, as shown in the center picture above. This is the situation as a cell enters prophase.
3. As prophase continues, each chromosome replicates to form a homologous pair of chromosomes held together by a centromere (small ball of clay in our model). The two chromosomes of a homologous pair are referred to as sister chromatids.
- Join two identical chromosomes with a small ball of clay, as shown in the right-hand picture above.
- At this point, prophase is complete.
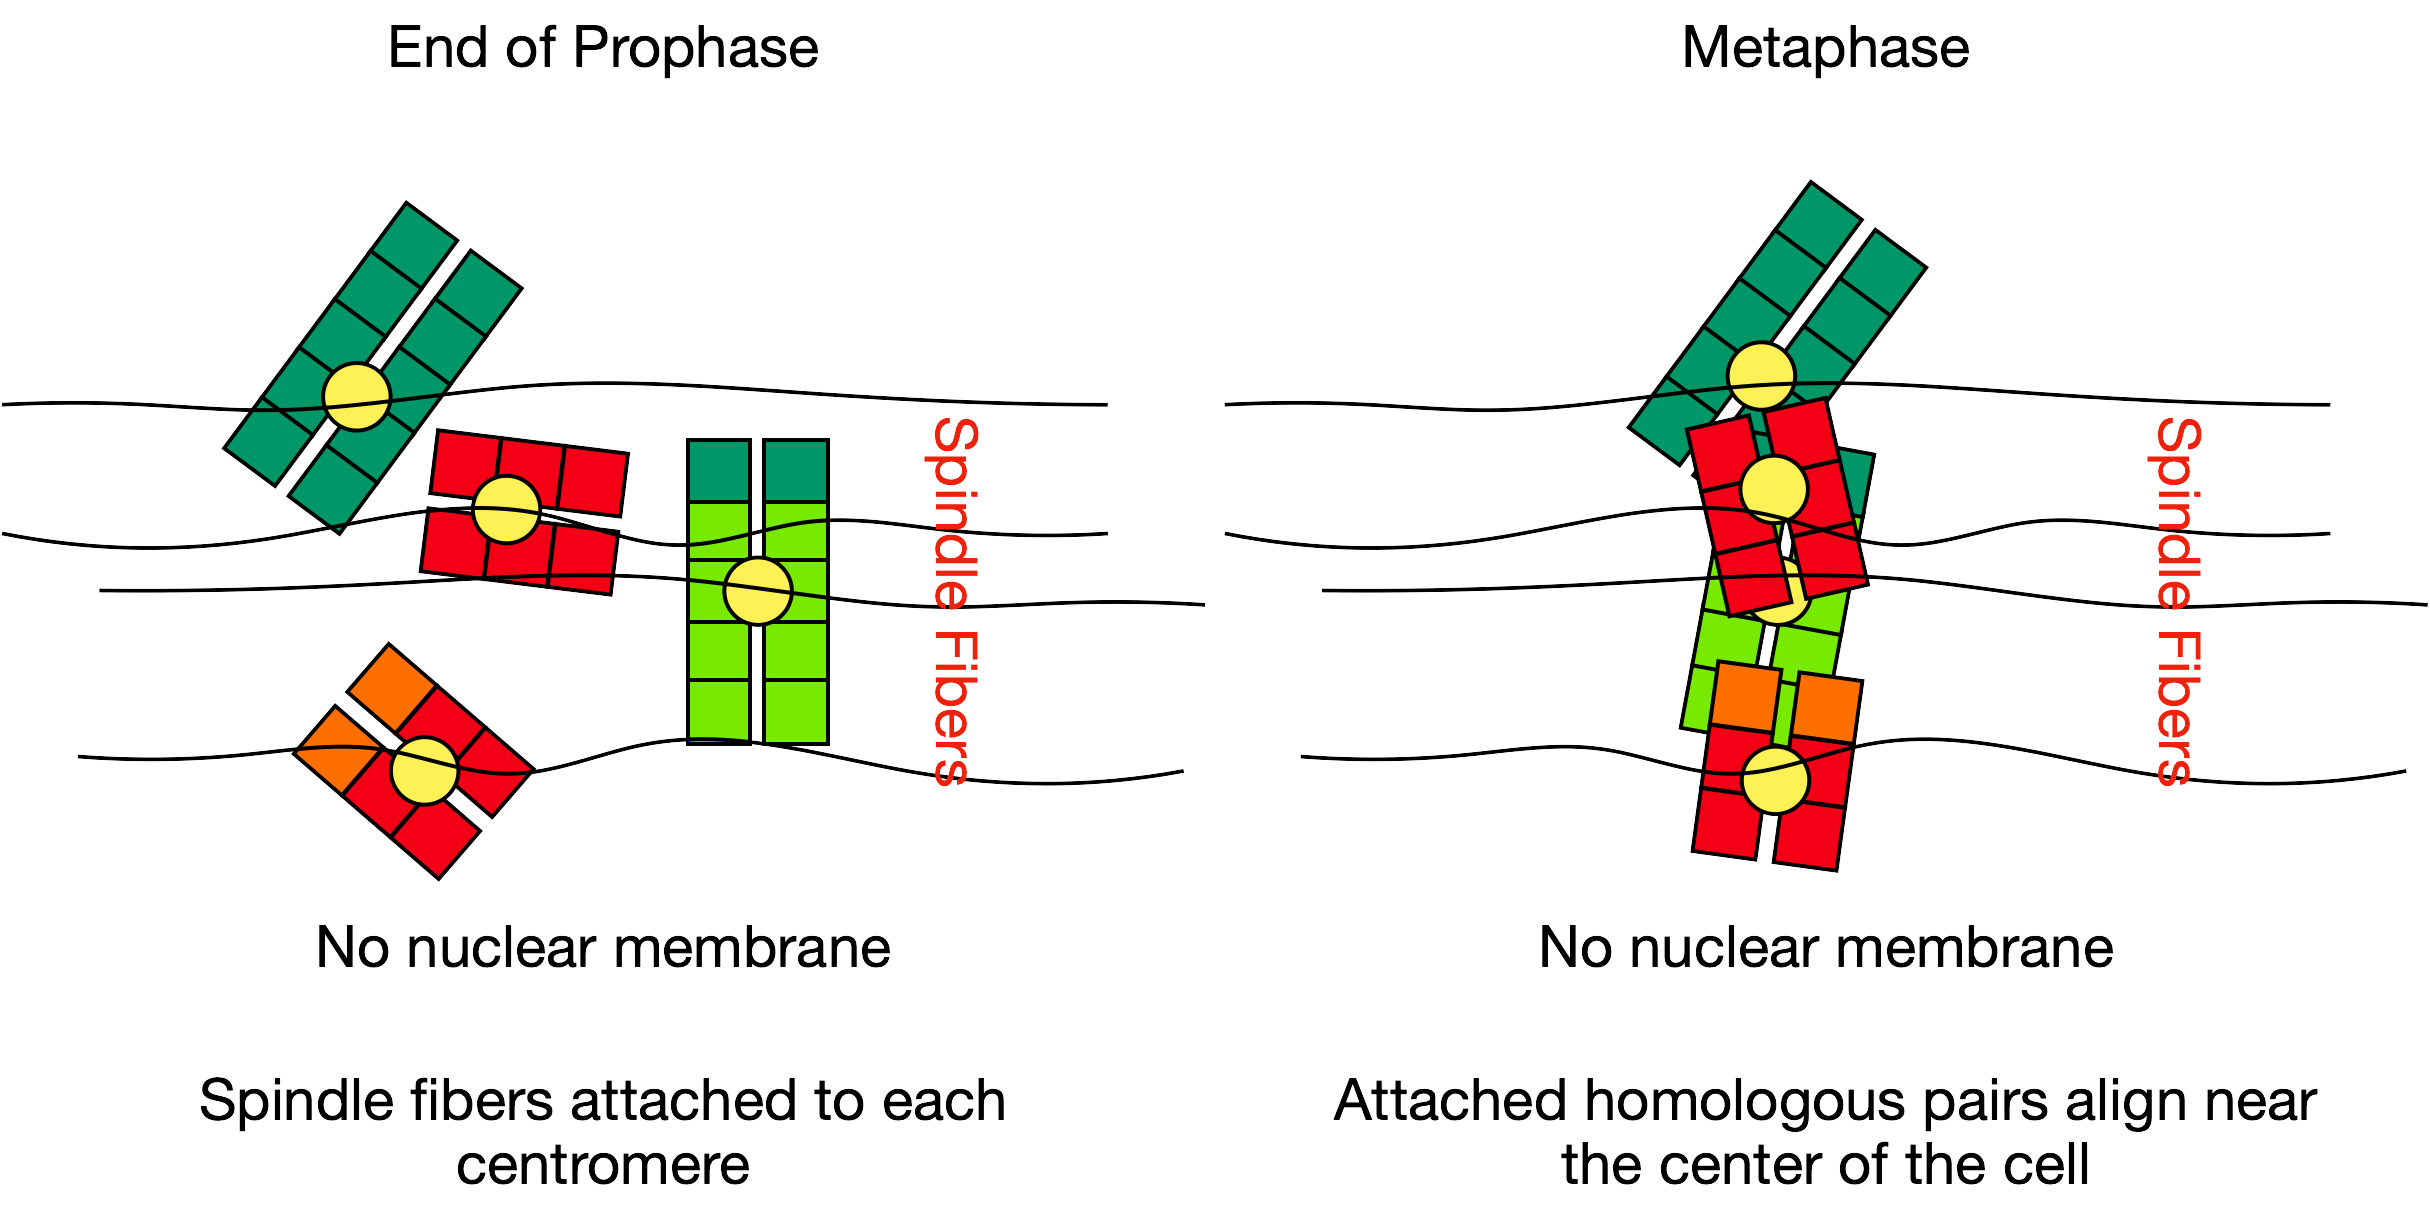
4. The situation by the end of prophase is shown below. Notice that there are four homologous pairs of chromosomes composed of two sister chromatids held together by the centromere. The nuclear membrane has disappeared, and the pairs of chromosomes are in the cytoplasm. Spindle fibers form from each end of the cell and attach to the centromere of each homologous pair of chromosomes… metaphase has started.
_______________________________________________________
B. Metaphase
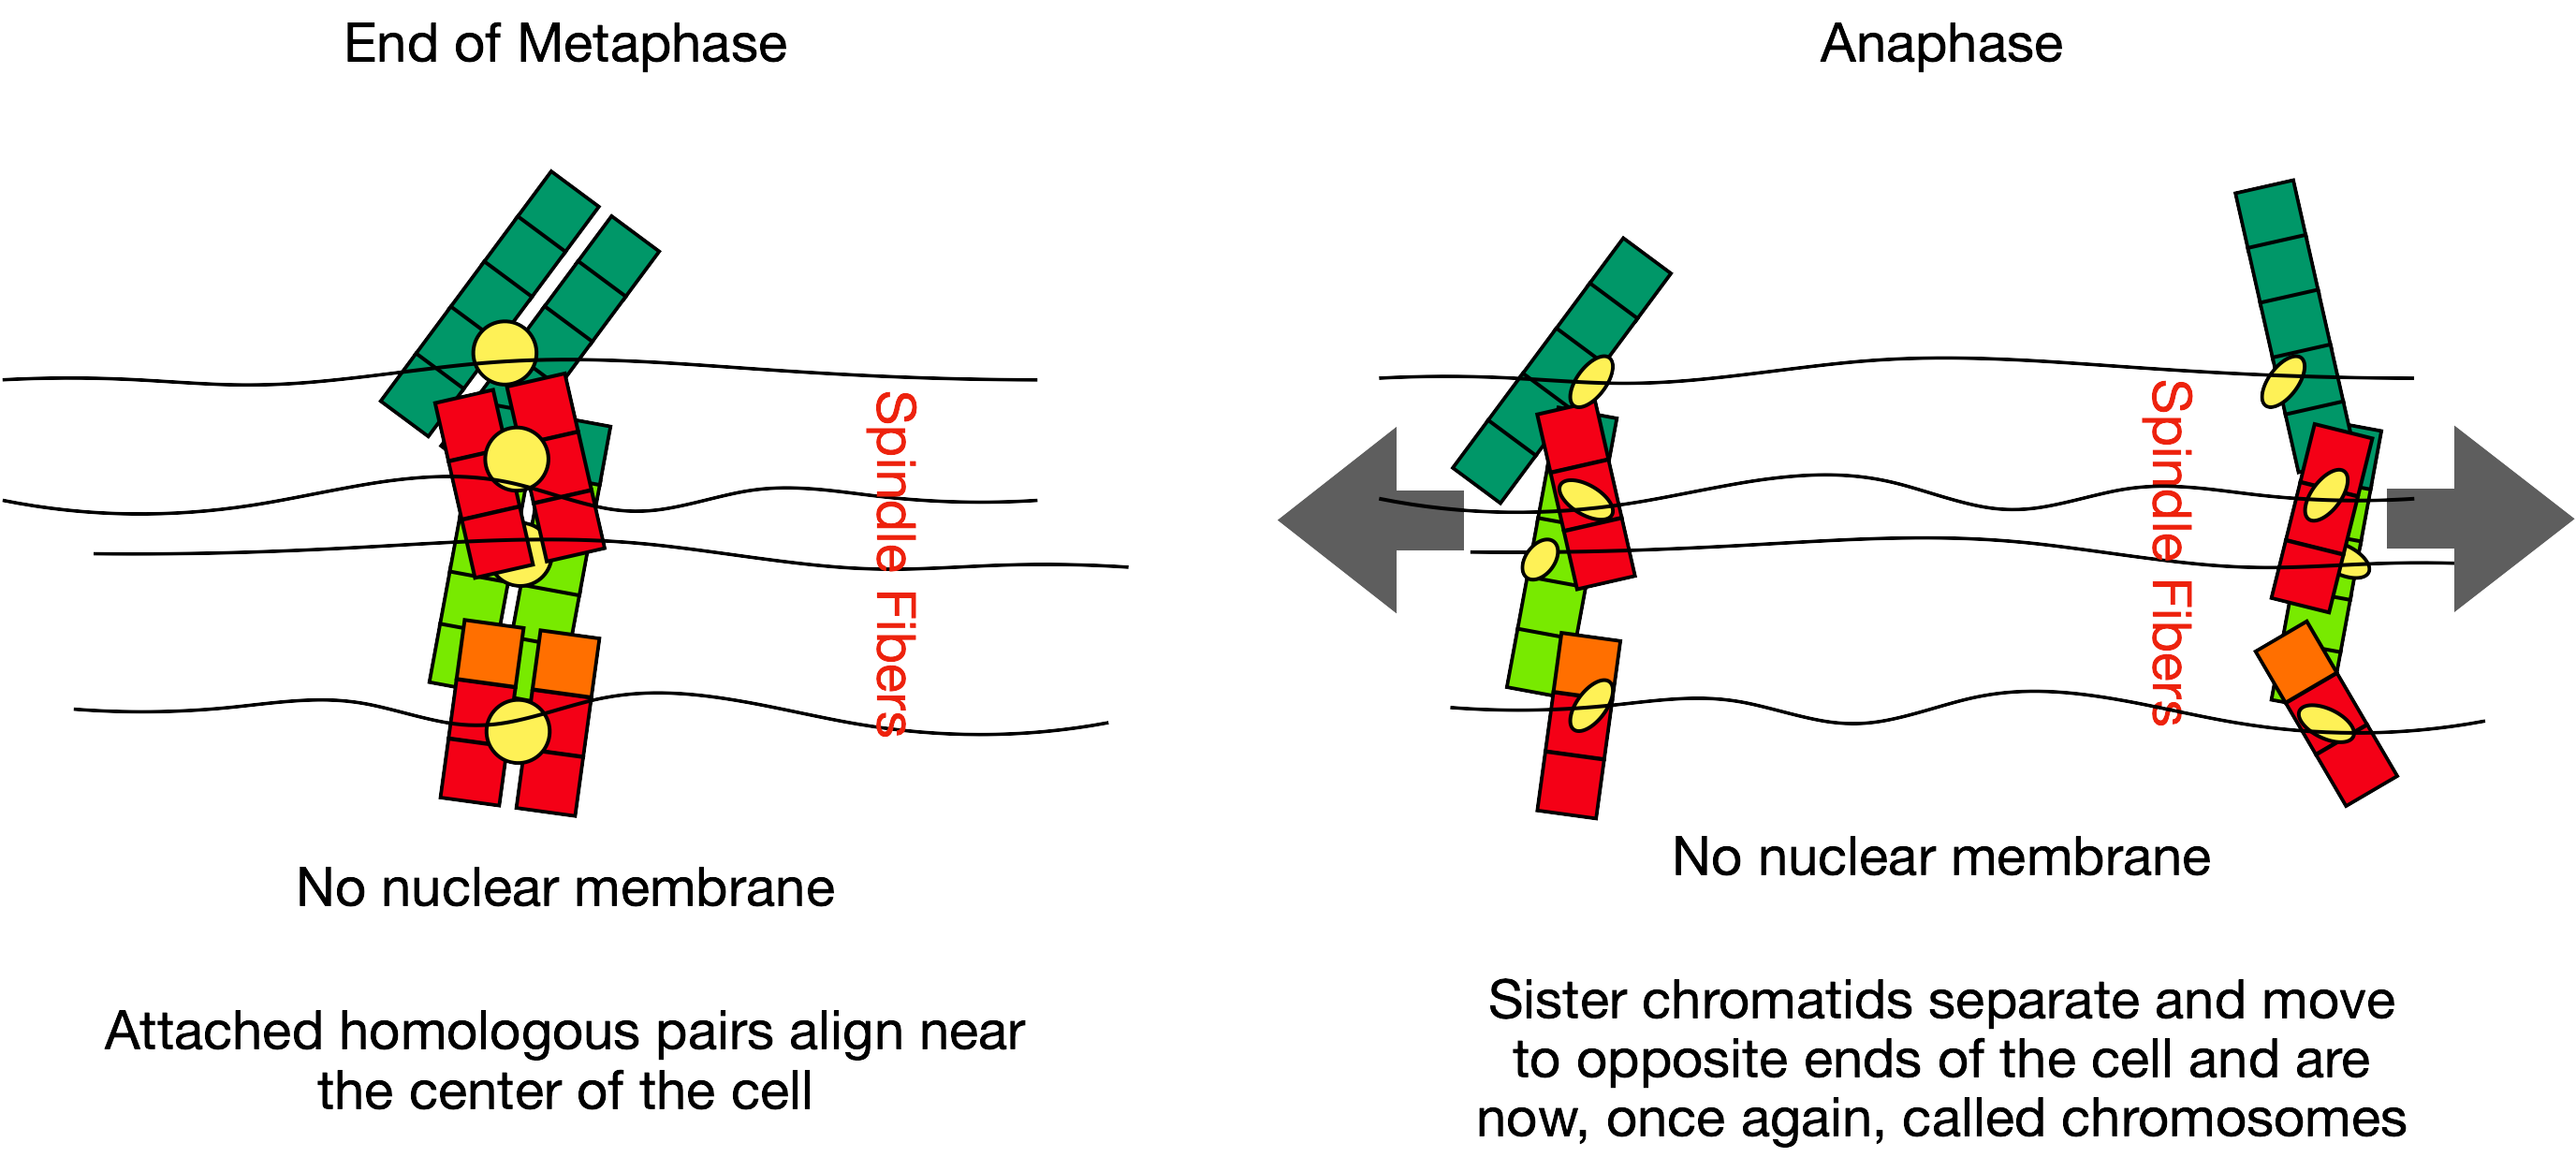
As prophase ends, homologous chromosome pairs form and attach to spindle fibers extending from the cell’s opposite ends. During this process, the nuclear membrane dissolves so the chromosomes can attach to the spindle fibers at their centromeres. At metaphase, the chromosome homologous pairs line up near the center in preparation for the next phase of mitosis.
1. Line the four homologous pairs of chromosomes at the center of the spindle fibers as shown below (note that the fibers attach to the homologous chromosome pairs at the centromeres.
_______________________________________________________
C. Anaphase
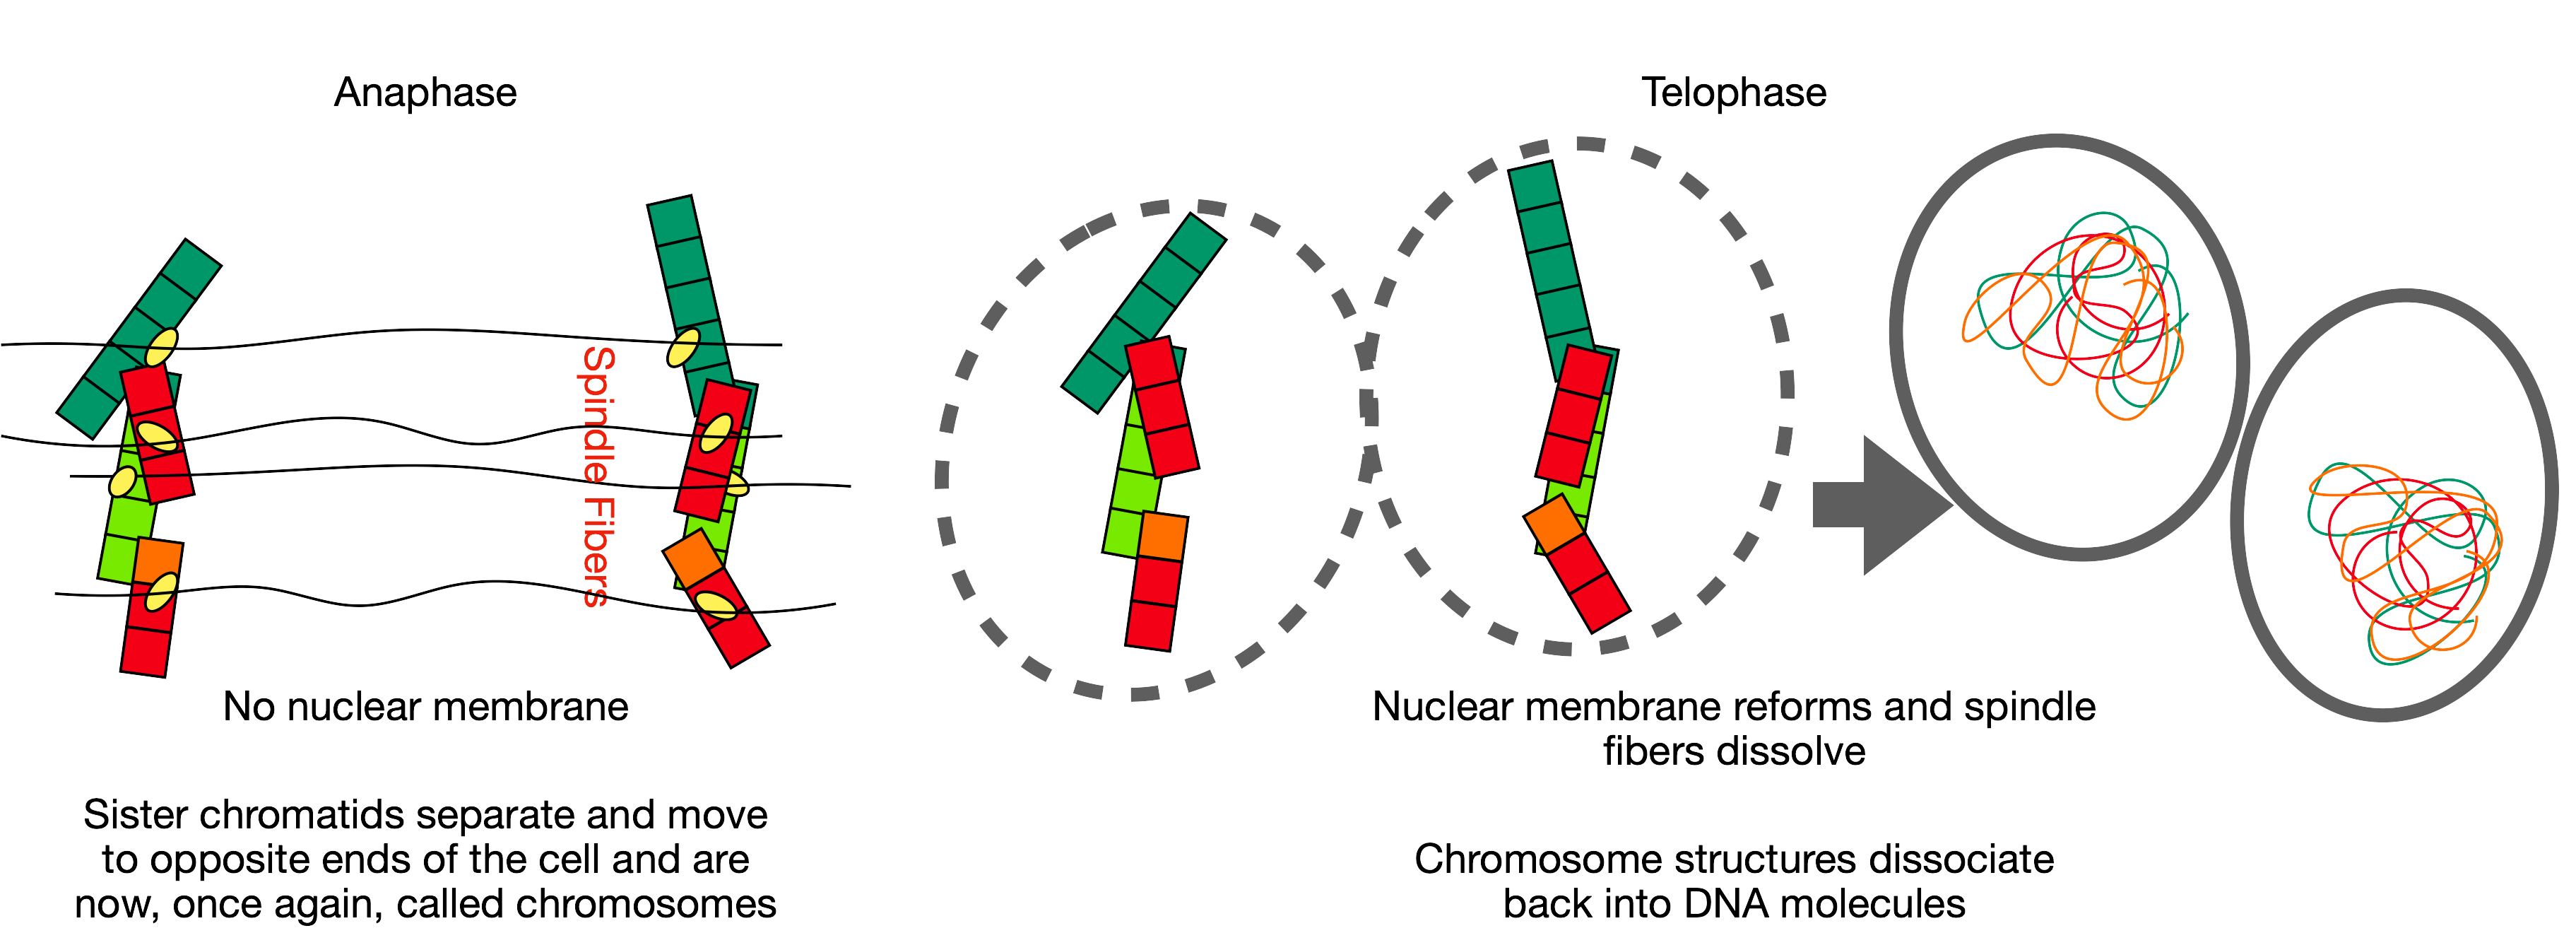
At anaphase, the homologous pairs line up at the middle of the cells begin to separate into sister chromatids, each of which is still associated with the spindle fibers. As anaphase progresses, the sister chromatids are pulled apart and are moved toward opposite ends of the cell.
1. Detach the homologous chromosome pairs in your model and a part of each centromere, and move the two homologous chromatids in opposite directions, as shown in the figure below. Once separated, the homologous chromatids are referred to as chromosomes.
_______________________________________________________

D. Telophase
At telophase, the chromosomes have moved to opposite areas of the cell. The spindle fibers dissolve along with the centromers. In addition, the nuclear membrane reforms around the chromosome groups at each end of the cell.
1. Remove the remaining centromeres (clay) and the spindle fibers (strings) once the chromosomes are separated at the end of anaphase.
2. Finally, add a nuclear membrane (circle of string) around each set of chromosomes.
3. Confirm that the two new cells formed in the model are genetically identical to the cell you started with.
Note: After telophase, cytokinesis completes the process of cell division by physically separating the cytoplasm into two distinct daughter cells. Cytokinesis ensures that each new cell has its own complete set of organelles and cytoplasm, finalizing the mitotic process.
_______________________________________________________
Summary of Mitosis