Teacher Portal
Science and Art
PreLab Slides 2
PreLab Slides 2
Science and Art

Science and Art
Investigation 2
PreLab Concept Slides


VART2pre-1
This is the second Investigation of the LabLearner CELL Science and Art. In it, students continue the exploration of perspective and the illusion of depth in paintings.
______________________________________________
VART2pre-2
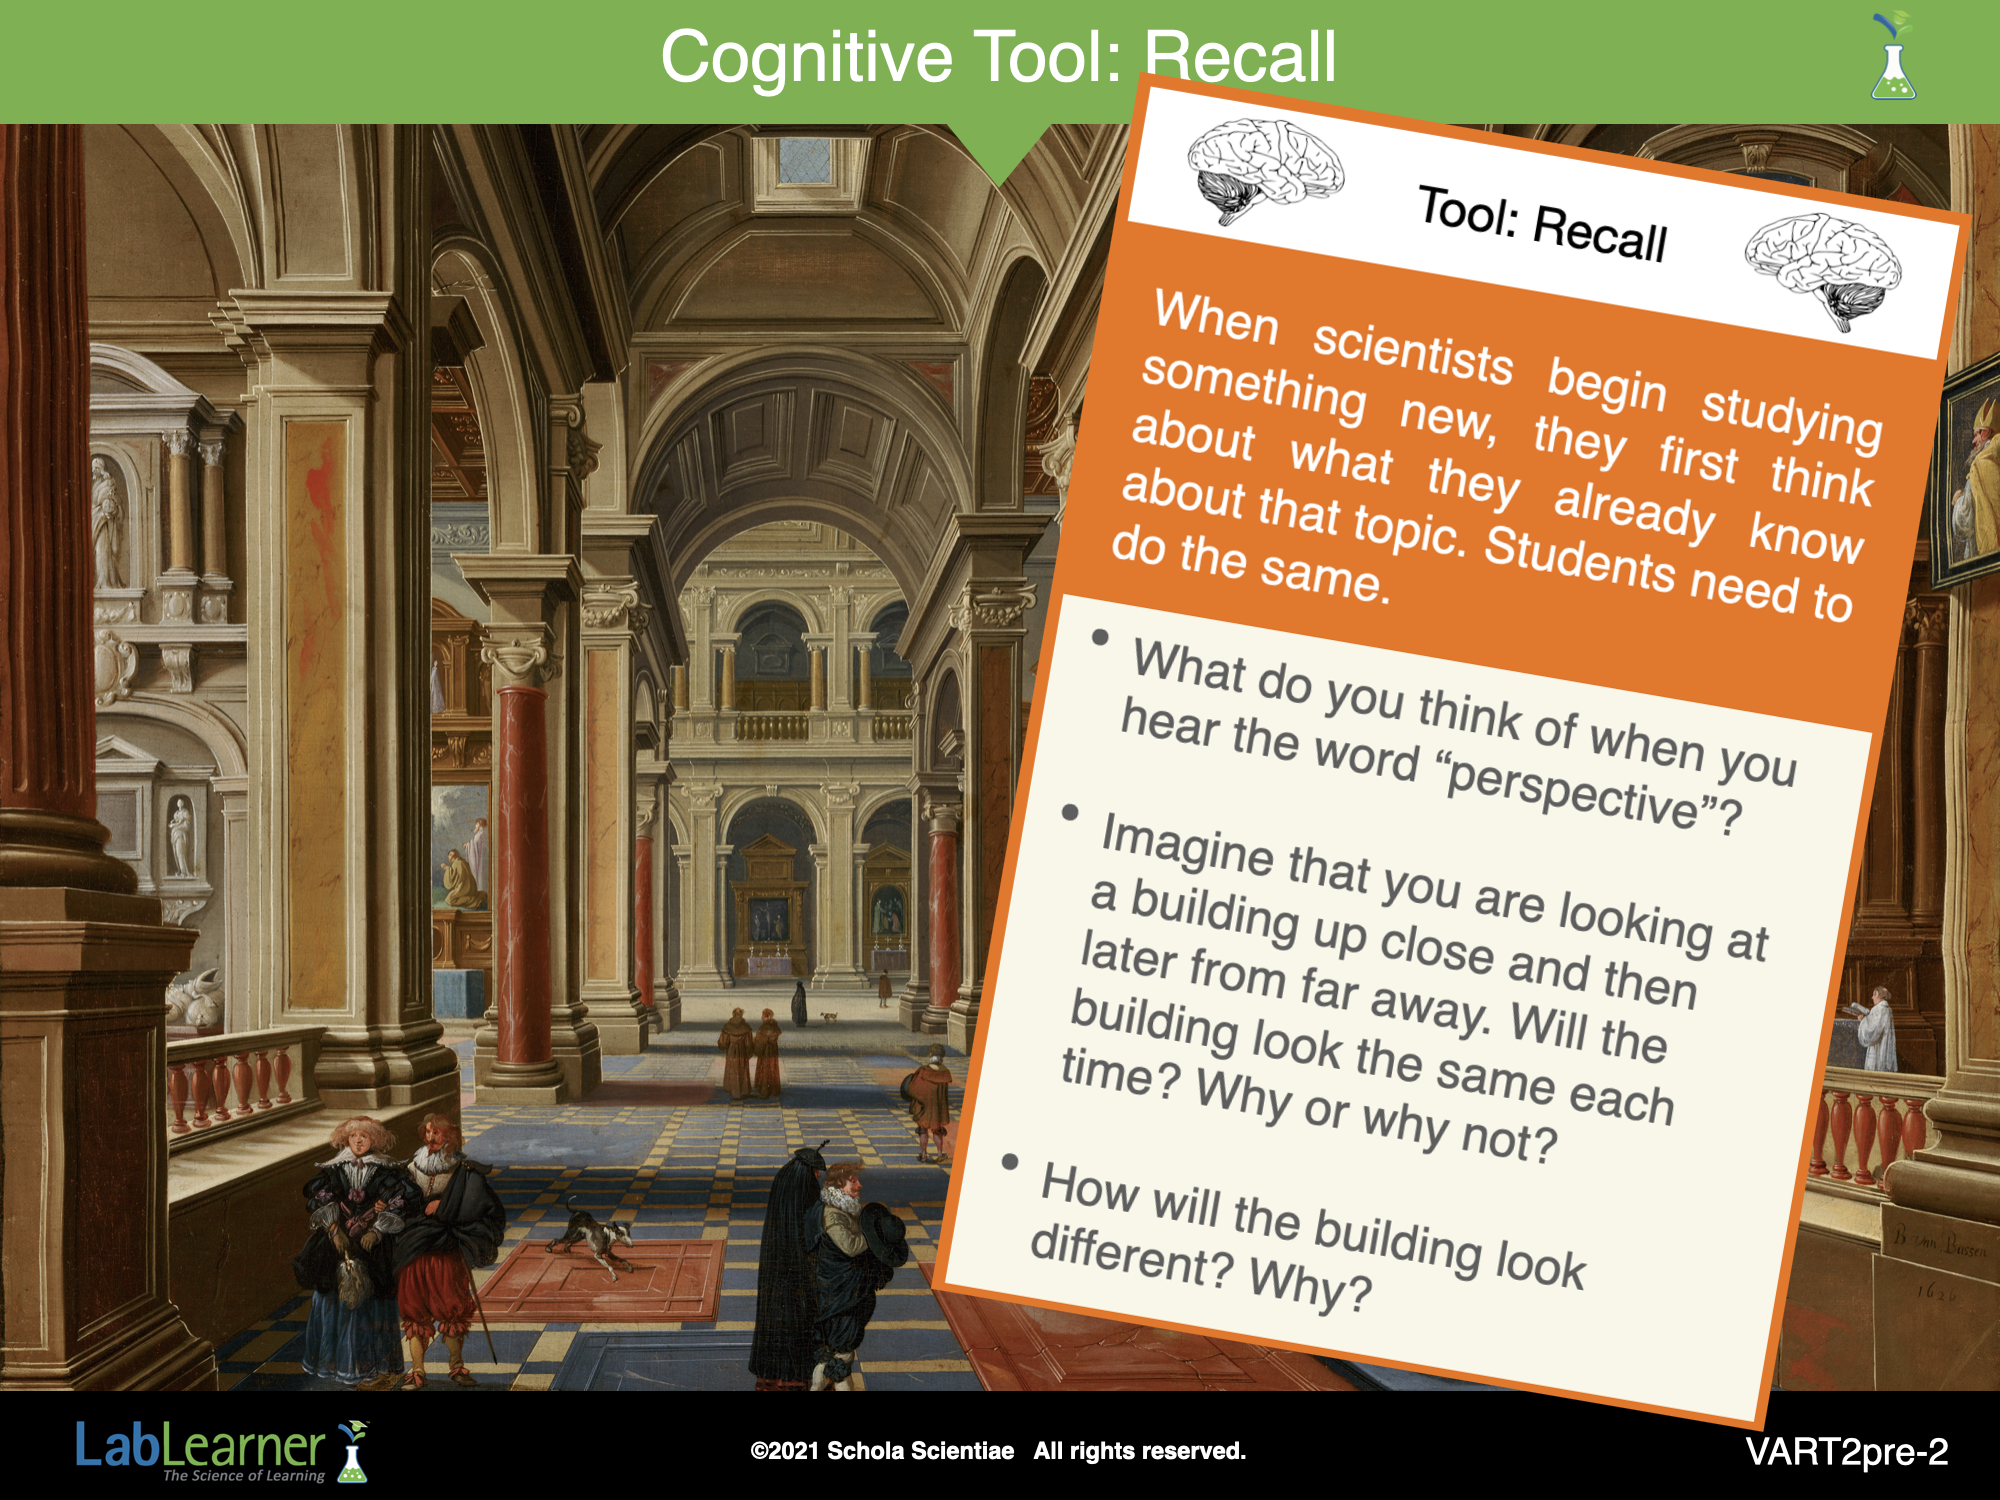
NOTE: The painting shown in the background is titled: Interior of a Church. It was painted around 1644 by an artist trained by the Dutch master Bartholomeus van Bassen.
Begin by asking students: What do we do when getting ready to learn something new? Students should realize that the Recall tool is appropriate.
Pose the following questions to prompt student recall about art and perspective:
1. Ask students: What do you think of when I say “perspective?” Student answers may vary. However, their answers should reflect what they learned about the perspective from Investigation One, such as how an object appears depending upon your point of view, the ability to produce a three-dimensional image in two-dimensional artwork, or the change in the appearance of an object as the distance from the object changes.
2. Ask students: Imagine you are looking at a building up close and then later from farther away. Will the building look the same each time? Why or why not? Students should indicate that the building will appear different when viewed close and farther away because the point of view has changed. In addition, the field of view changes, and the part of the field of view that the object takes up changes when viewed from different distances.
3. Ask students: How will the building look different? Why? The building will look wider when it is closer because it takes up more field of view. The building will look narrower when it is farther away because it takes up less of the field of view.
______________________________________________
VART2pre-3
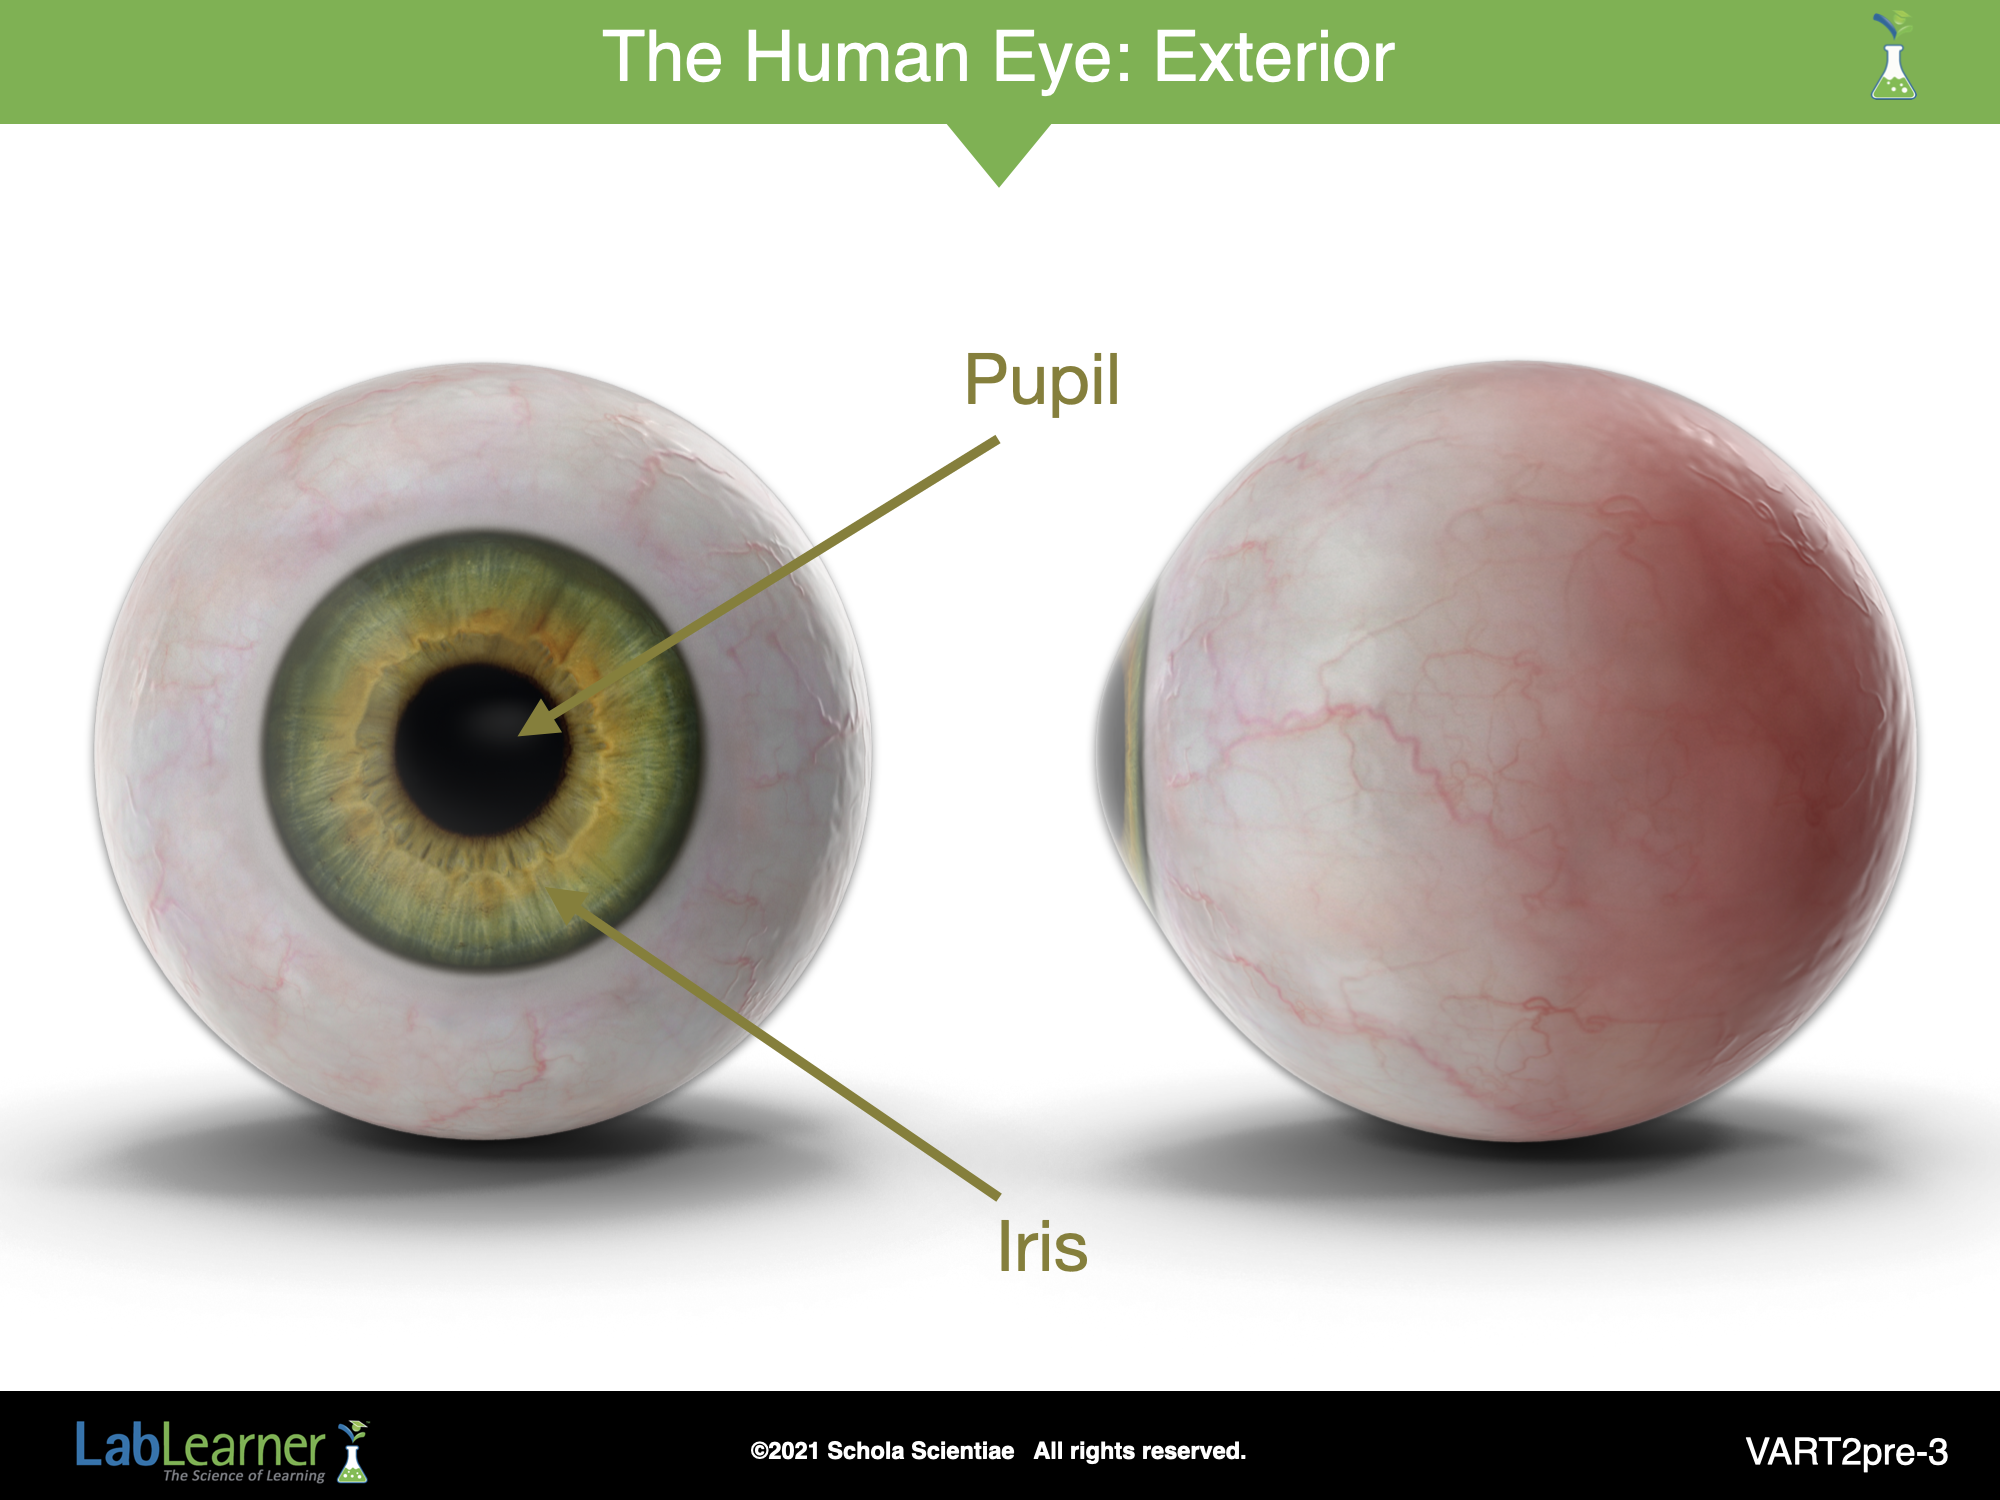
B. Continue the discussion of perspective and field of view by inviting students to look at a model of the eye. Encourage students to refer to and complete, if necessary, Problem 1a in their Student Guide PDF as a part of the discussion (shown below).

1. Draw students’ attention to the eye diagram on the slide. Point out the various labeled parts of the eye.
Note: This slide shows the outside or exterior of the eye. The next slide shows a cross-section of the eye’s interior. The side view of the eye is included to show that the front of the bulges out slightly. Students can feel this bulge by gently touching their closed eyes.
______________________________________________
VART2pre-4
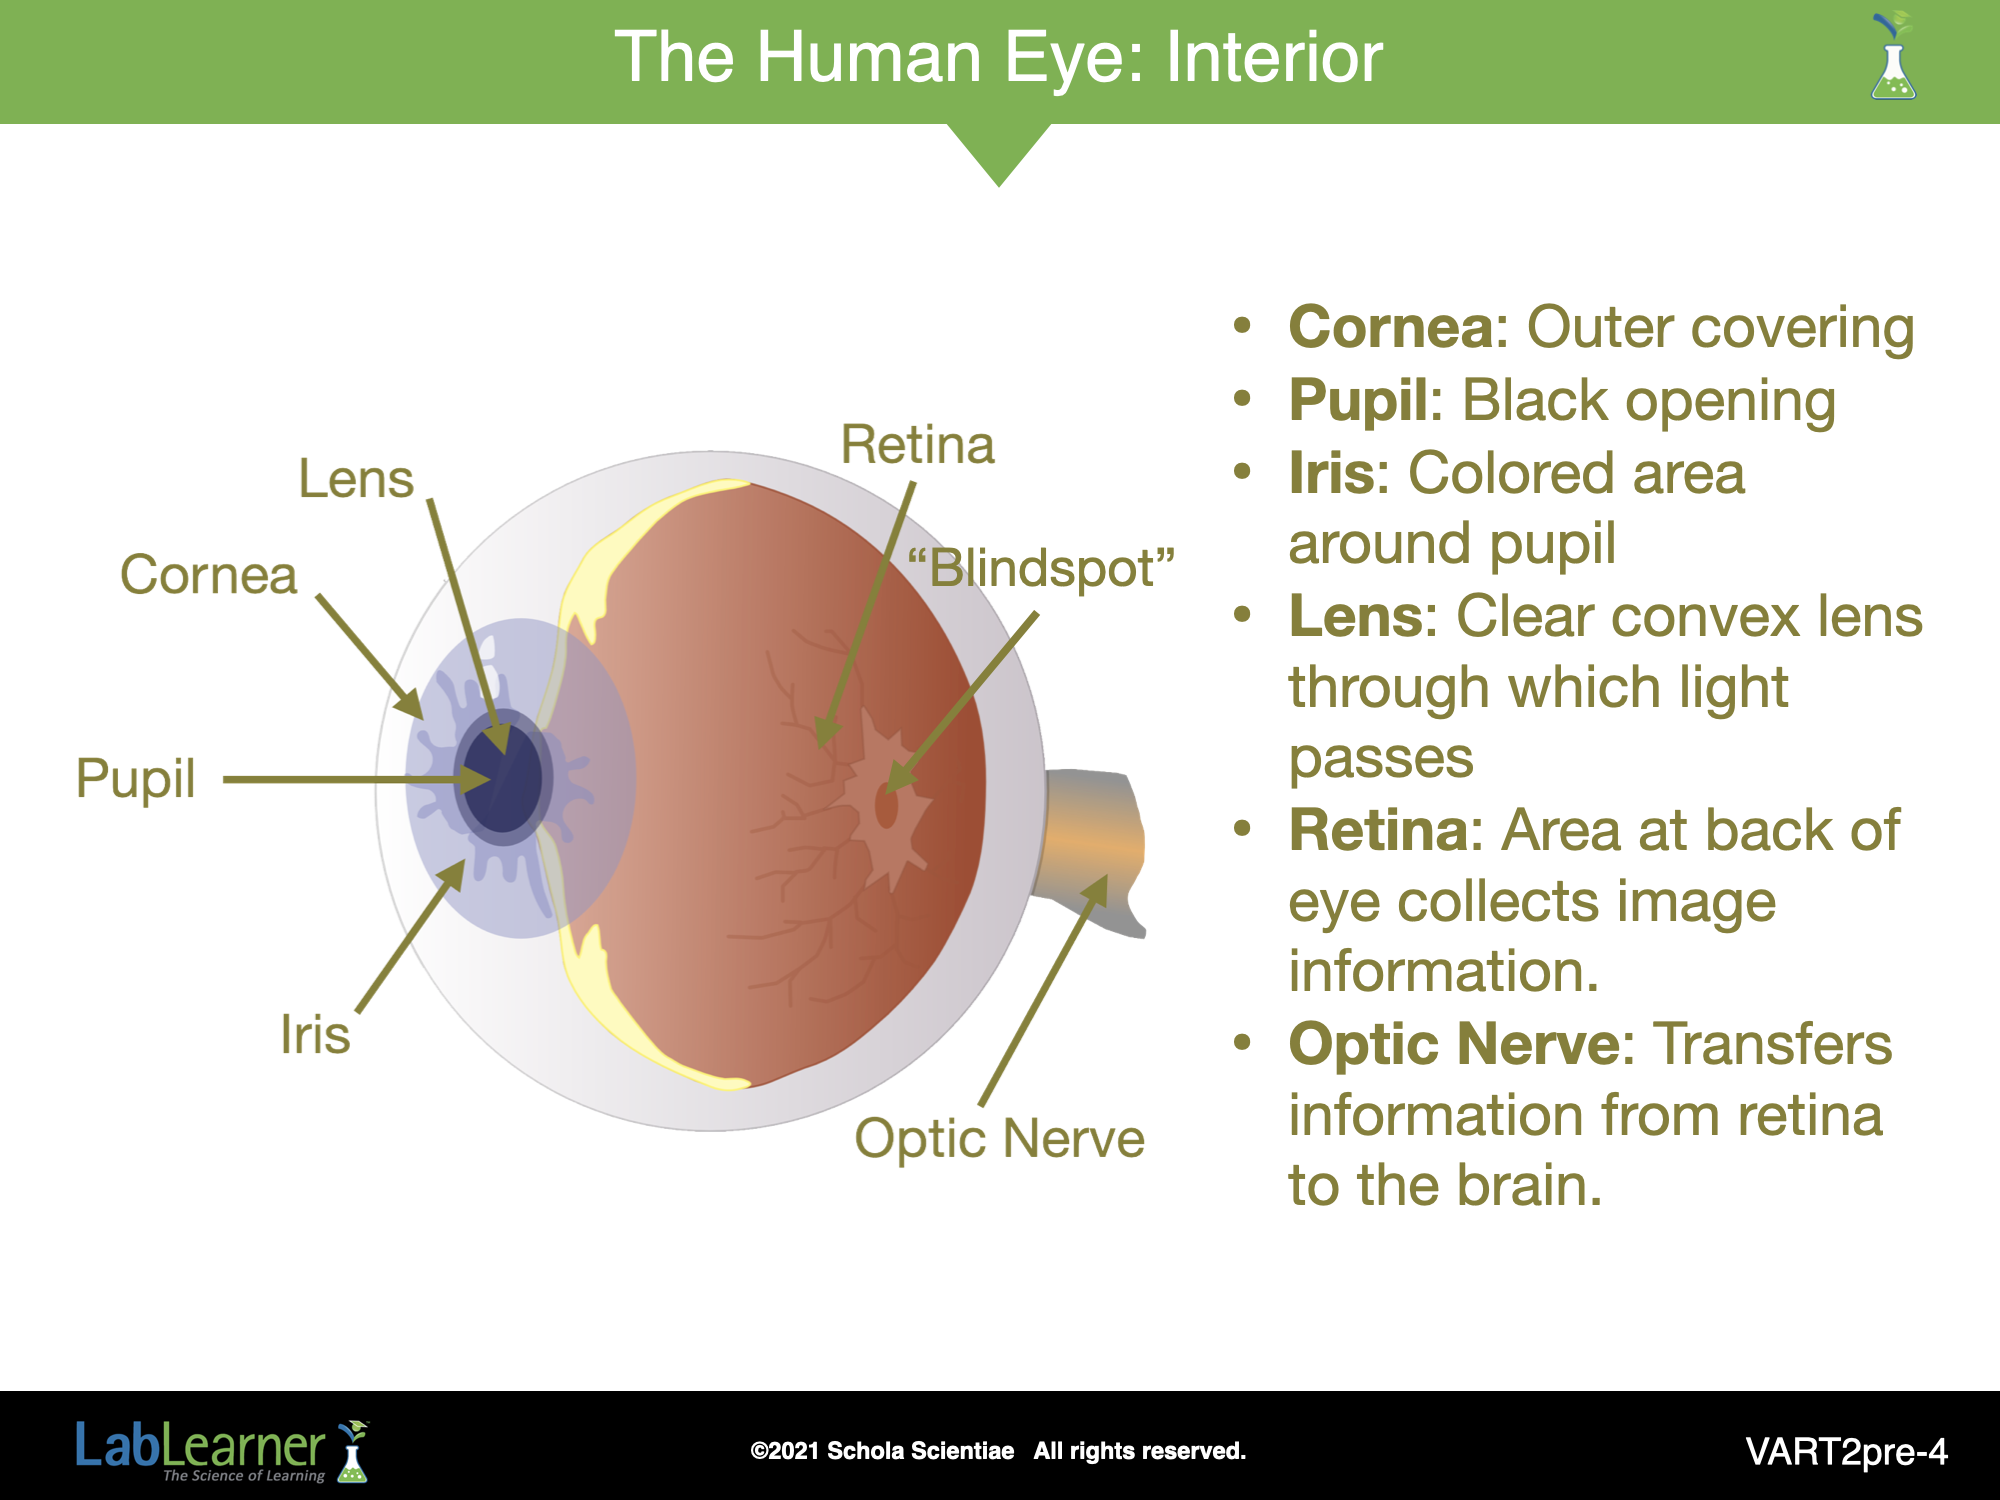
This slide shows the inside or interior of the eye. The retina is an area of sensory cells at the back of the eye. It covers a large part of this area.
Notice that where the optic nerve enters the eye, it occupies a small area of the retina. Since this area of the retina is devoid of sensory cells, light information that strikes this small patch is not detected. This results in a “blindspot” that students will learn more about in LabLearner middle school.
______________________________________________
VART2pre-5
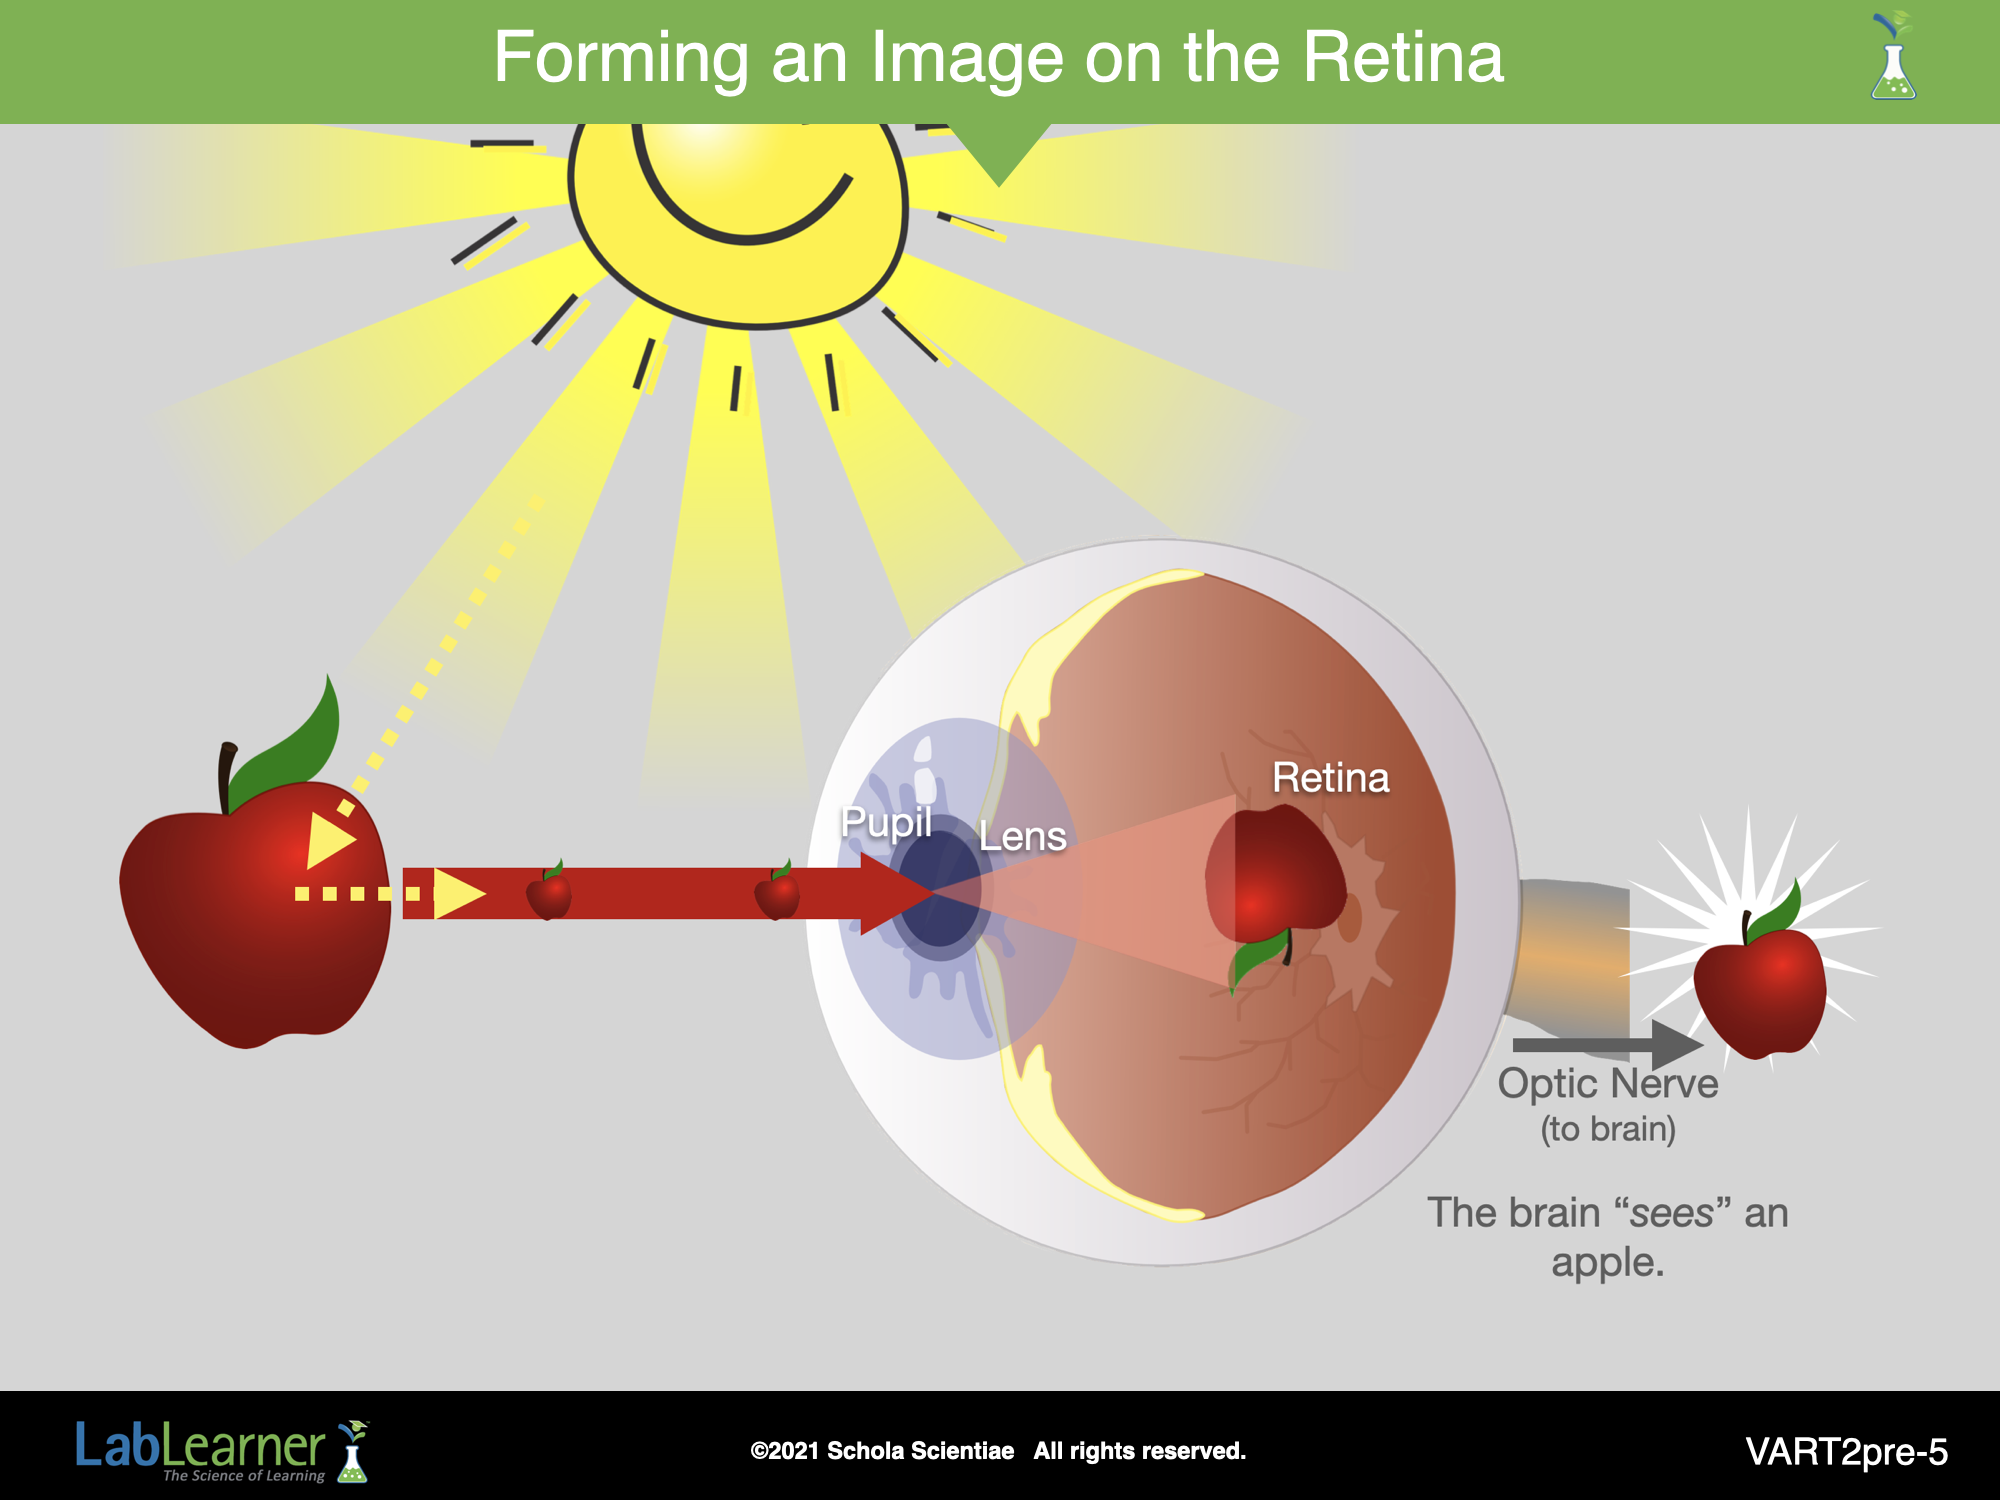
1. Walk students through how images appear on the retina. Use the steps below as a guide:
a. Explain to students that light reflects off of an object and then passes through the eye’s outer layer, called the cornea.
b. Light then enters the eye through an opening called the pupil. The pupil size is controlled by the iris, the colored part of the eye.
c. Light from the object then passes through a lens that focuses the image of the object onto a structure in the back of the eye called the retina.
d. Cells in the retina convert the light falling on them into nerve signals from the optic nerve to the brain.
e. The brain then interprets these signals allowing the identification of the object.
2. Ask students: Think about the meter sticks and the wood block from Investigation One. Remember that they appeared differently when they were close and far from the eye. Do you think the image of the wood block on the retina was the same when it was close to the eye and far from the eye? What about the meter sticks? Student answers may vary. Accept all student answers at this time. The activity that follows is designed to help students answer this question.
______________________________________________
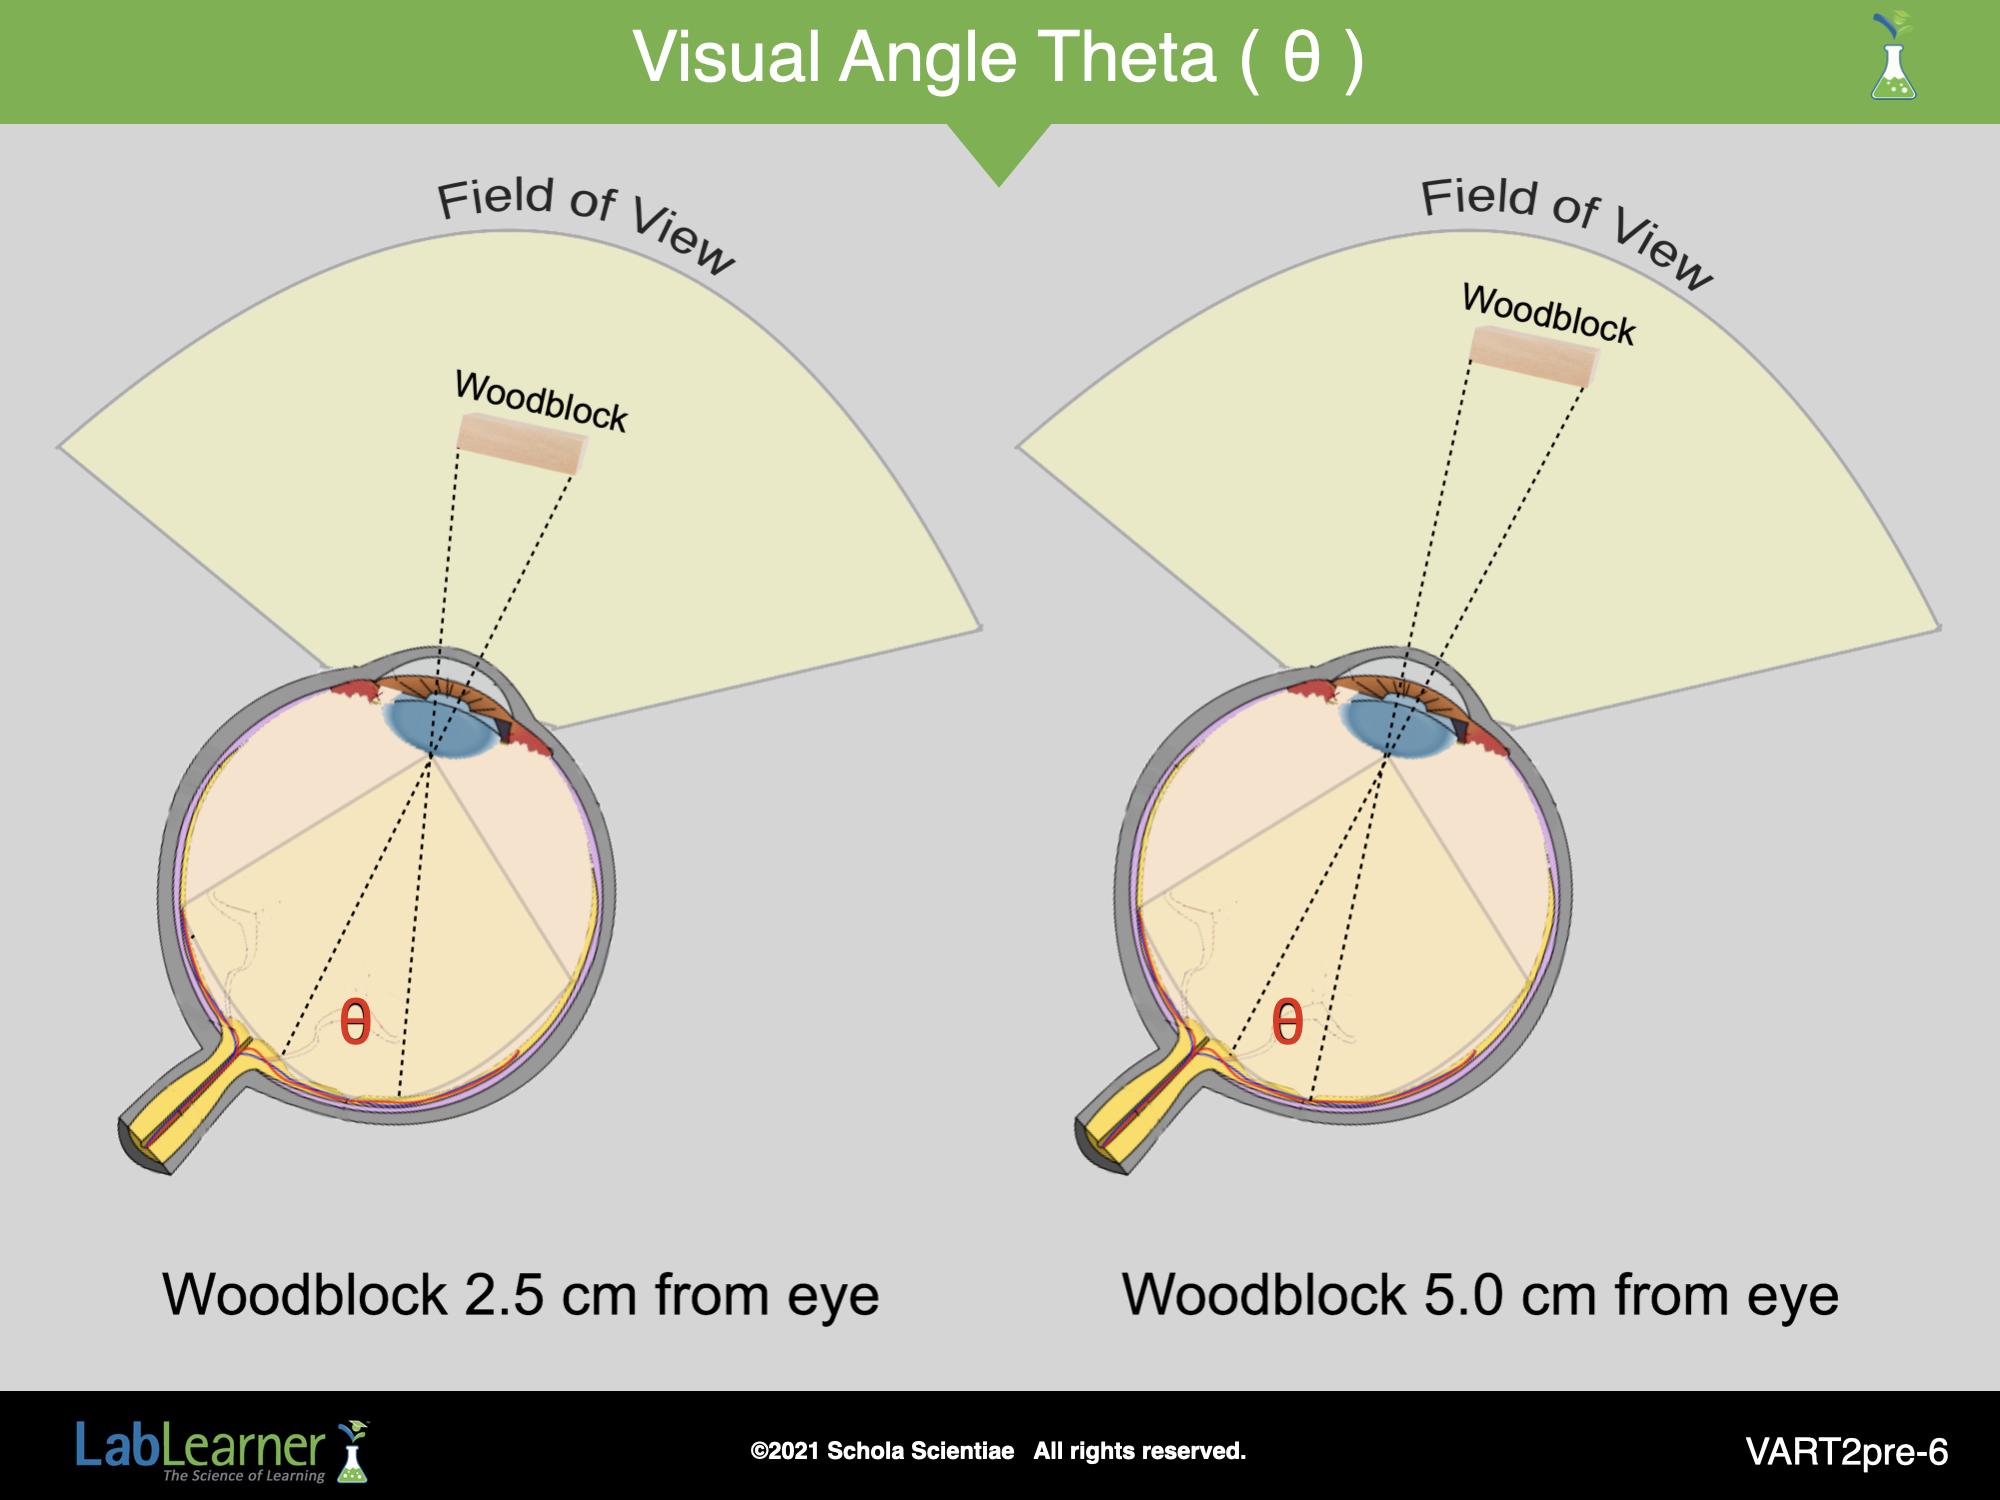
VART2pre-6
4. Explain the following parts of the slide:
a. In each of these two drawings, the field of view for an eye and the appearance of the woodblock from Investigation One are shown at two distances (2.5 cm on the left and 5.0 cm on the right).
b. Notice that the field of view is the same for each diagram (yellow area outside and outside the eye. The field of view for the human eye is about 150 degrees. The diagrams have a field of view close to this.
c. The diagram models the woodblock when it was 2.5 cm from the eye. The other diagram shows when the wood block was 5 cm from the eye.
d. Both the solid black lines and the dotted lines show how the refraction of light through the lens produces an image on the back of the retina. The solid black lines show the connection between the field of view outside the eye and on the retina.
e. The dotted lines illustrate the connection between the woodblock outside the eye and the image of the woodblock on the retina.
______________________________________________
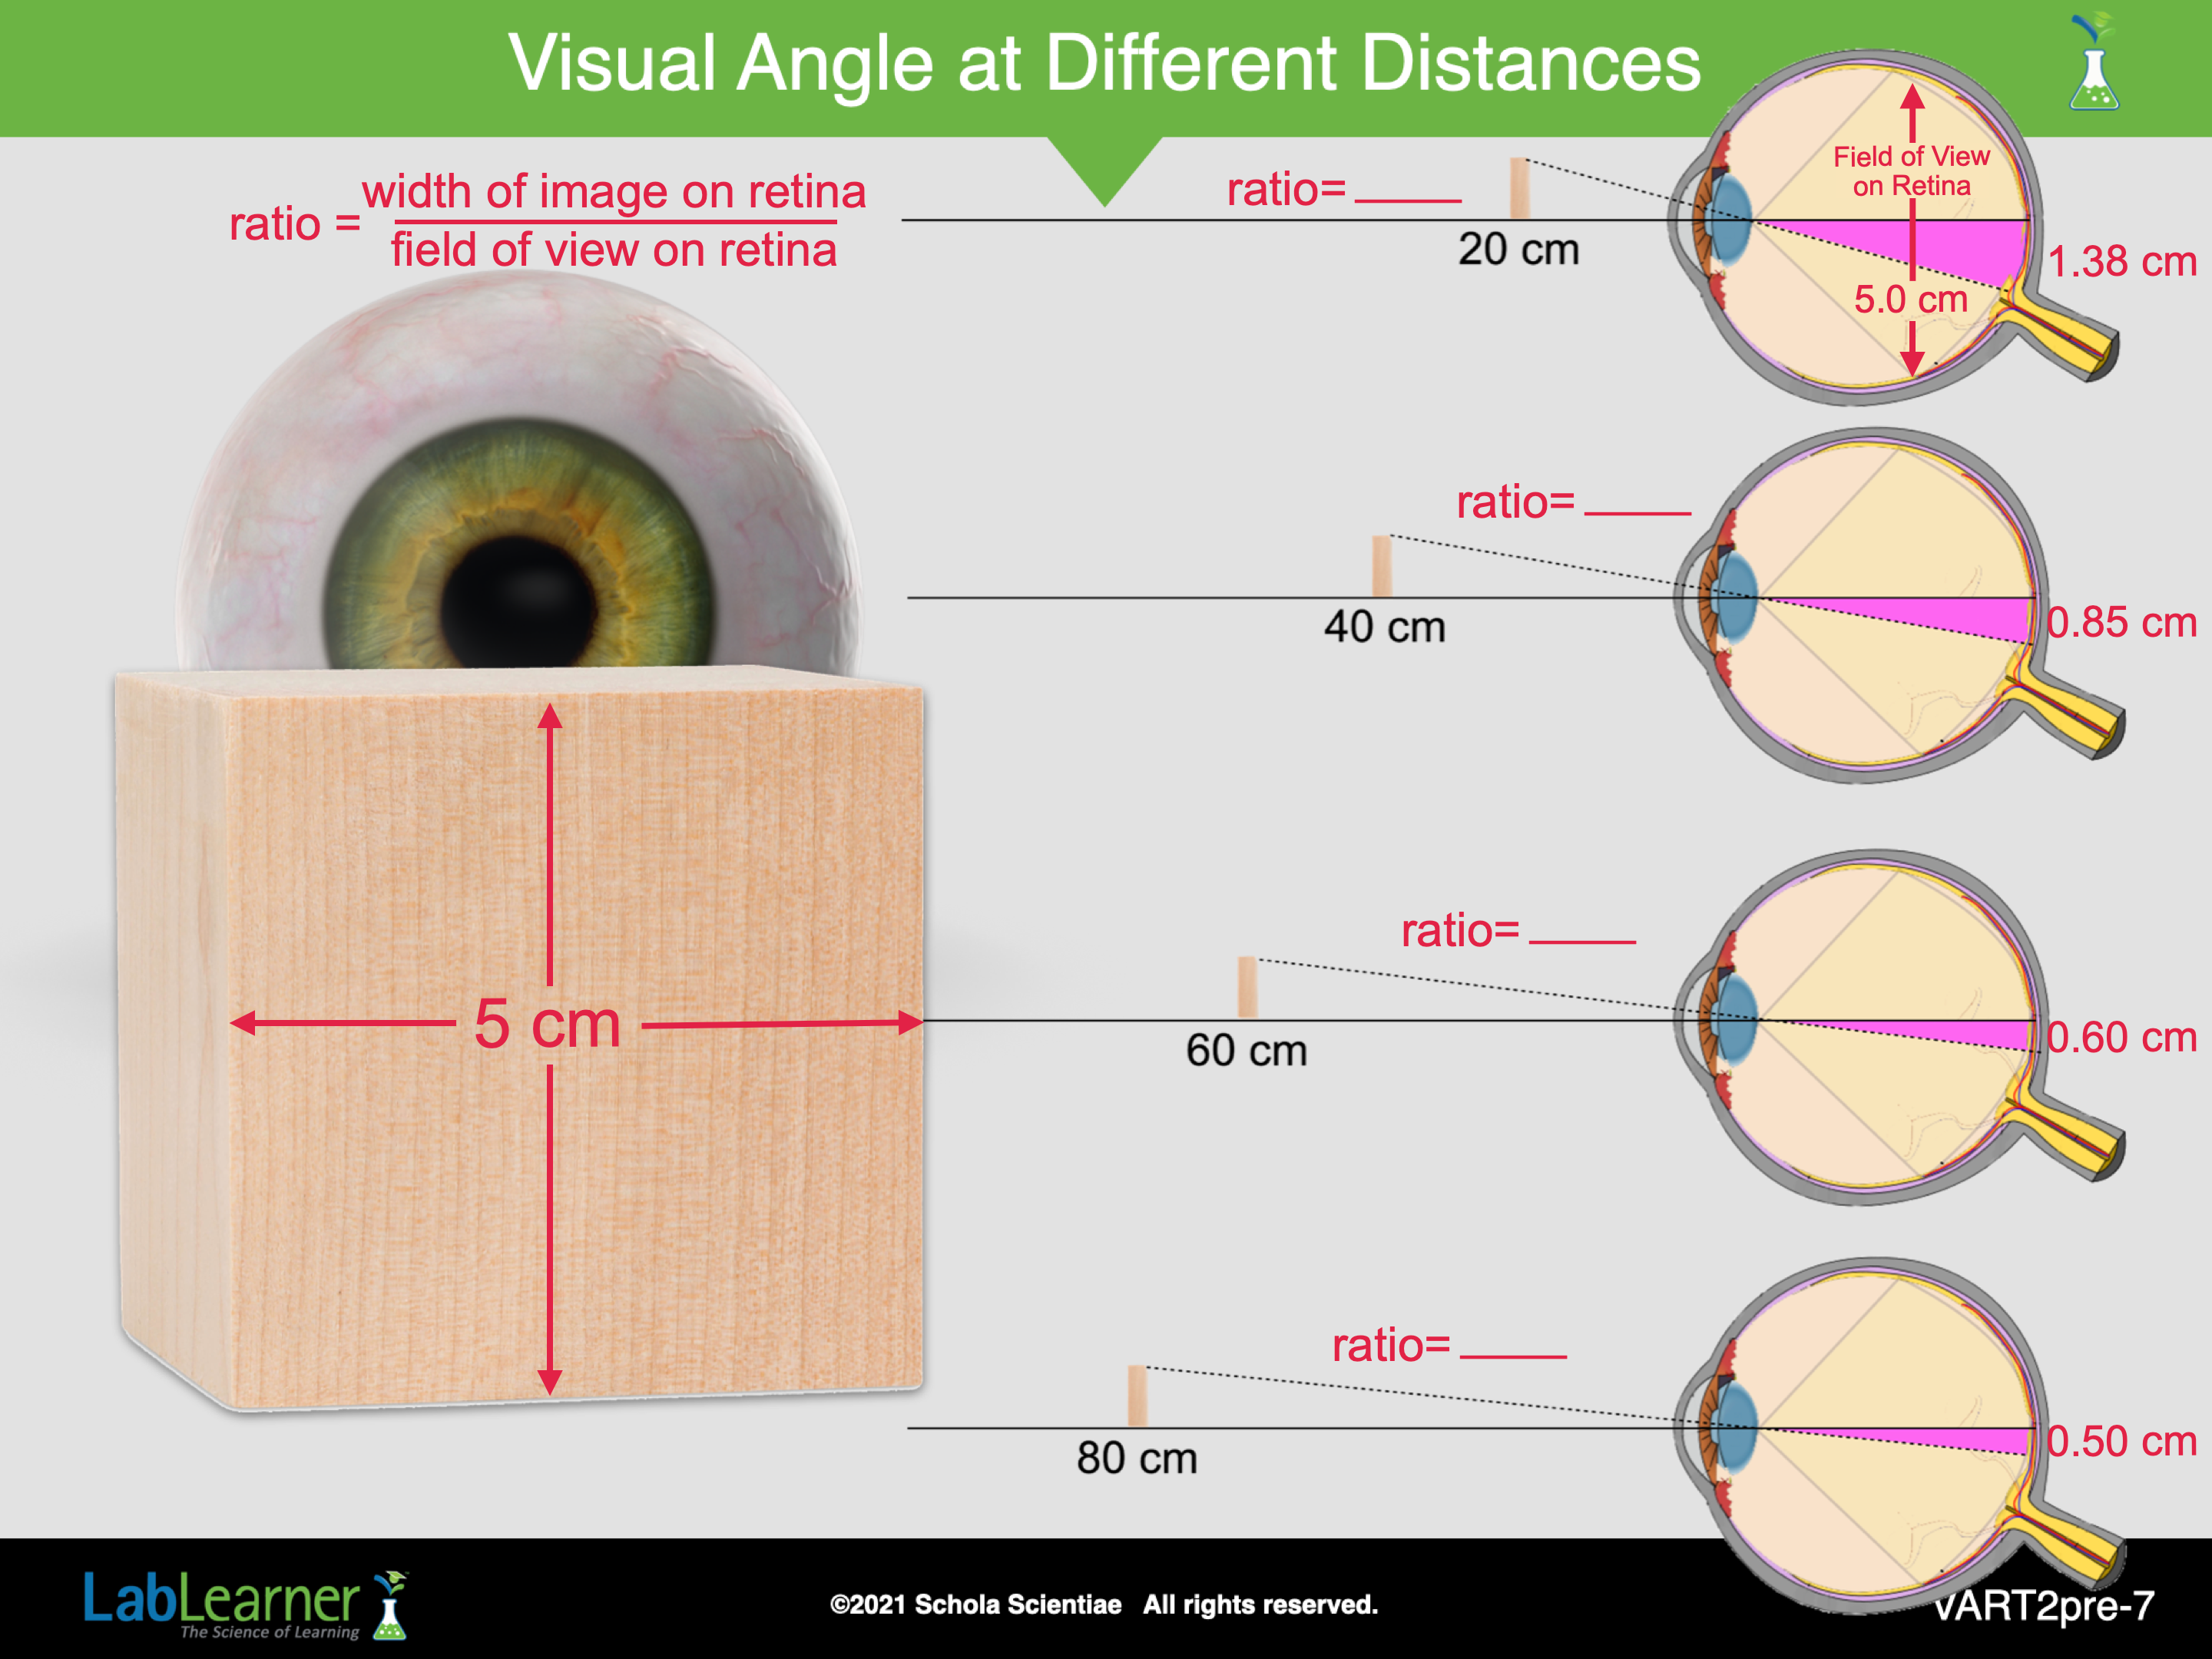
VART2pre-7
Explain to students that this slide should help them to better understand why an object appears smaller the farther it is from the eye.
a. Divide students into the same five cooperative groups from the Investigation One lab section.
b. Briefly walk students through the directions for solving the problems on this slide. Students should observe the image’s width on the retina for each diagram.
c. Students should notice that, in the diagram, the field of view is the same for each retina because the field of view for an eye is the area is space that is visible to an eye. The field of view for an eye encompasses part of the area on the retina.
d. Students should then use the width of the images on the retinas to calculate the ratios of object width/field of view width for each circumstance.
e. Provide time for students to compare the ratios and to compare these ratios with those they calculated in the PostLab of Investigation One.
f. Ask students: What did you discover about the ratios of object/field of view on the retina when the wood block was at different distances? The ratio of the object/field of view on the retina was larger when the wood block was closer to the eye and smaller when it was farther from the eye.
g. Ask students: How do these ratios compare to those you calculated in Investigation One. Do you see the same trend? The ratios show the same pattern. The farther the object is from the eye, the smaller the ratio of the object/field of view. In other words, when the object is farther from the eye, it takes up less of the field of view of the eye.
Investigation One looked at this ratio when comparing the object to the field of view outside the eye. The model students just completed shows that the same relationship exists INSIDE the eye on the RETINA.
______________________________________________
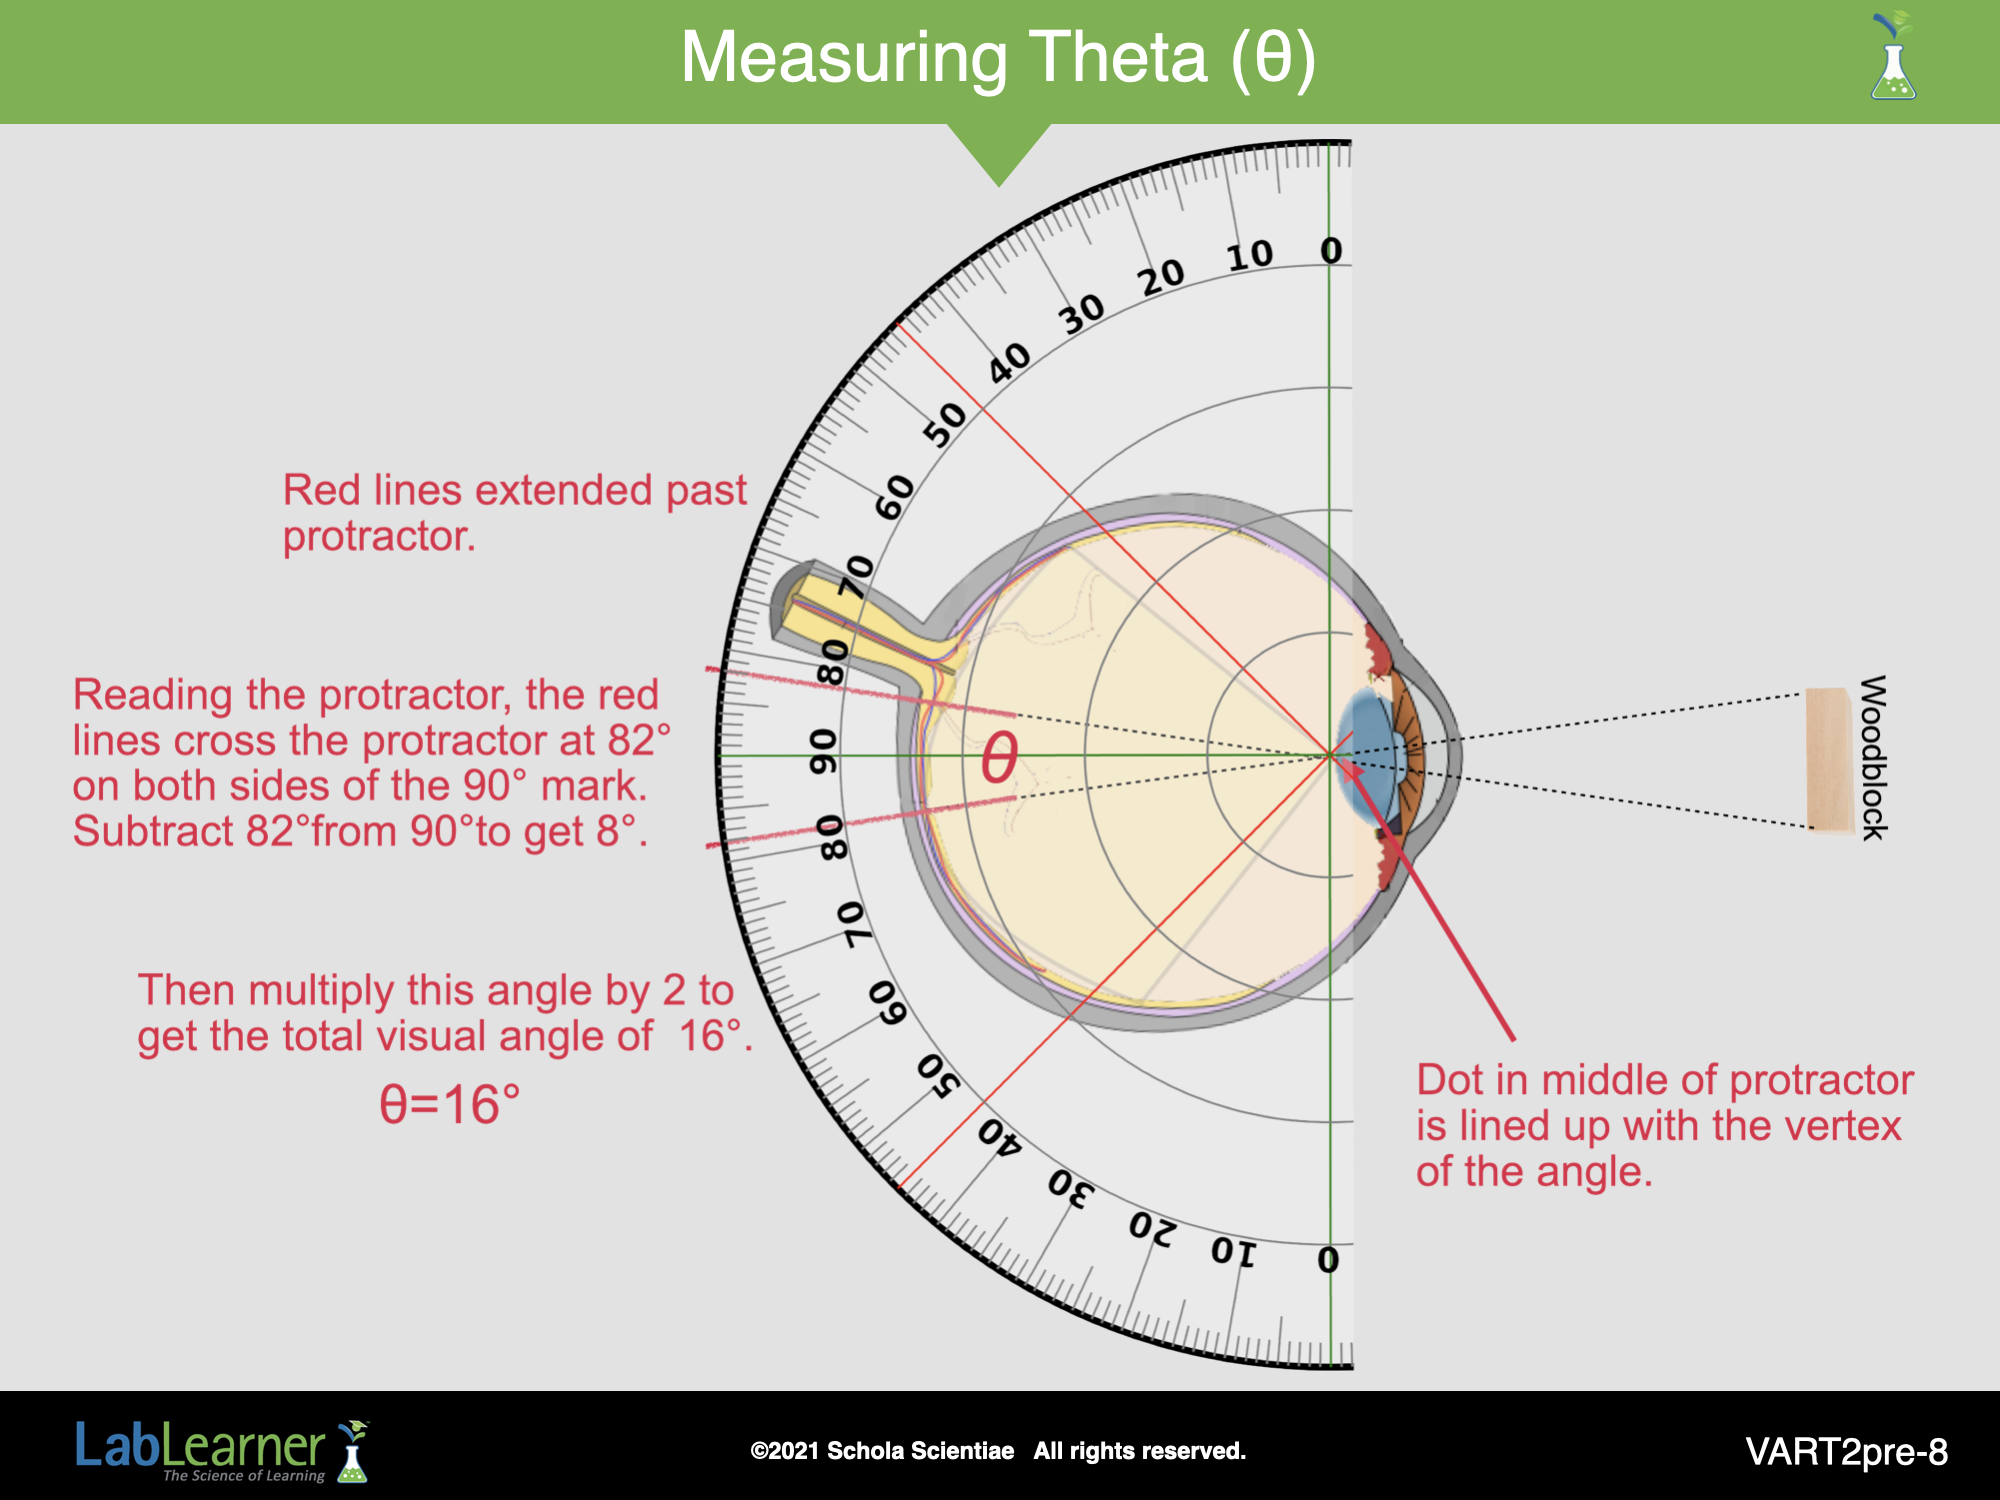
VART2pre-8
Tell students that scientists usually use another type of measurement to compare images formed on the retina. Instead of ratios, they often use angles ( θ ). Direct students’ attention to the vocabulary term visual angle:
Visual angle: The angle at which light from an object enters the eye. The visual angle can be measured either as light enters the eye or inside the eye when light is focused on the retina.
a. Discuss the term with students and go through the red lettering on this slide to illustrate how the angle theta (θ) is derived using a protractor.
e. Complete this section of the PreLab by helping students find patterns and draw conclusions about visual angles, the distance of objects from the eye, and how large or small objects appear. After this discussion, students should be able to draw the following conclusions:
-
-
-
- Objects closer to the eye appear larger because they take up more field of view and have a greater visual angle on the retina.
- Objects farther from the eye appear smaller because they take up less field of view and have a smaller visual angle on the retina.
-
-